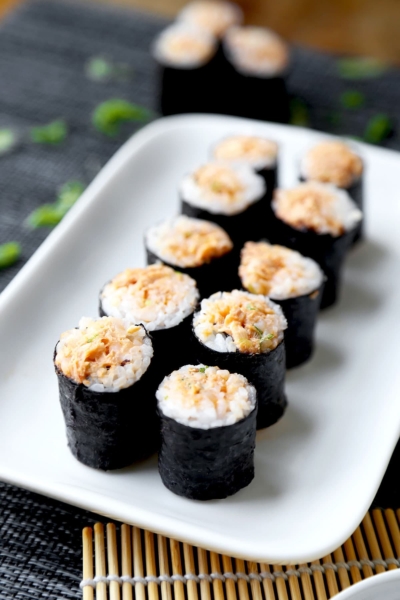
Meet my favorite Japanese convenience store snack of all time: onigiri. Fluffy, salted and lightly compressed rice filled with goodies like salmon, kombu or okaka – wrapped in delicately toasted, crackly seaweed sheets. Whether you call them onigiri, musubi – or just rice balls – there’s a lot to love about these 4 easy recipes! I make them from scratch at home at least once a week.
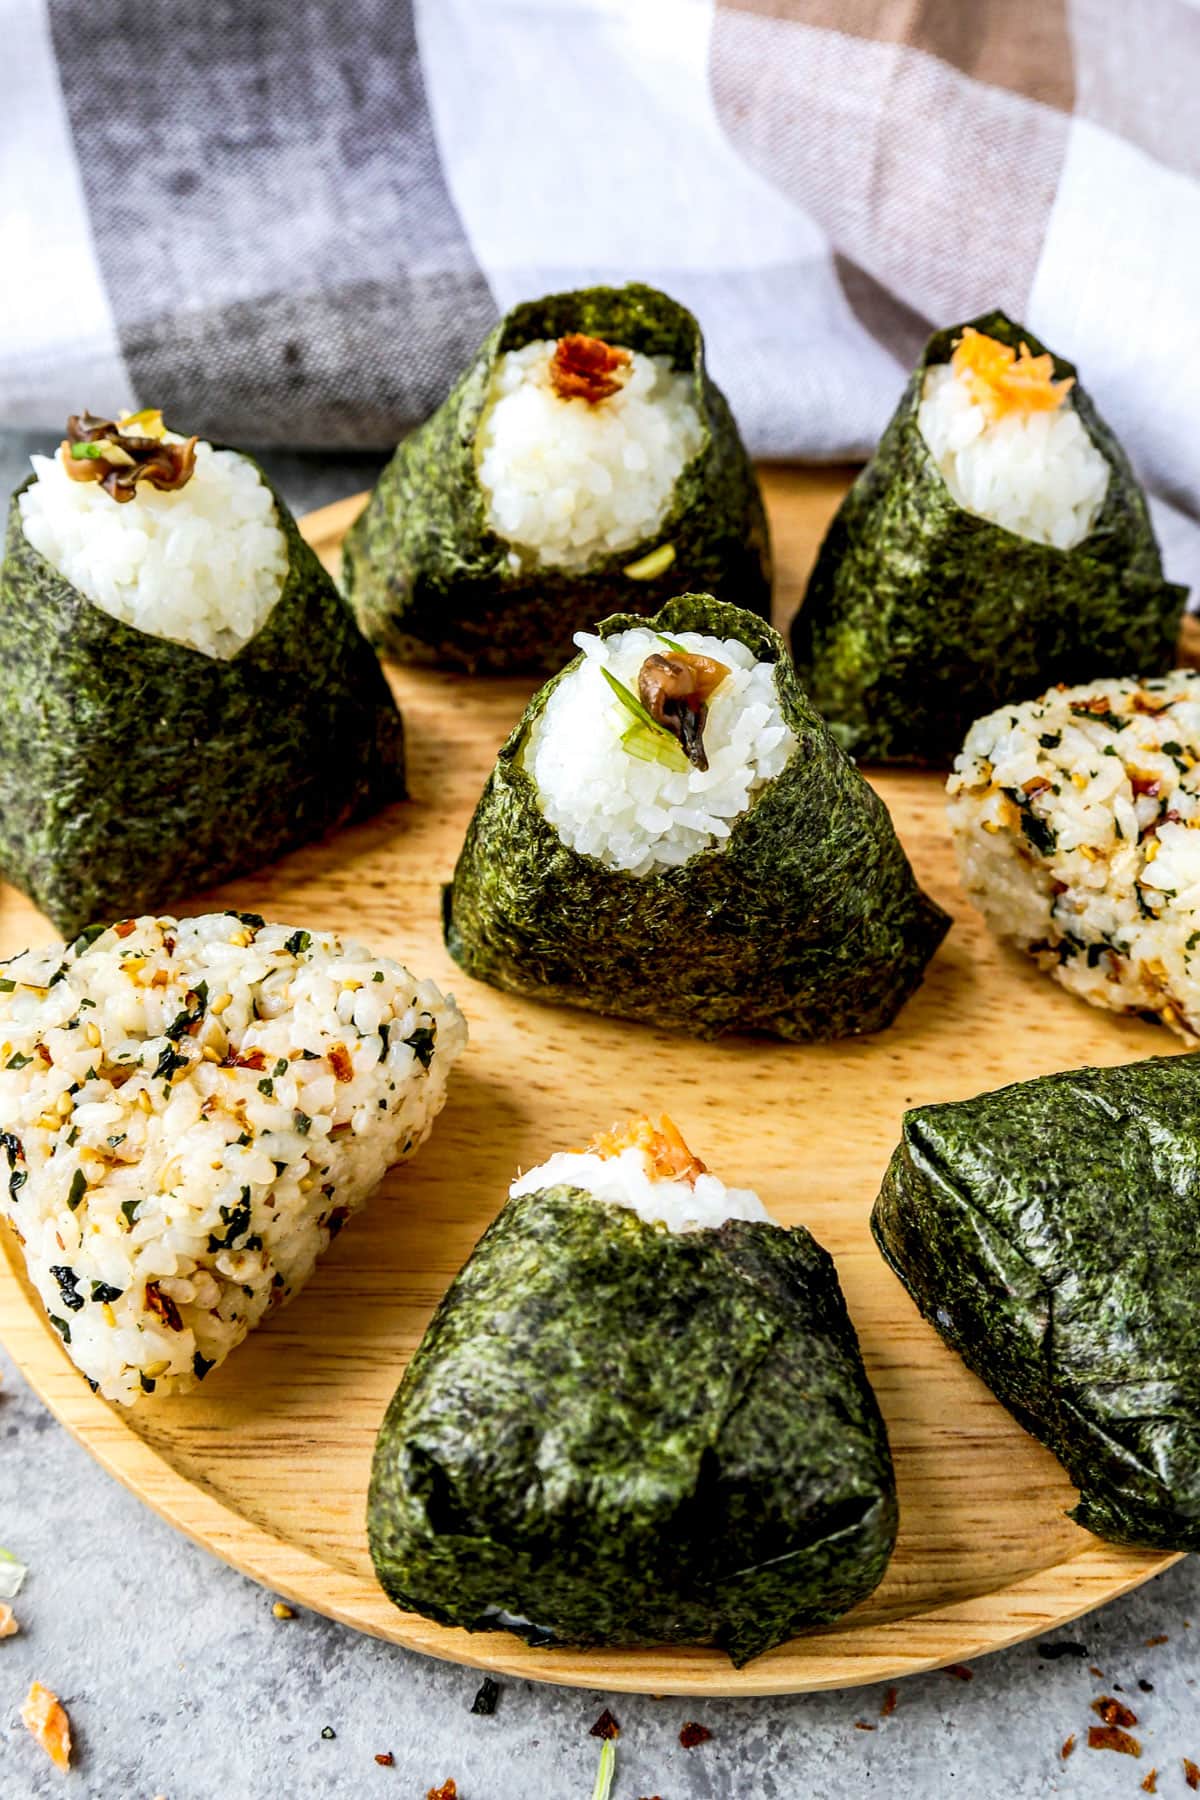
“Let’s go to 7-Eleven.” These words generally spill out of my mouth at random times whenever I’m in Japan. I’ve got a real weak spot for fluffy tamago sando (Japanese egg salad sandwiches), savory winter oden – and my all time convenience store favorite: onigiri. Onigiri (おにぎり) are those lightly salted Japanese rice balls most commonly formed into a triangular shape. My favorite fillings as a little kid were umeboshi (Japanese pickled plum) and okaka (shaved bonito flakes mixed with soy sauce). But, these days, I literally love em all.
I remember being a little intimidated the first time I set out to make rice balls at home. But, over time, I learned a couple of easy tricks to keep the train on the tracks. And I also embraced the fact that I’m not striving for uniform perfection (those perfectly shaped onigiri at the konbini are formed my a mechanical press anyway). There’s nothing wrong with rice balls that look a little, ahem… homemade. As long as the texture of the short grain rice is fluffy, and the fillings pop with flavor, that’s really all that matters to me.
Table of Contents
Ingredients
Scroll to the bottom of this page for detailed instructions, ingredients and measurements.
No matter what fillings you use, most Japanese onigiri have 3 base ingredients:
- Short Grain Japanese Rice: I hate to tell you this – but there are no substitutes. When cooked, the short, stubby Japanese rice grains stick together slightly, while retaining a fluffy yet toothsome chew.
- Salt: I use a bit of kosher salt to simply season my rice balls. (This is different than the seasoning mixture used in sushi rice though).
- Nori: This is an edible seaweed, dried and pressed into thin sheets. I wrap most onigiri in sheets of nori just prior to serving.
Fillings
This is my favorite part! Some of the more common Japanese-centric onigiri you’ll see at the store are tuna-mayo, ikura (salmon roe), kombu (simmered seaweed) and, Ben’s favorite: mentaiko (spicy salted pollock roe). Obviously, I have a SERIOUS soft spot for umeboshi onigiri (sour pickled plums).
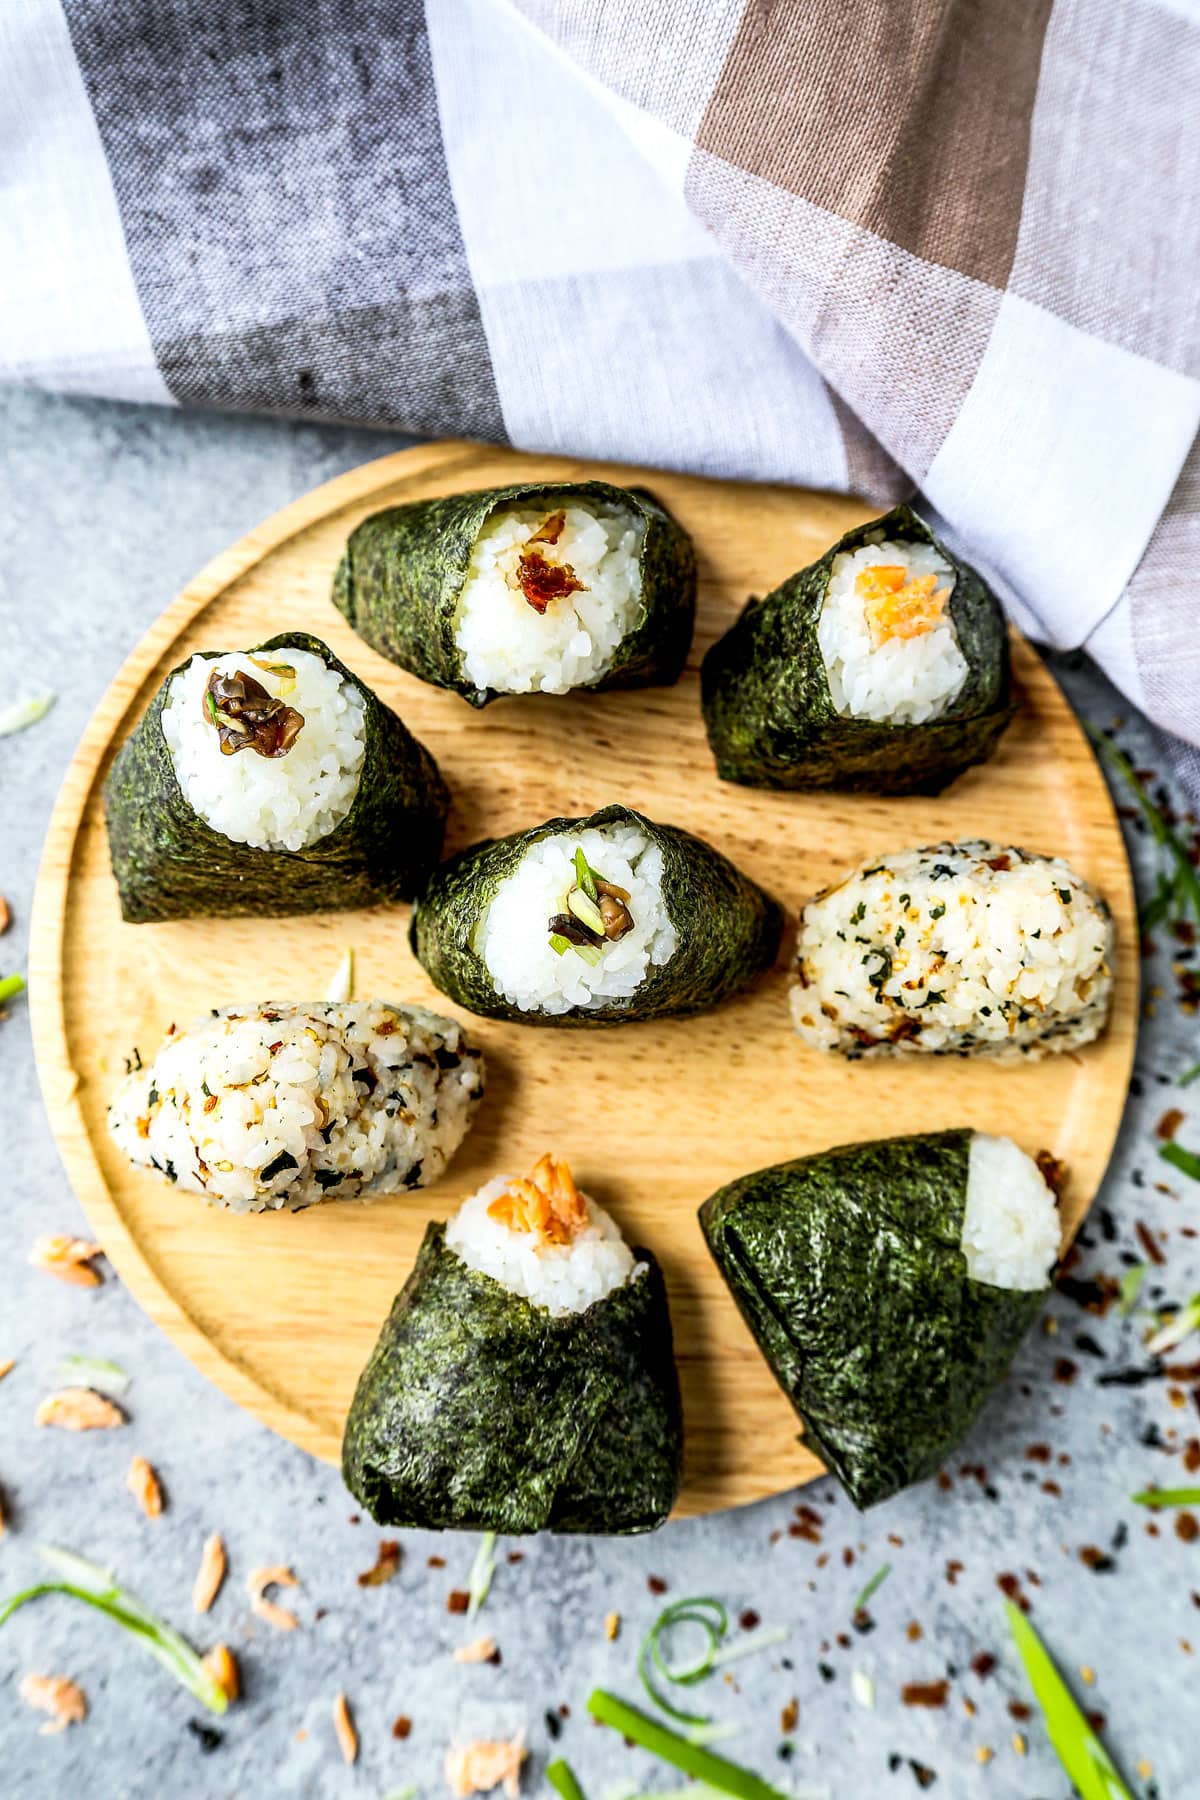
But today, I’m going to introduce four different onigiri preparations – with fillings that still tend toward the more traditional Japanese flavor profile:
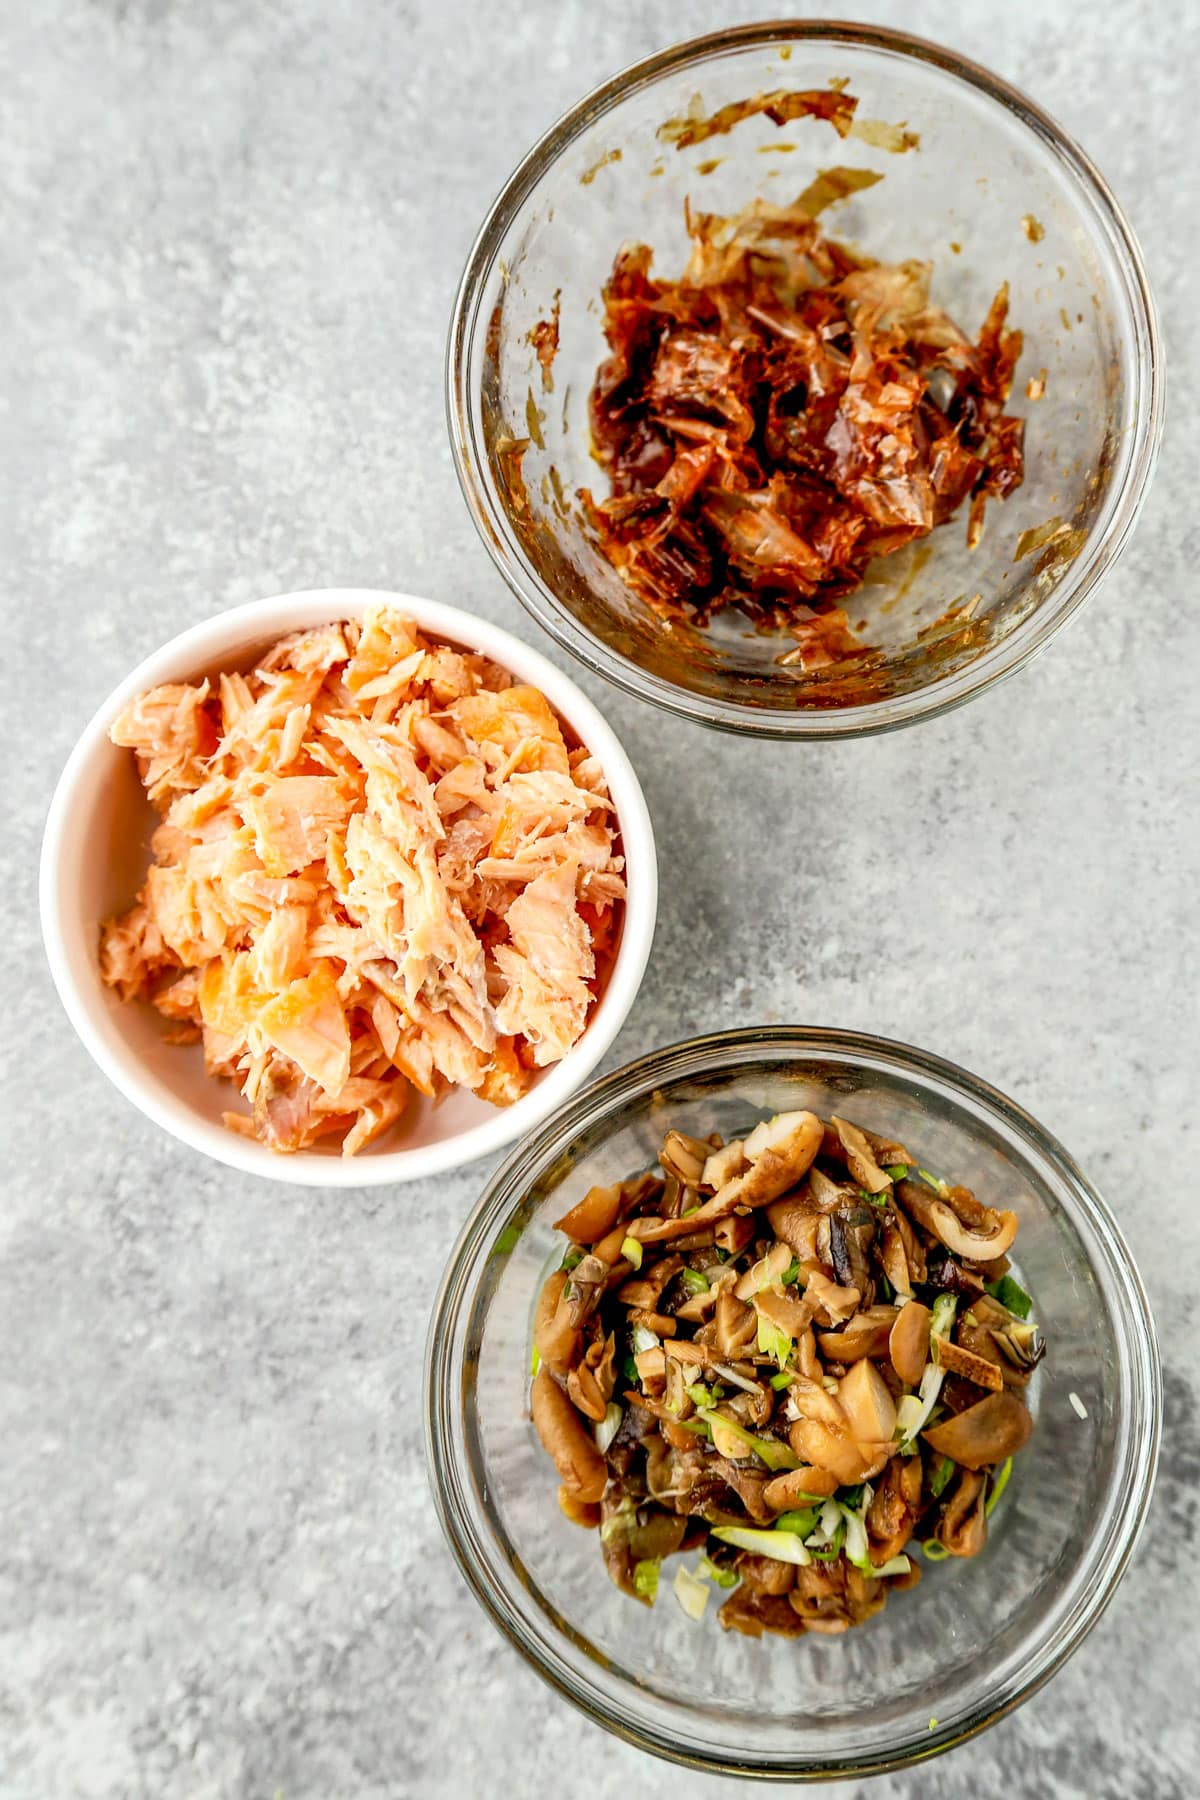
- Okaka (おかか) – A savory combination of fermented and dried skipjack tuna or bonito flakes (katsuobushi) and soy sauce. Deep and salty in flavor.
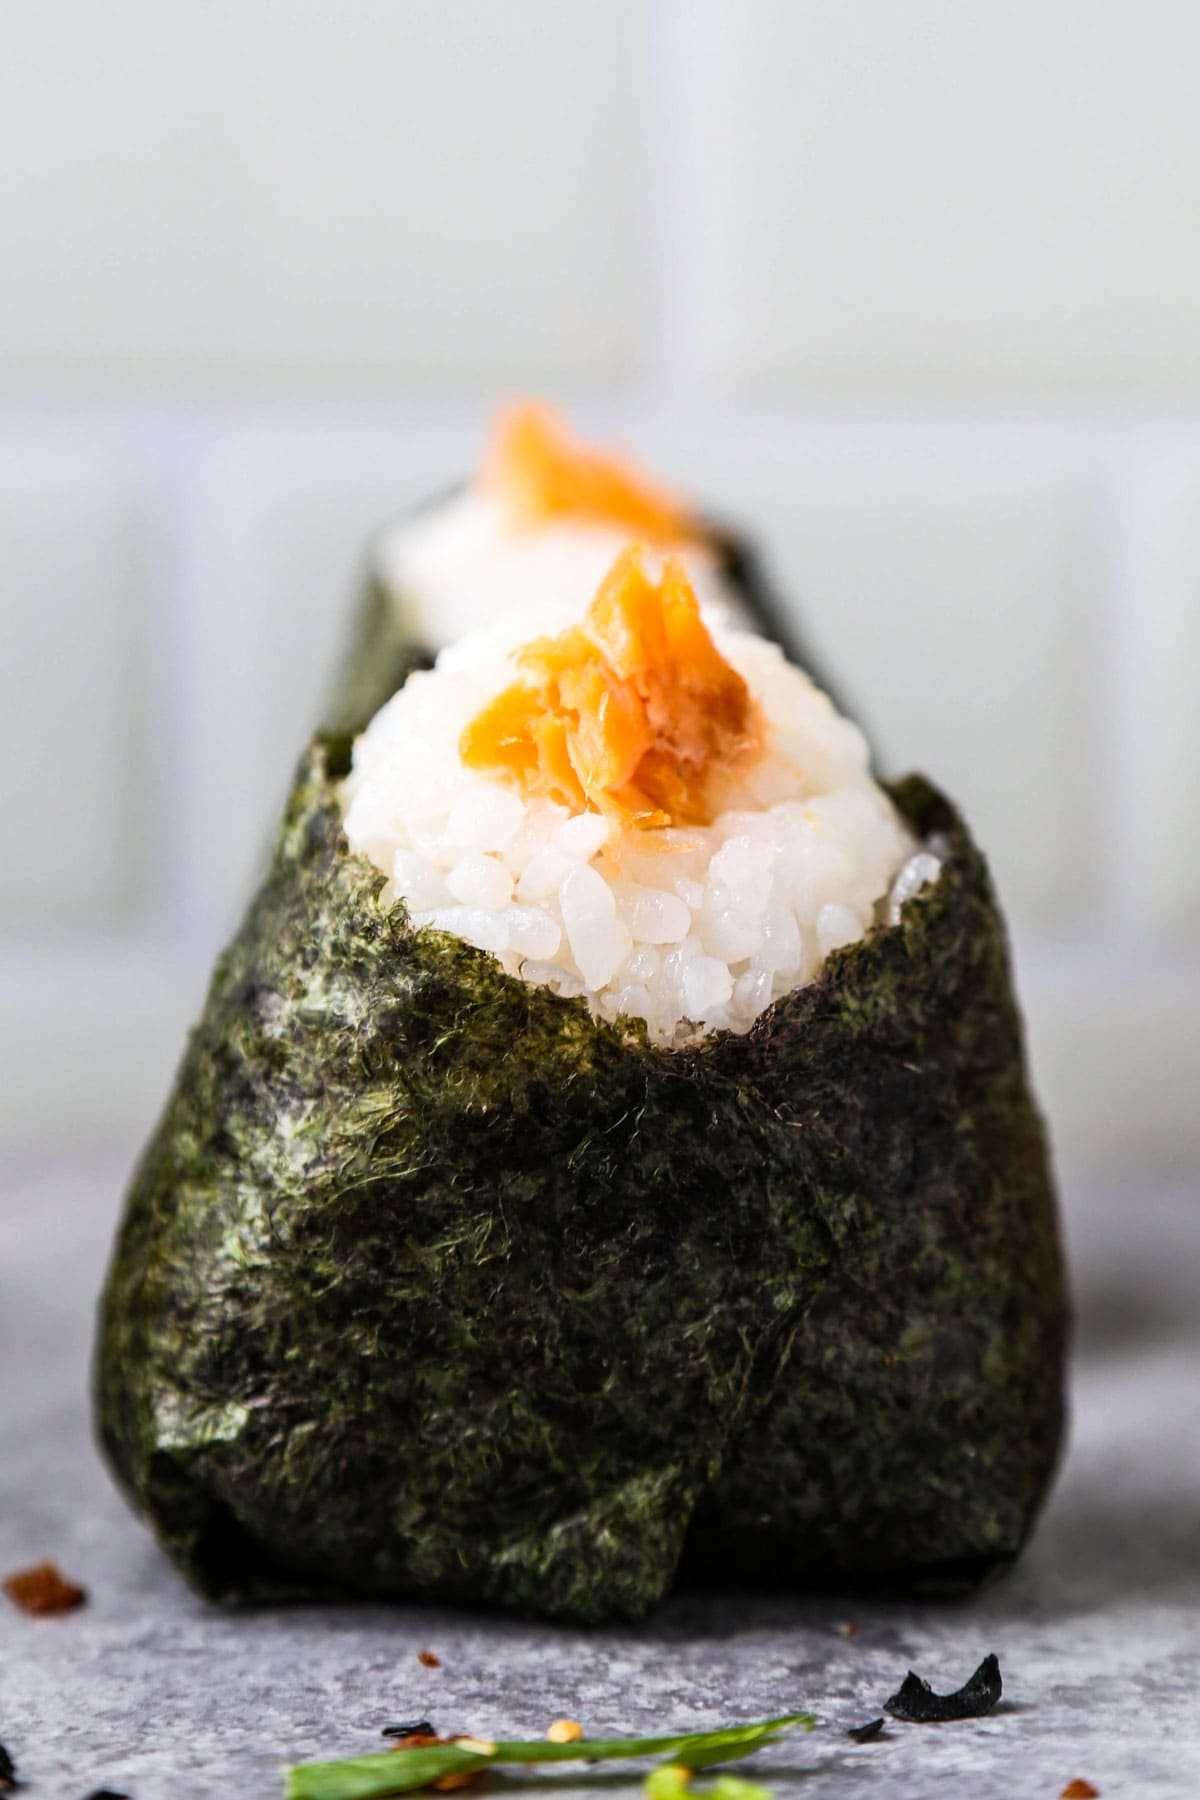
- Shiozake (塩鮭) – Salted salmon, oven-roasted and flaked. This mild yet savory Japanese salmon onigiri preparation really lets the richness of the fish shine. Once I learned how to make shiozake from scratch, I never looked back.
- Mushroom and Scallions – I finely chop straw mushrooms, then quickly pan saute them with a bit of soy sauce, mirin and sugar. Then I add minced green onions at the end. Umami, sweet and complex.
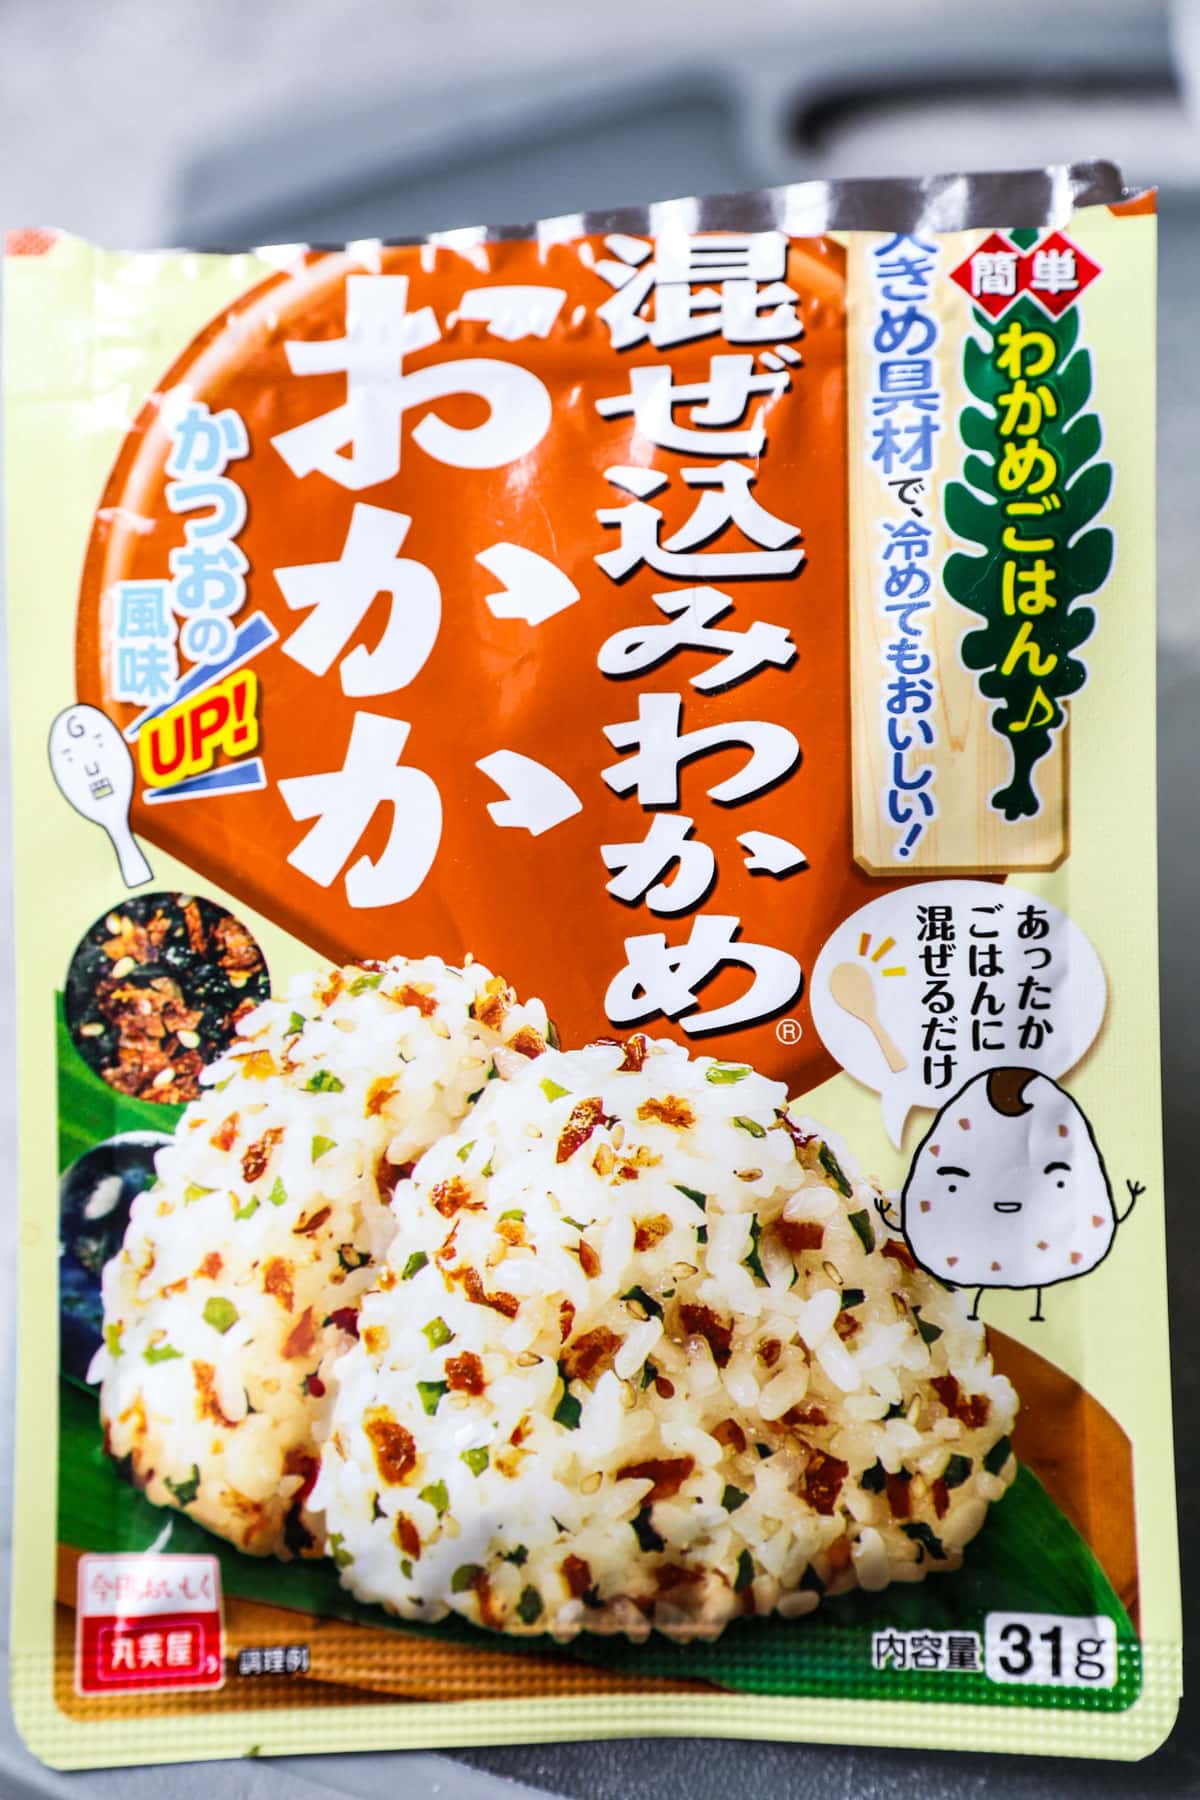
- Furikake (ふりかけ) – This is either a pre-packaged rice seasoning mix, typically comprised of dried ground fish, seaweed, sesame seeds and spices. Or you can make furikake from scratch. I mix the furikake in with the cooked rice before forming the onigiri. This is also the only rice ball I don’t cover in a sheet of nori (but you totally can if you want).
Kitchen Tools and Tricks
First, let’s get this out of the way: it can seem intimidating trying to form perfect parcels of Japanese rice for the first time. So forget about perfect. I make these all the time, and I can’t achieve perfection. But here are a couple of kitchen tools you can lean on to get the basics right.
- Onigiri Mold. This is a plastic triangular rice mold that not only shapes homemade onigiri perfectly, but also locks you into a in a uniform size.
- Plastic Wrap. A bare bones hack is to use a bit of kitchen plastic-wrap to help you mold your onigiri without them falling apart in your hands. My mom does this. It just works.
- Rice Cooker. Cooking Japanese rice on the stovetop isn’t difficult. But I love the consistency you get with a rice cooker. Extravagant? Yes. Perfect rice every single time? Also yes.
It took me a lot of practice at the beginning. But I never worry about trial and error in the kitchen. You still get to eat the failures!

How to Make Onigiri
I like to have all of my ingredients laid out in front of me first. It just makes the whole process run smoothly.
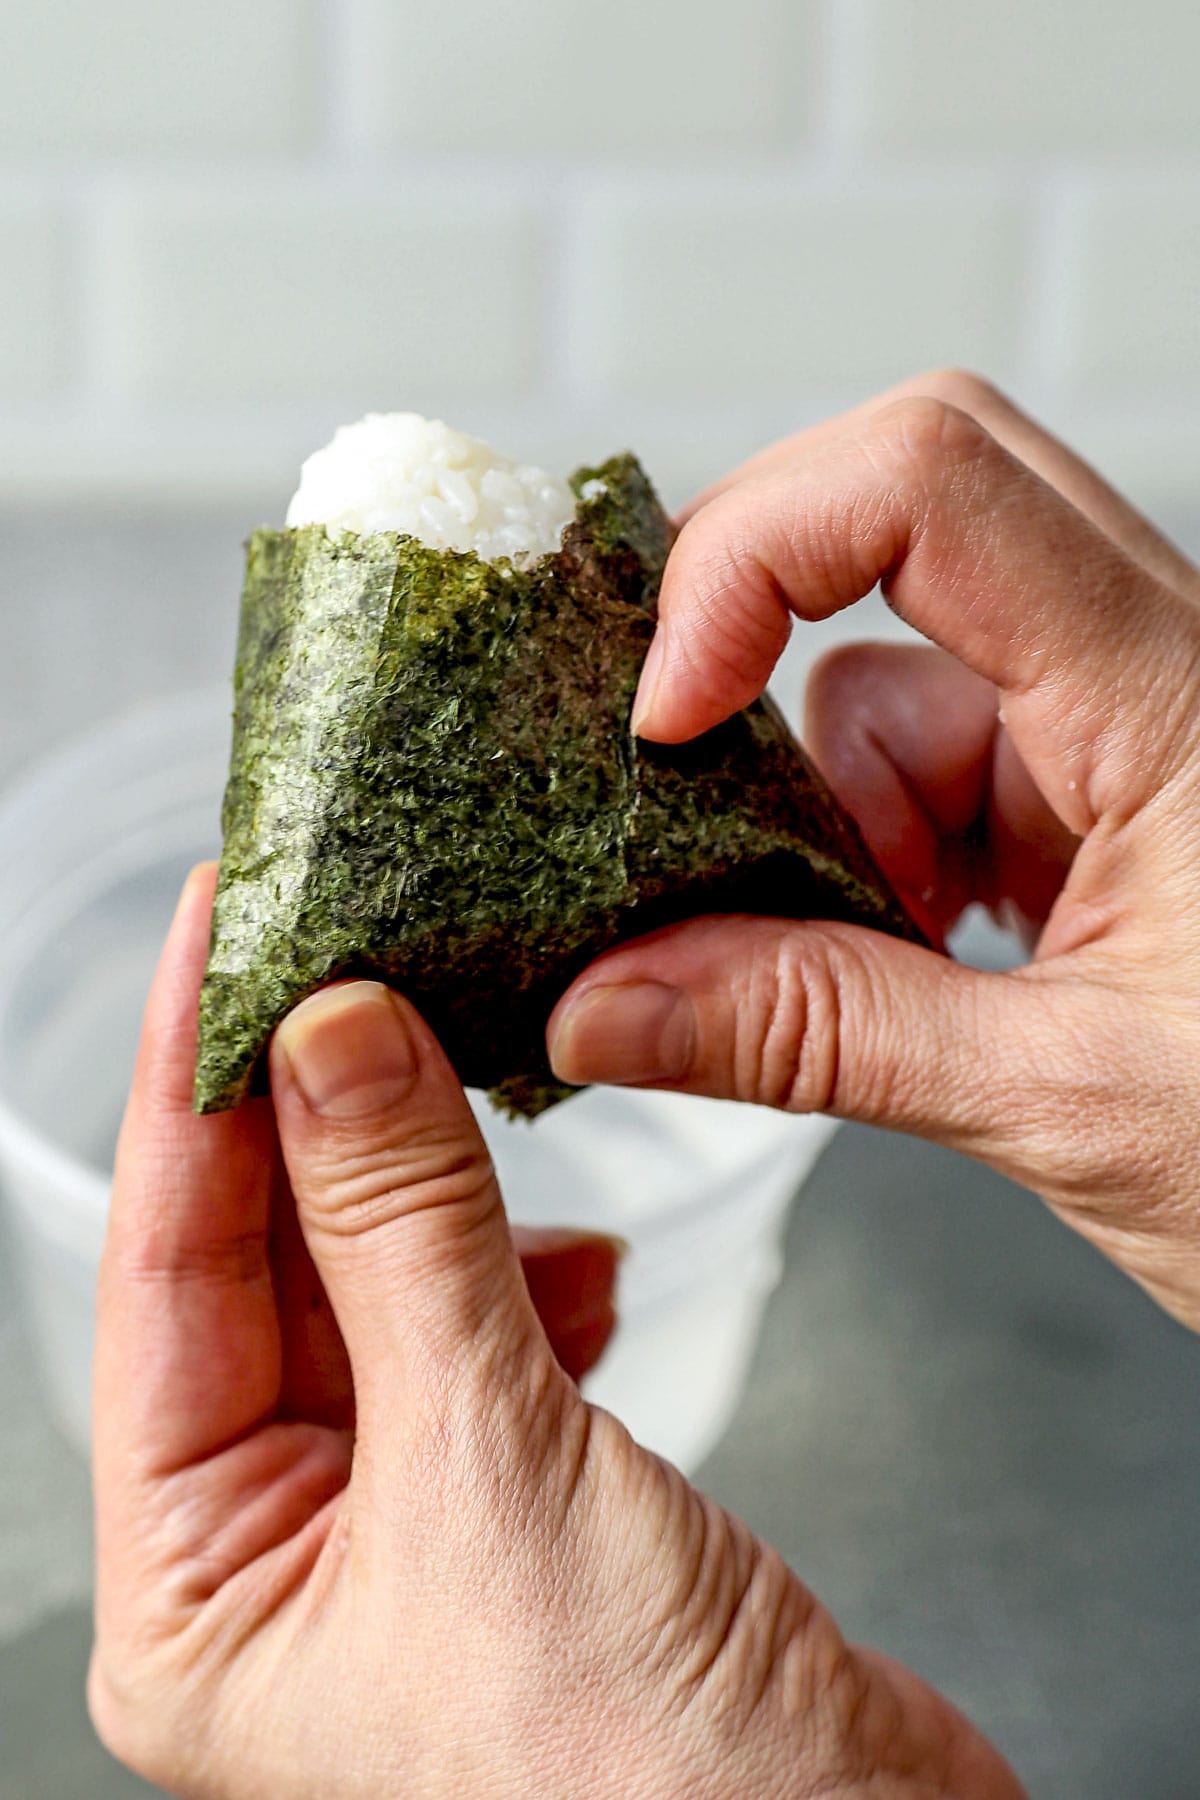
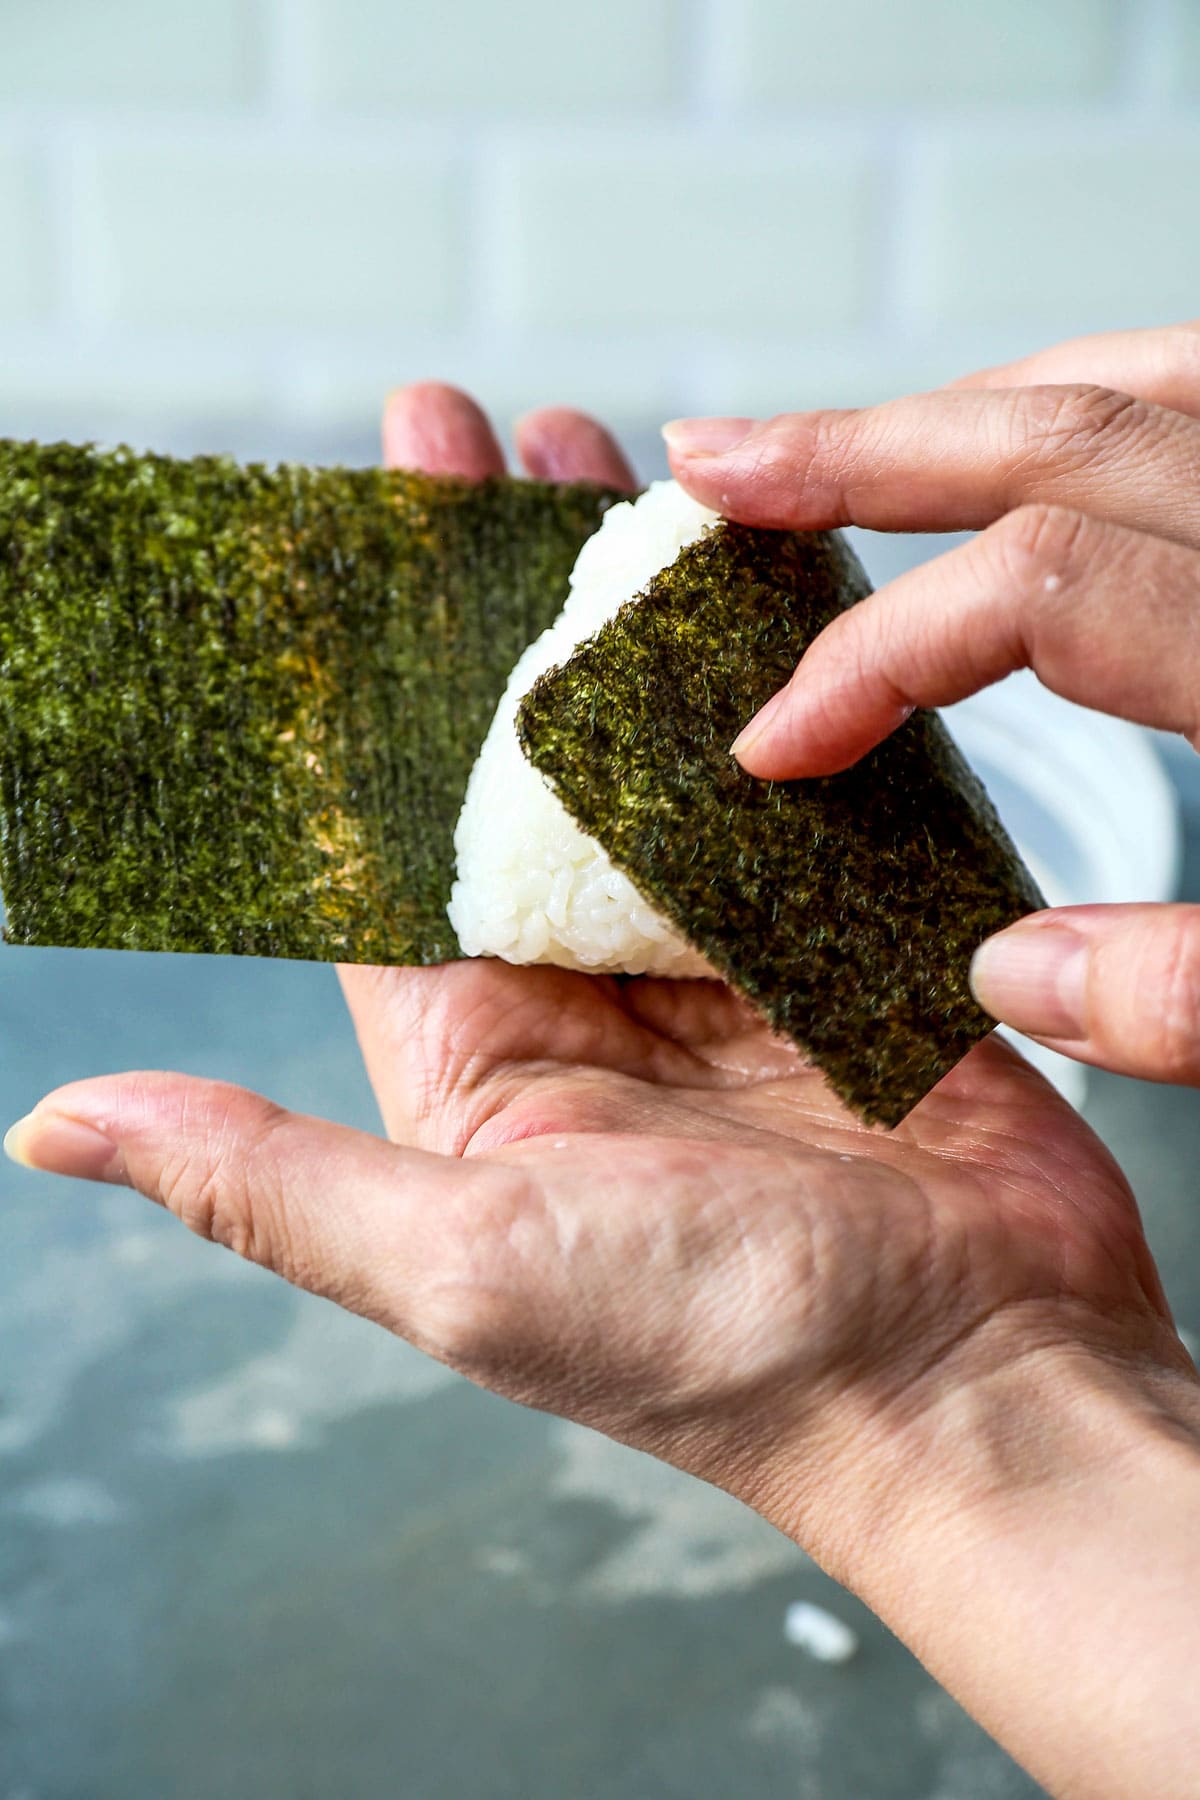
- Size the nori. Take a full sized sheet of nori (seaweed) and cut it lengthwise into thirds. Keep this in a dry spot.
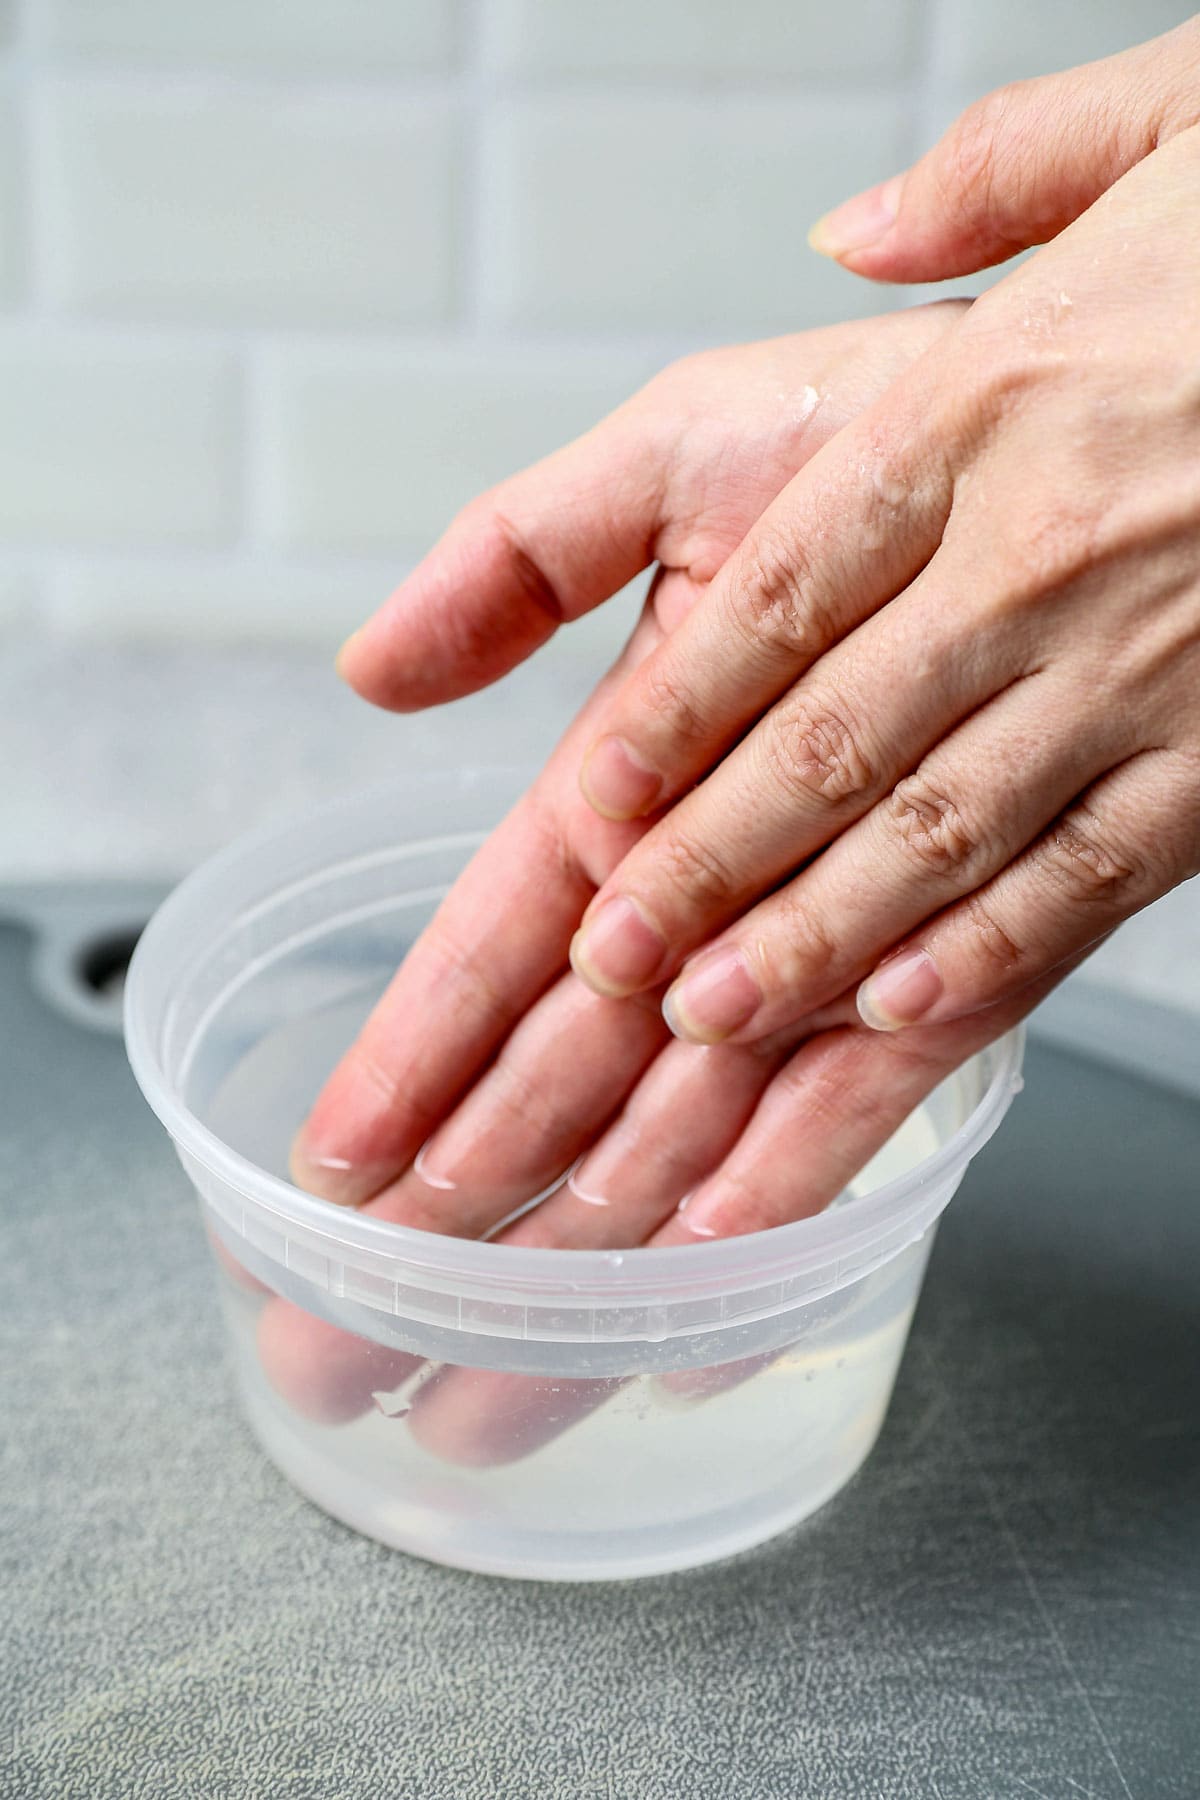
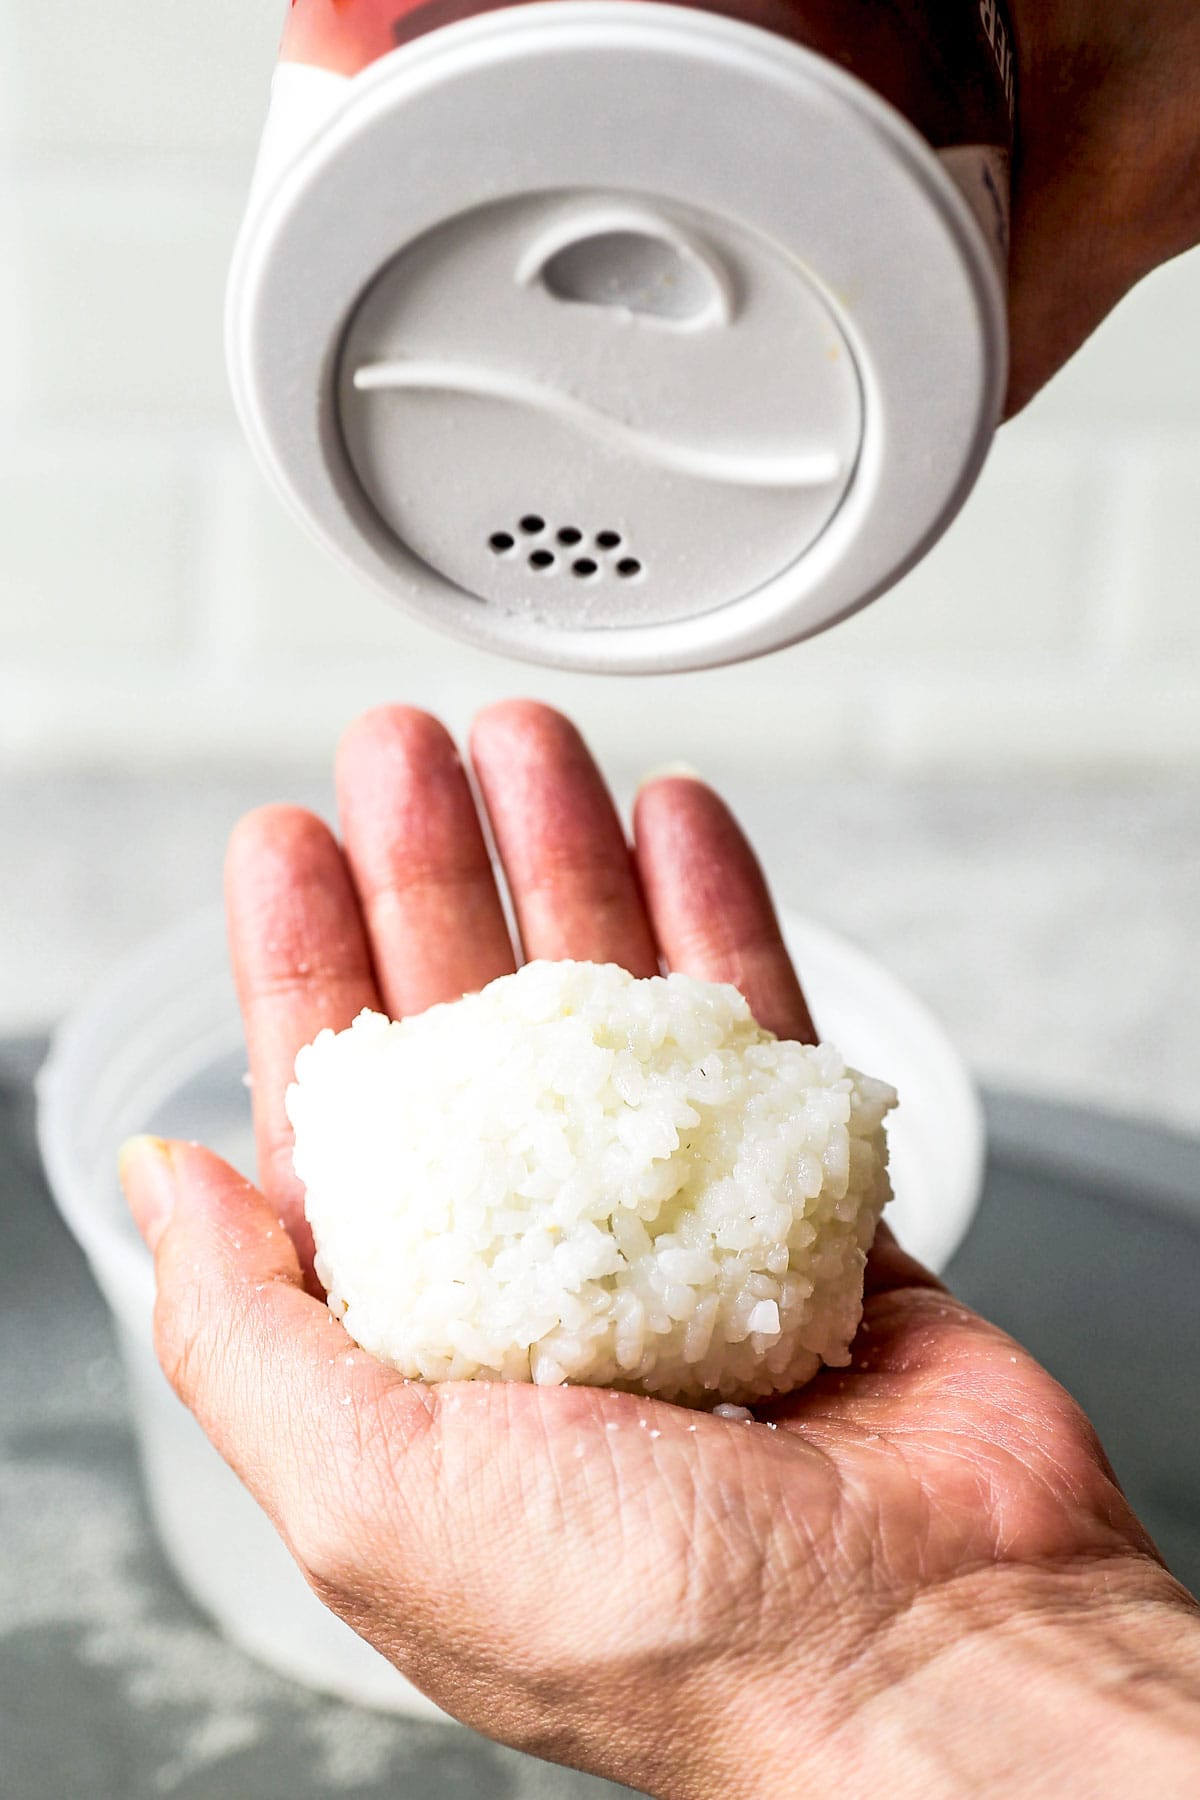
- Wet your hands in water. This important step will keep the rice from sticking to your hands – and allow you to mold your onigiri easily.
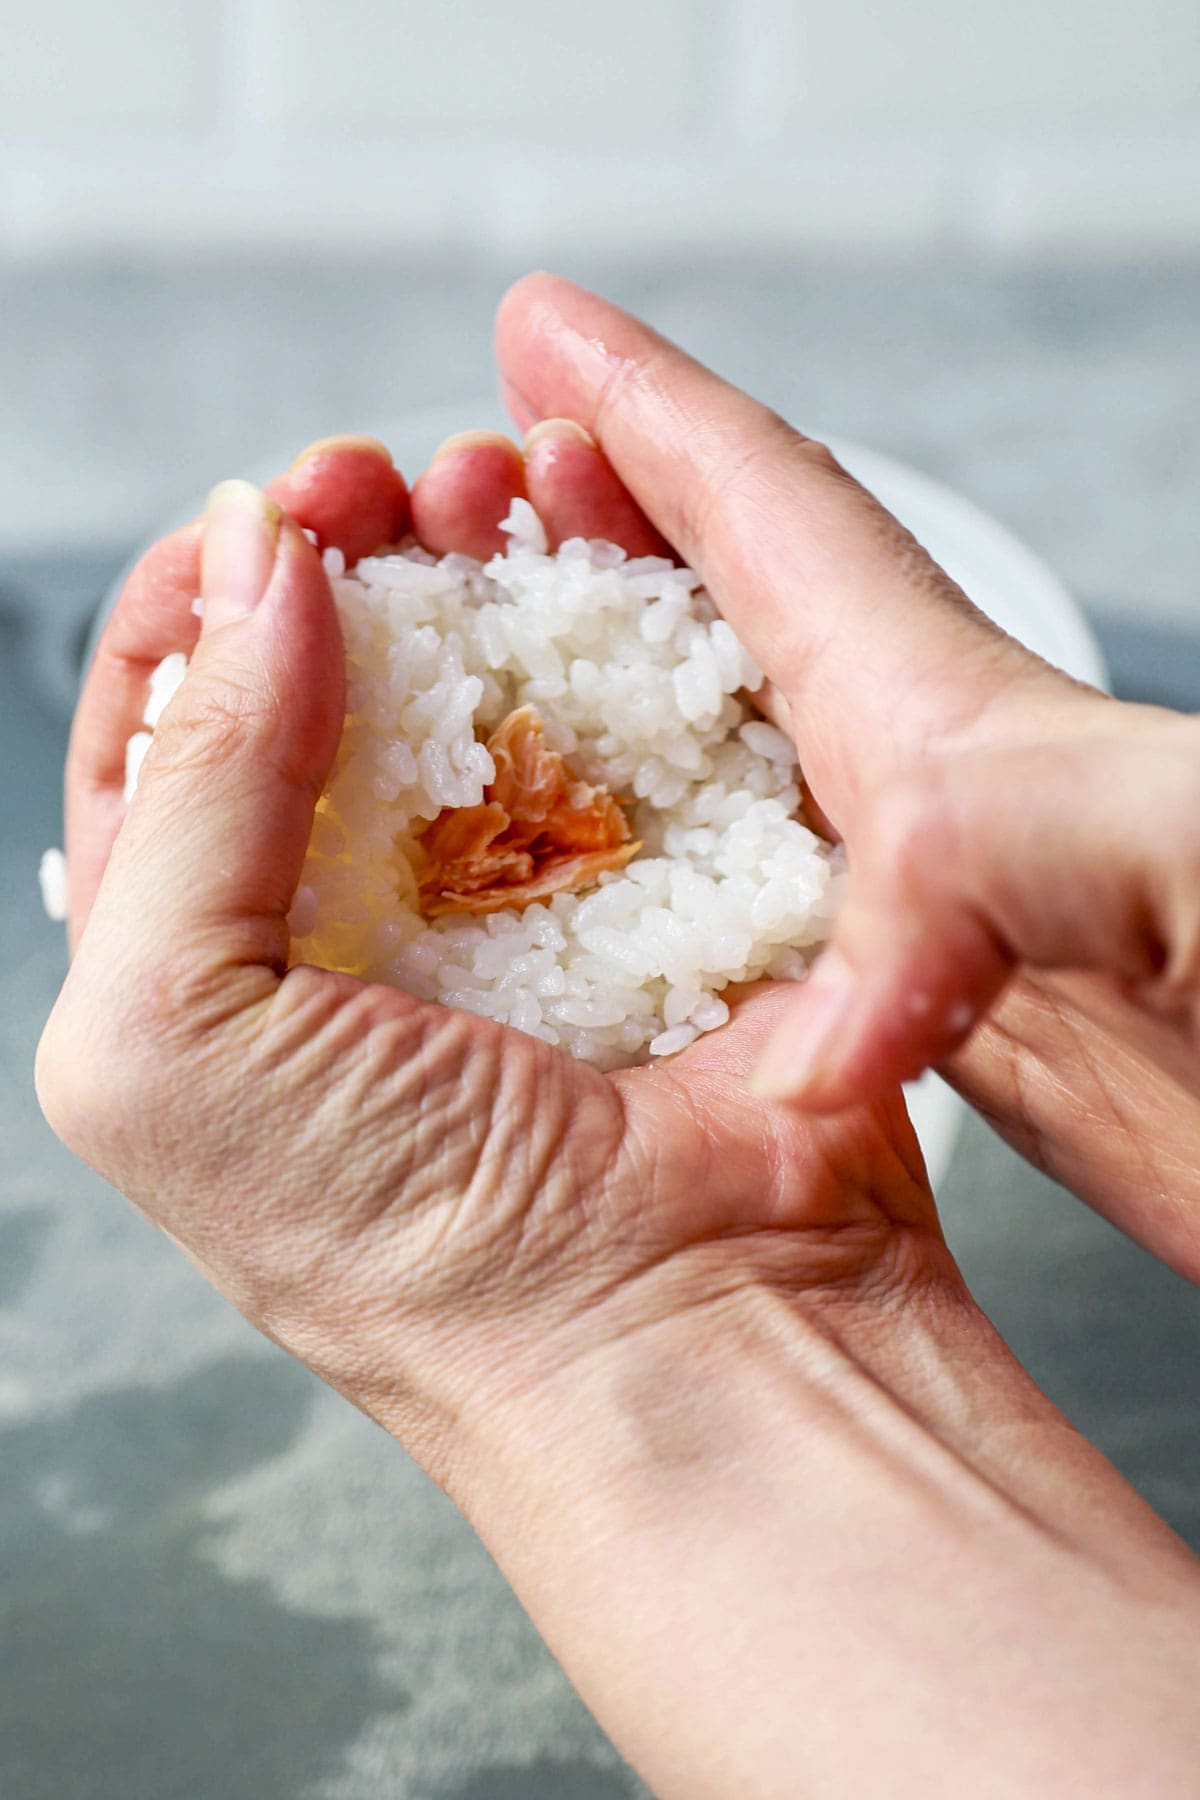
- Portion the rice and add filling. Place between ⅓ and ½ cup of cooked Japanese rice in your wet palm – and create a small indentation in the middle with your thumb. Add about ½ tablespoon of your filling to the indentation and then enclose with the rice.
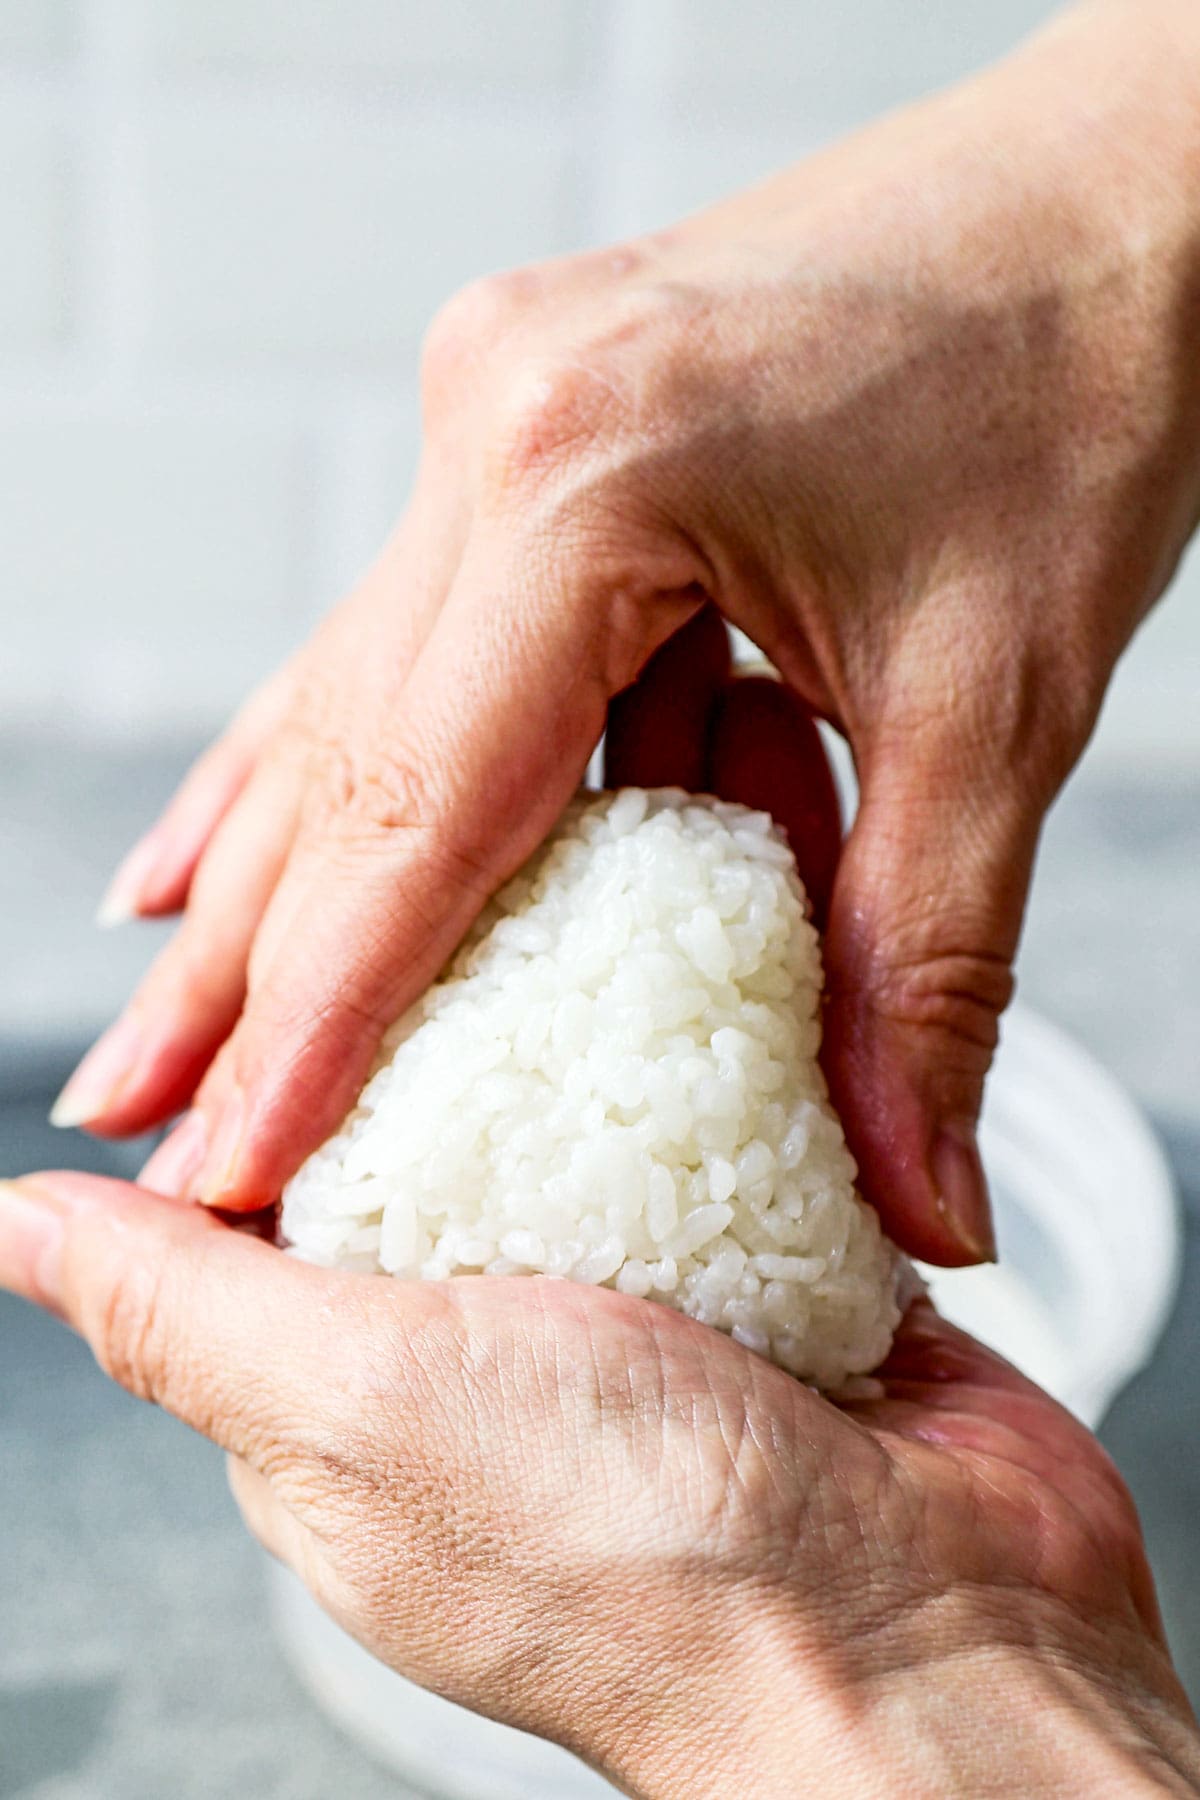
- Shape and season the onigiri. Form the rice between your two palms into a triangular shape. Sprinkle the exterior with a bit of salt.
- Wrap with nori. Finally, grab a piece of that cut nori and wrap it around your rice ball – kinda like you’d wrap yourself in a blanket.
Expert Tips
- Keep the nori dry. Japanese seaweed sheets have a delicate, crackly chew to them. But that quickly changes when those sheets come into contact with moisture. That’s why rice balls from convenience stores have a layer of plastic between the rice and seaweed sheet. I wait to wrap the rice until immediately prior to serving. And, when prepping, I always make sure to check for wet spots on the counter before setting my nori sheets down.
- Top the rice ball with a bit of the filling. If I’m making multiple onigiri with different fillings, I like to put a tiny bit of that filling on top of my completed rice ball, so I know which is which. The finished rice balls all tend to look pretty similar without that marker.
Note: when I’m making furikake onigiri, I just mix the rice seasoning into a batch of cooked rice and mold my rice balls into shape. I don’t usually add a sheet of seaweed to this preparation (but that’s totally up to you).

Variations
- Make them circular. While I’ve shaped my own onigiri in the most common triangular way, some people prefer their onigiri to be formed in a circular fashion. You can use your hands or even a ring mold to get some perfect-ish circles.
- Grill or pan fry them. This is called yaki-onigiri. Simply place your rice ball (without the nori!) in a grill pan until the rice browns and crisps on the outside – then repeat on the other side.
- Make a sandwich. Another, more modern permutation is onigirazu (おにぎらず) – which is basically an onigiri in sandwich form. The rice mimics the bread of a sandwich – and it’s common to use way more fillings inside an onigirazu than in a traditional onigiri.
Remember: Style points aside, as long as your rice balls hold together, it’s onigiri.
Storage and Reheating
Onigiri taste best fresh, served either hot – or approaching room temperature. That said, you can store leftovers in the fridge for up to 2 days, covered.
- If your leftover onigiri was already wrapped with a seaweed sheet, remove that before popping it in the fridge.
Gently reheat leftovers at short 15-20 second intervals in the microwave until the rice softens (take out before they’re piping hot) and wrap with fresh nori sheets.
What to Serve With Onigiri
When I’m making lunch at my place, I like to pair Japanese rice balls with multiple small salads and easy side dishes. Here are a few of my favorites:
- Shiraae (Japanese Mashed Tofu Salad)
- Nasu Dengaku – Miso Glazed Eggplant
- Japanese Potato Salad ポテト サラダ
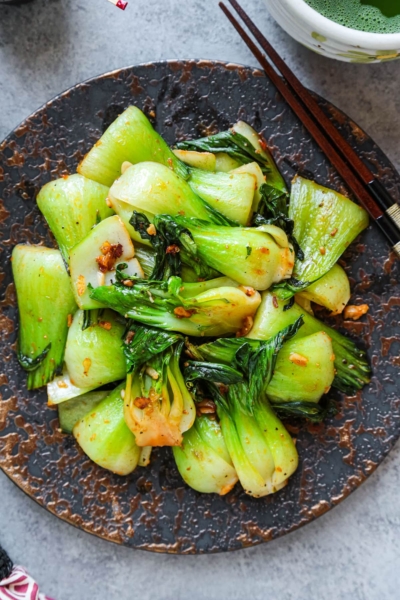
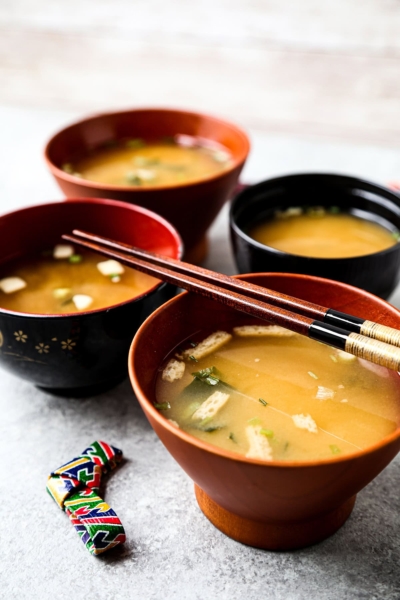
- Miso Soup
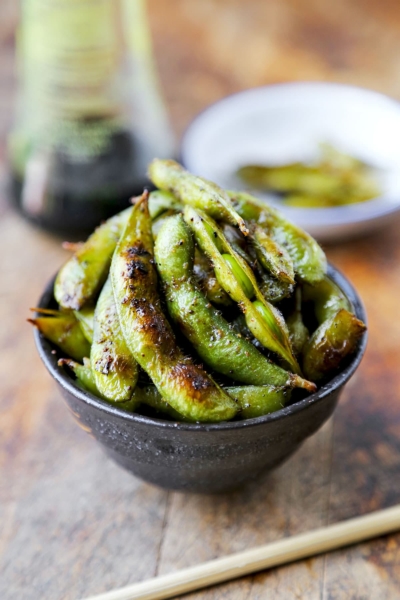
- Edamame with Soy and Sesame Sauce
Frequently Asked Questions
Not really. Short grain Japanese rice is the only type of rice used to make onigiri. It’s perfectly sticky without being gloppy – and has just the right amount of chew. The only thing I’ve experimented with (with actual success) is using a 60/40 split of Japanese short grain rice and Japanese short grain brown rice. I mix those two after cooking each one separately. It works fairly well! But if you’re thinking of making rice balls with something like Jasmine rice, it won’t work as the grains are too dry to stick together.
It’s important to wet your hands with water before handling the rice, so it’s easier to form the rice balls without having the grains sticking to your hands.
To keep the nori sheets somewhat crisp, wrap each rice ball immediately prior to serving it. Nori gets soggy from the moisture of the rice fairly quickly. If the onigiri is wrapped too early, the nori can become a little gummy and chewy.
There’s no actual difference. An onigiri is the same as a musubi regardless of what the label at the store says. It’s still a rice ball. The name preferences are more regional than anything. And there are even a ton more regional words at hyper-local levels for onigiri. But no matter where I’ve been in Japan, I’ve referred to rice balls using both terms interchangeably – from Hokkaido to Kyushu – and no one has ever looked at me like my head was on fire.
Did you like these recipes? Are there changes you made that you would like to share? Share your tips and recommendations in the comments section below!
PrintOnigiri – Japanese Rice Balls (おにぎり)

These are my favorite Japanese onigiri flavors. All 4 variations are super easy to make and bursting with authentic flavors. Make one, or try them all!
- Prep Time: 15 minutes
- Cook Time: 25 minutes
- Total Time: 40 minutes
- Yield: 6 to 8 rice balls 1x
- Category: Snack
- Method: Hand Shaped
- Cuisine: Japanese
- Diet: Low Calorie
Ingredients
Ingredients
- 3 cups cooked Japanese short grain rice
- kosher salt
- 2 to 4 sheets nori (dried seaweed sheets)
Okaka (Bonito Flakes With Soy Sauce)
- 1/2 cup dried bonito flakes
- 1 tablespoon soy sauce
Salted Salmon
- 1 small piece salmon
- kosher salt
Mushrooms and Scallions
- 1/4 cup canned straw mushrooms, diced
- 1/2 tablespoon soy sauce
- 1 tablespoon mirin
- 1/4 teaspoon granulated sugar
- 1 green onion, minced
Furikake (Japanese Rice Seasoning)
Instructions
Okaka
- Mix. In a small bowl, add dried bonito flakes and soy sauce. Stir until the bonito flakes absorb all the soy sauce. Set aside.
Salted Salmon
- Preheat oven to 400ºF.
- Season and roast the salmon. Sprinkle salt on both sides of the salmon filet and transfer to a cooking tray covered with parchment paper. Roast in the oven for 25 minutes.
- Flake the salmon. Flake the cooked salmon with chopsticks or a fork and set aside.
Mushrooms and Scallions
- Cook the mushrooms. In a small pan over medium heat, add mushrooms, soy sauce, mirin and sugar. Cook until the mushrooms have absorbed the liquid (about 1-2 minutes).
- Cool to room temp. Turn the heat off and transfer to a bowl. Let cool to room temperature and mix in scallions. Set aside.
How to Shape Onigiri
- Cut the nori sheets. Grab a sheet of nori (dried seaweed sheet) and cut it into thirds. Set aside.
- Place a small bowl of water in your prep area. Wet your hands with water before handling the rice. This is to prevent the rice grains from sticking to your hands.
- Form the rice balls. Scoop between 1/3 to 1/2 cup of rice into the palm of your wet hand. Create a small indentation in the center of the rice by pressing with your thumb.
- Add the filling. Add about 1/2 tablespoon of filling to the center indentation and press gently.
- Shape into triangles. Shape the rice between your palms into round or triangular shapes by gently pressing. Don’t press too hard (but hard enough that the rice can hold a shape).
- Season rice and wrap with nori. Sprinkle a little kosher salt around the exterior of the onigiri. Grab a piece of nori and wrap it around the onigiri, like you’d wrap yourself in a blanket.
- Repeat. Set the finished onigiri on a plate and repeat the same steps until all the rice is used. Serve hot or at room temp.
** Note: If making multiple flavors, top each rice ball with a little filling. Use as a visual indicator for the filling inside each onigiri.
Furikake Onigiri
- Mix furikake with rice. Sprinkle desired amount of furikake seasoning on the cooked rice and mix well. Shape rice into triangles or balls and serve.
Notes
Onigiri taste best fresh. Serve either hot – or approaching room temperature. That said, you can store leftovers in the fridge for up to 2 days. Gently reheat leftovers at intervals in the microwave until the rice softens (take out before they’re piping hot) and wrap with fresh nori sheets.
Nutrition
- Serving Size: 1 rice ball
- Calories: 94
- Sugar: 0.1g
- Sodium: 103.4mg
- Fat: 0.2g
- Saturated Fat: 0g
- Unsaturated Fat: 0g
- Trans Fat: 0g
- Carbohydrates: 20.2g
- Fiber: 0g
- Protein: 2.3g
- Cholesterol: 1.1mg


If you were to pack a couple onigiri for a lunch later in the day, what is the best way to wrap them so they don’t stick together or fall apart in transit?
Hi JJ! The best way is by wrapping the rice balls separately in plastic wrap (you can wrap them pretty tightly), without the nori sheet. Then when you are ready to eat, unwrap the rice ball and you can then wrap it in nori if needed 🙂
Hello there, glad that I found your recipes. I have a question and hoping you might be able to help. When I was a child, we lived in Okinawa, this was in the mid 80s. I am white, but was able to go off-base to a Japanese childcare facility. The people were so heat to me and over my time I was able to learn to speak, read and write Japanese. When I was old enough for school, the owner would take me back to base and drop me off. She often gave me an onigiri to snack on. Most of the time it was just salted rice, sometimes it had nori covering it, but every once in a while it had this filling that was amazing. Being just a young boy, I can’t for the life of me remember what it was. I do remember that it was my favorite food to eat and that it was a burnt orange paste in color. It had a salty umami flavor but have never been able to find it again. I do not know if it was an original recipe or a common item they had. We moved back to a rural location in the Midwest America and it was years before I saw another person with Japanese heritage. It is a prayer but maybe you can help guide me to finding that lost treasure. Thanks for your time.
RJ Chancellor
Hi RJ!
The orange paste you are talking about is called mentaiko, which is pollock roe 🙂 You can get it at Japanese supermarket in the refrigerated or frozen section. It’s so delicious I’m not surprised it’s left an impression on you! 🙂
Passing this on to my American friends I loved with in Japan! My guilty onigiri pleasure? Tuna with mayonnaise. So American, so gaijin. Still my fave!
I love tuna mayo as well! I wish Seven Eleven could sell them here too, they are so good 🙂
I love love love, umeboshiiiii anything. Oishi neeee!?!?!!!!
When I lived in Okinawa, my friend Aimi Chan (she’s an adult but we would joke around) brought me a container of umeboshi and in two days, my face was swollen…. because I ate the whole container. I went to the doctor to take some pill to lower my sodium. Lmao. Such a silly move I made, but I’m committed to umeboshi for life. Thanks for the wonderful post and photos! I just made onigiri for my neighbor.
You made me laugh so hard with this story! You beat me with your love of umeboshi haha! I thought I was bad but I’ve never gone to the doctor for eating too many of them ! Thank you for sharing this story, I love it!!
I actually grew up in Hawaii and making musabis are way easier than people make it out to be!
Greetings!
I have been experimenting with these for a little while as a perfect lunch food. I work with kids so an on the go meal is what I need!
Now I just need to find some good ingredients locally and I’m good to go!
Thank you for this wrote up it makes so much sense and I feel like I’ll be able to make some super tasty food instead of being intimidated by Japanese cuisine!
Hi! I was wondering how these keep: irrespective of filling, must they be eaten fresh or can they last in the fridge? If I make some for lunch, will they last in a lunch box in a fridge or will they get dried out? Thanks!
Hi MK!
They will last in the fridge so as they don’t have any seaweed wrapped around as the texture turns soft and mushy fairly quickly and are kept in an airtight storage container to prevent the rice from drying. You can then microwave the onigiri for a few seconds and then wrap seaweed around them.
You can also freeze onigiri, my mother does it all the time! Wrap them individually in plastic wrap (without the seaweed) and put them in a Ziploc bag or storage container. Then right before eating, microwave for 20-30 seconds and they come out beautiful 🙂
Thank you o much for your recipes and tips. We love onigiri, a taste we developed from our many business trips to Japan.
We have s sweet tooth, so we decided to make a sweet version: coconut, mango onigiri. Our Japanese friends rolled their eyes, but gave it a try and also loved it.
* filling is diced fresh mango with a little coconut milk
* outside is rolled in toasted coconut
* served with sweetened coconut milk drizzled over top.
Its not traditional – but its yummy!!
Thanks
Thank you for sharing Wes! 🙂
I love you! Nothing more to say. Il make onigiri now every day and my 3 year old daughter loves it too! She said she never wants to eat bread again in the evening or any day, just only moms onigiri rice balls , yummy! Haha and that only was my first try :))
Thanks for your great blog and all your tipps. I want to read more about your japanese kitchen knowledge <3
Aww thank you so much for the beautiful comment! I have a big smile of my face thanks to you 🙂 xx
I am a retired flight attendant I flew for 39 years internationally l one of the things I miss the most is the foreign food and the grocery stores I used to buy the Poor Mans Tuna Rolls I would buy them in the Tokyo airport little grocery store and truly miss eating them and finally I found a recipe so I Thank you
Wow, Aida you must have so many interesting stories! I’d love to hear about your travels, you should start a blog 😉 I hope you enjoy my onigiri recipes, they are simple but yummy. Just like my mother makes them 🙂
YUM……brings back memories of when my parents took me, my 4 siblings and a couple of neighbours to the annual church picnic. My mother always made Onigiri, teriyaki chicken, teriyaki salmon, and of course can’t forget the veggies, fruit and watermelon.
Your recipes bring back a flood of memories…..Wow!
Yum indeed Victoria! Your mom’s onigiri sound so delicious 🙂