Making this mochi recipe at home is so easy that you won’t believe it until you make it! All you need is an immersion blender and a microwave to make these chewy Japanese rice cakes.

I’m so happy to share this recipe with you today because I’m a huge fan of mochi!
Never in my life did I imagine I would be able to make mochi using a microwave. The only other time I saw it made from scratch was in Japan and let me tell you – it was not an easy process!
It was New Year’s Day and my whole family gathered at my uncle Nori and aunt Fumiko’s place for mochitsuki ((餅つき), which is a traditional mochi making ceremony to celebrate the arrival of the new year. The men were outside pounding freshly cooked mochigome (short grain sweet rice) using a large mortar called usu (碓), and a wooden mallet called kine (杵), while the women stayed indoors, shaping the mochi into perfectly uniform balls
It was such a fun and interesting process watching one person pound the rice while the other was in charge of turning it. All the men took a turn pounding and turning the rice until it slowly turned into a chewy dough.
We made so much mochi that day that the entire living room floor, which was covered with bed sheets, was filled with rice cakes! My aunt packed a few mochis for everyone to take home that day, which my mother used to make ozoni the next.
It was an experience I’ll never forget because it brought me so close to my relatives and my Japanese roots.

What is Mochi?
Mochi is a Japanese rice cake made of Japonica glutinous rice, called mochigome (糯米), that’s been cooked and pounded into a sticky paste. Once pounded, the rice is molded into a ball, rectangle, or other shape. The texture is chewy and the flavor slightly sweet.
It can be served as a traditional Japanese confection called wagashi, stuffed with sweet red bean paste (called daifuku), with kinako (sweet soybean flour), stuffed with ice cream, added to soups, or brushed with a little soy sauce, toasted over a grill, and wrapped in seaweed (called isobemaki).
Mochi is a traditional Japanese food that’s served on New Year’s Day in ozoni and also used as a New Year decoration (kagami mochi) to represent good luck and good fortune.
In the springtime, mochi is dyed pink to represent the arrival of cherry blossoms, and is stuffed with anko (sweet red bean paste). This confection is called sakura mochi (sakura is the Japanese word for cherry blossom).
Where to Buy Mochigome
Mochigome is very easy to find.
You can find it in Japanese grocery stores and other Asian supermarkets. Just look for the words short grain sweet rice on the package.
You can also order mochigome on Amazon or other online supermarkets selling Asian food.
Where to Buy Mochi
If you don’t feel like making mochi from scratch but crave the chewiness (I’ve been there many times!), you can buy mochi in most Asian supermarkets and Japanese grocery stores.
You can also purchase different types of mochi such as rice cakes, daifuku, or mochi ice cream, on Amazon.
Ingredients for Mochi
- Mochigome rice: Mochigome rice is Japonica short grain sweet rice. Make sure you get the short grain kind as there are other types of glutinous rice such as Thai or Vietnamese sticky rice, which are longer and thinner.
- Water: It took me a while to figure out the right ratio of water to rice but it was worth the effort! 425ml is just the right amount to give the mochi a stretchy, chewy texture that’s not too dry or too loose.
- Potato starch: While Chinese cuisine often calls for cornstarch, you will find that potato starch is the preferred starch for Japanese cooking. I often swap one for the other since they are very similar so go ahead and use cornstarch if you cannot find potato starch or already have cornstarch in your pantry.
Tools Needed to Make Mochi in a Microwave
- Rice washing bowl (optional but very useful)
- Immersion blender
- Tall cup (I use the one that came with my immersion blender)
- Microwave safe container with a lid
- Baking sheet
How to Make Mochi
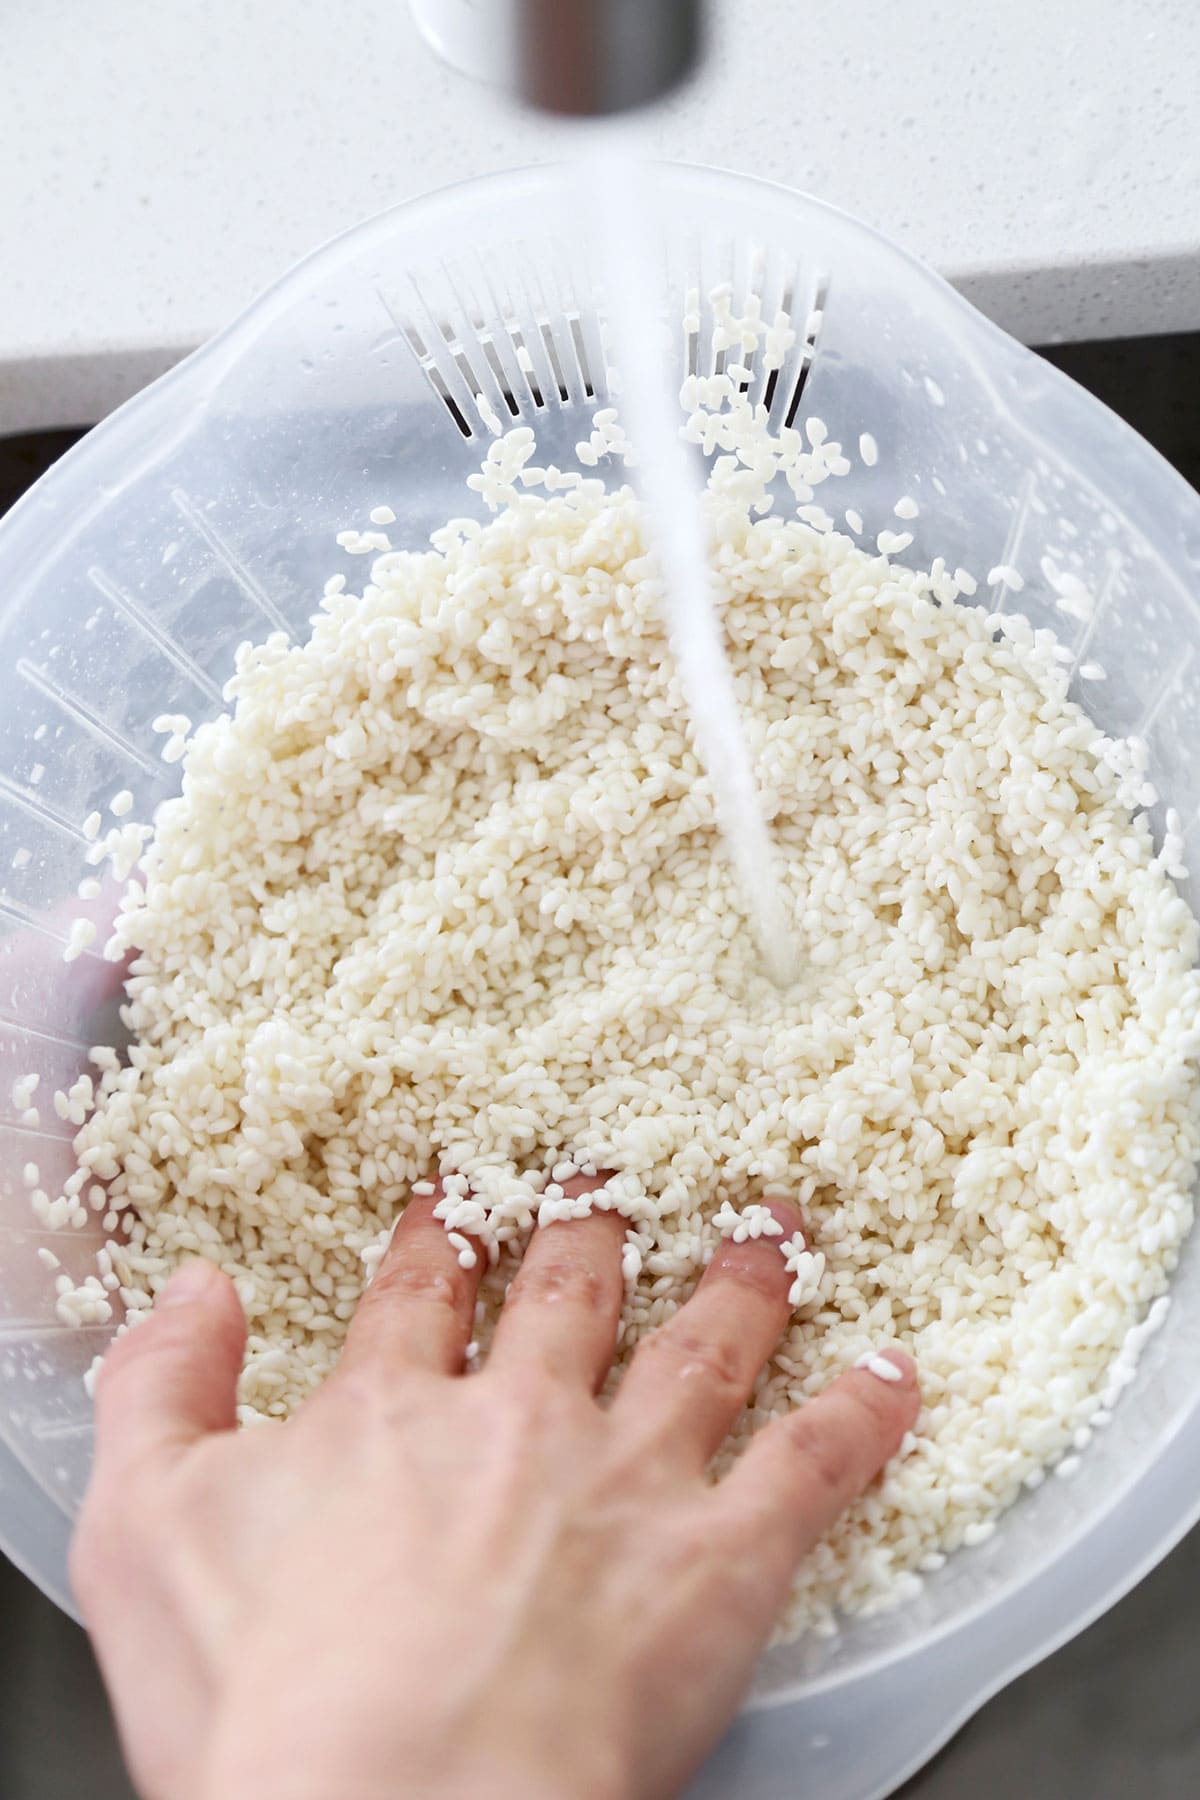
- Put the rice in a rice washing bowl and rinse under running water until the water runs clear. Drain. Alternatively, you can put the rice in a bowl and fill it halfway with rice. Rinse the rice in a swirling motion and drain most of the water. Refill the bowl again and repeat the rinsing motion. Drain and refill with water. Keep doing this until the water is clear and then drain the rice using a strainer.
- Place the rice in a bowl with the water and let sit for 90 minutes.
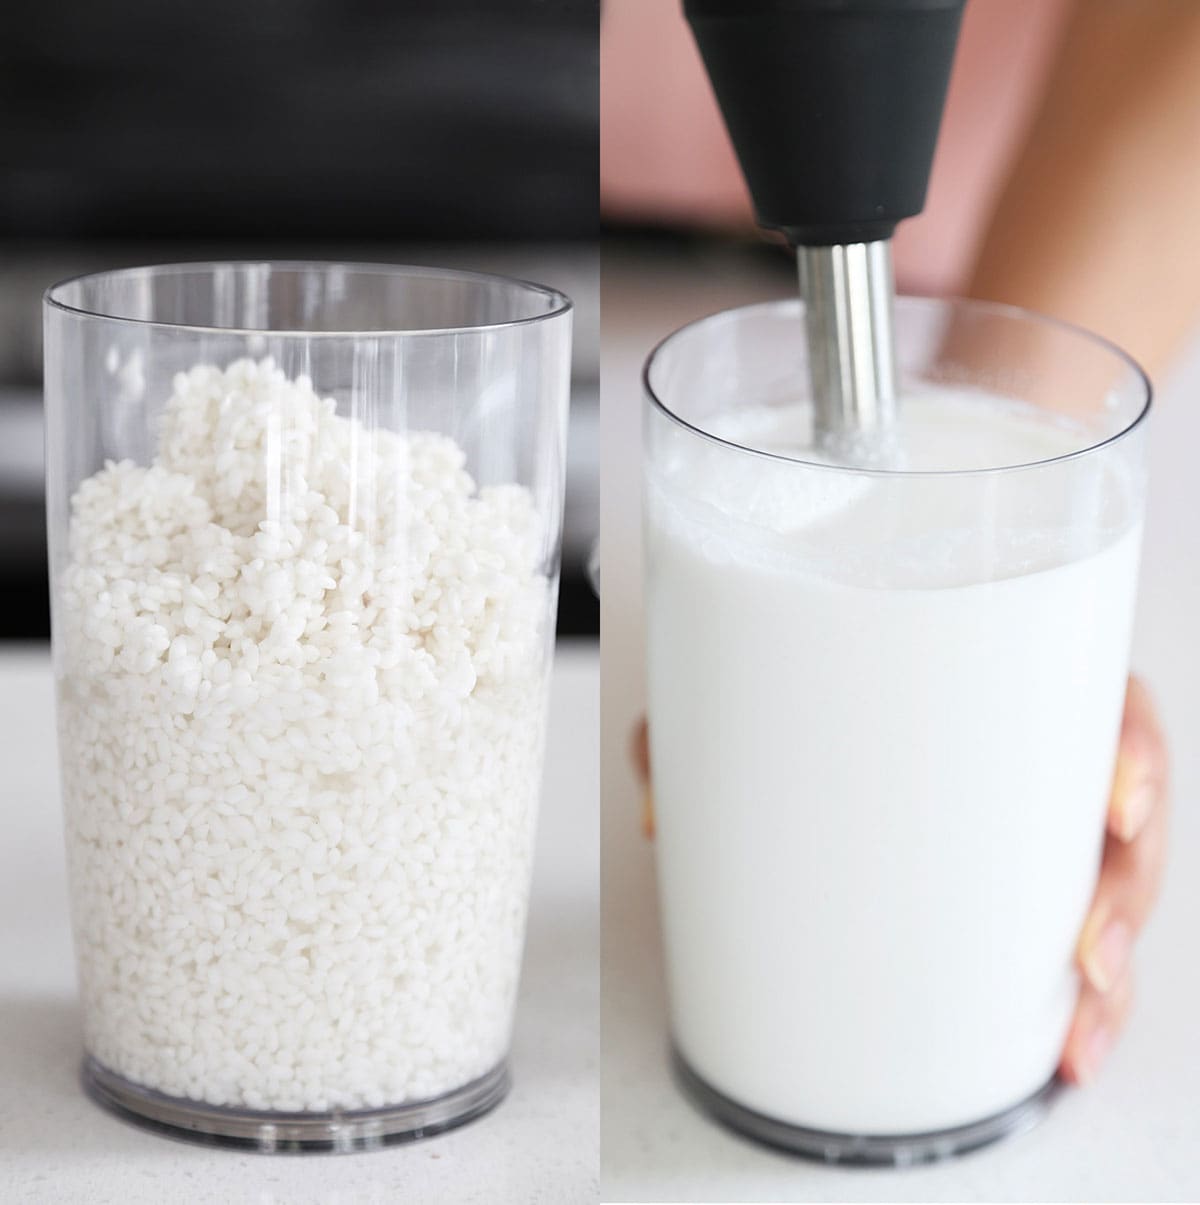
- Scoop half of the rice and water and place it in the immersion blender. Blend the rice and water for about 1 minute, until the mixture turns into liquid and looks like milk. Add the remaining rice and water and blend the same way.
- Place a plastic or rubber spatula in a cup filled with room temperature water.
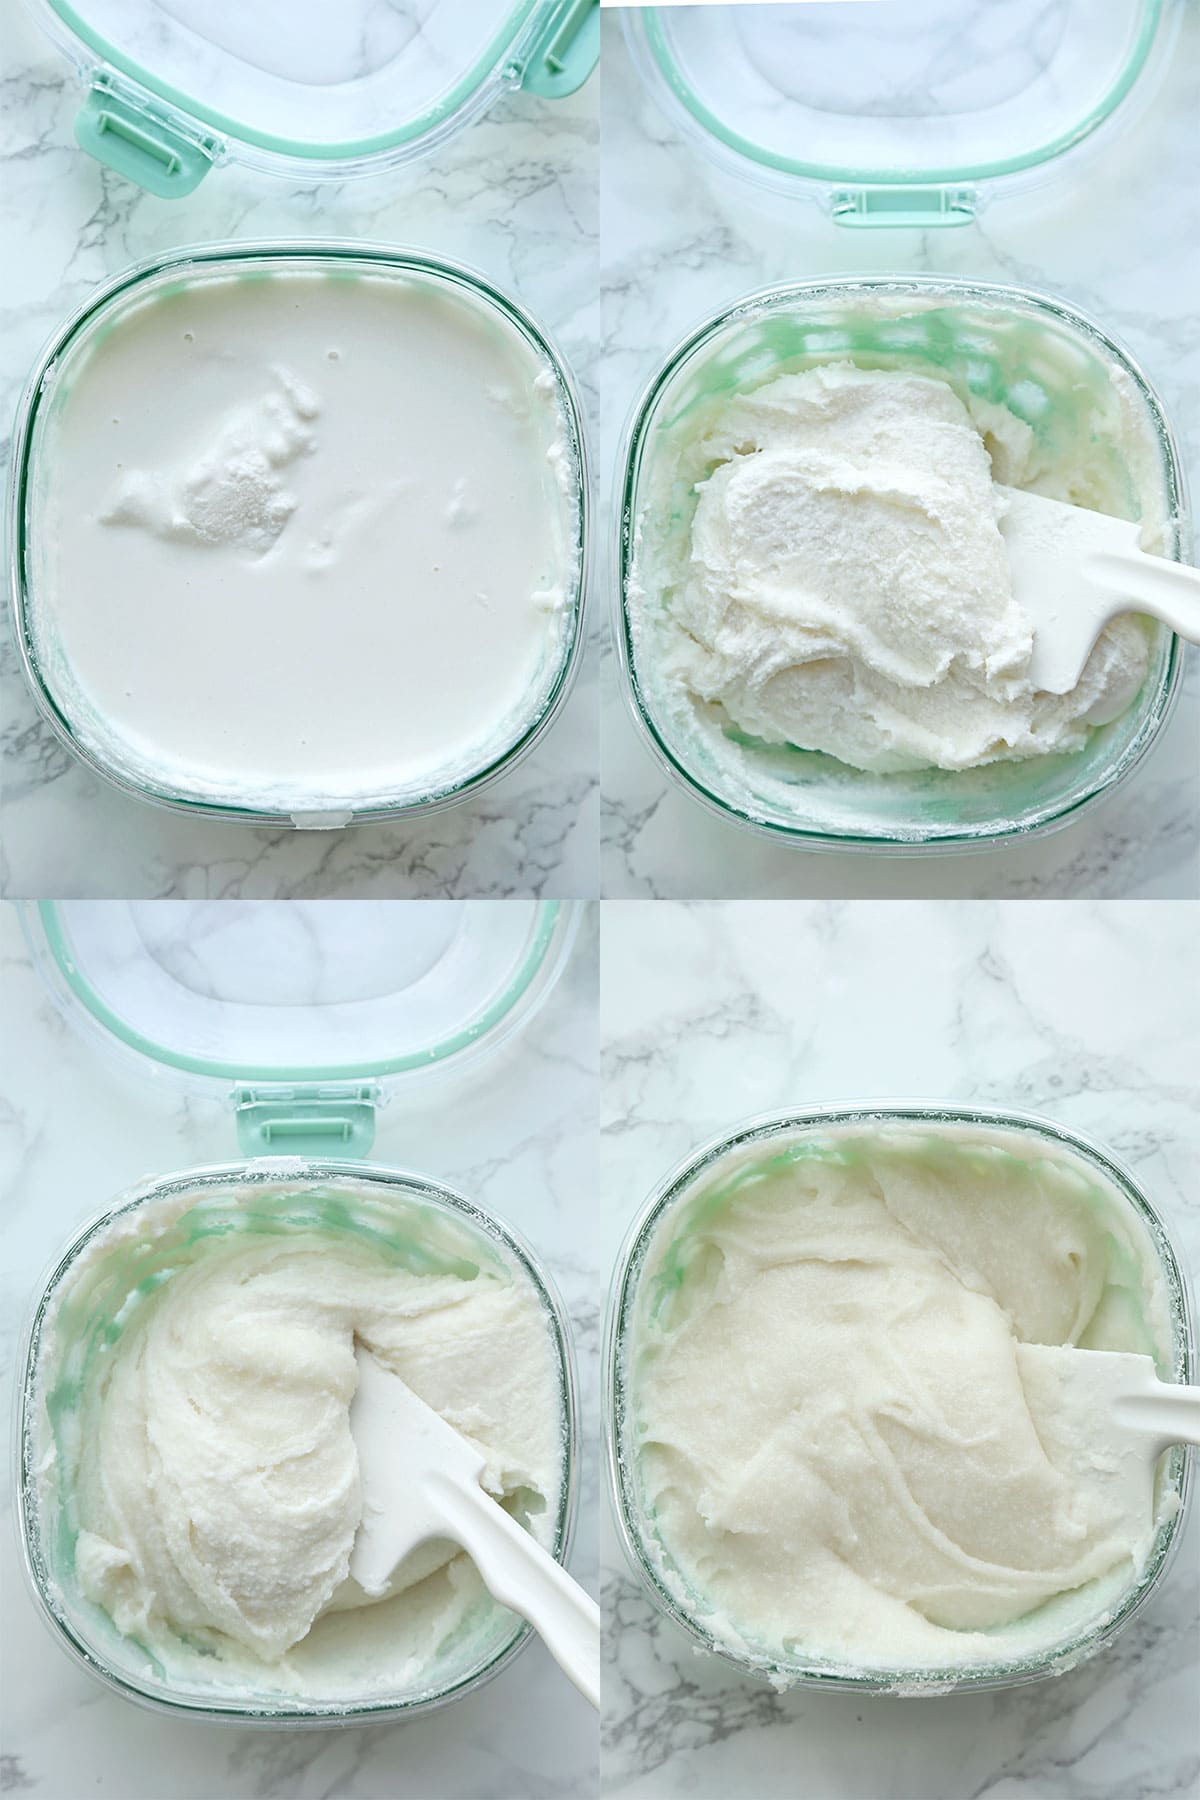
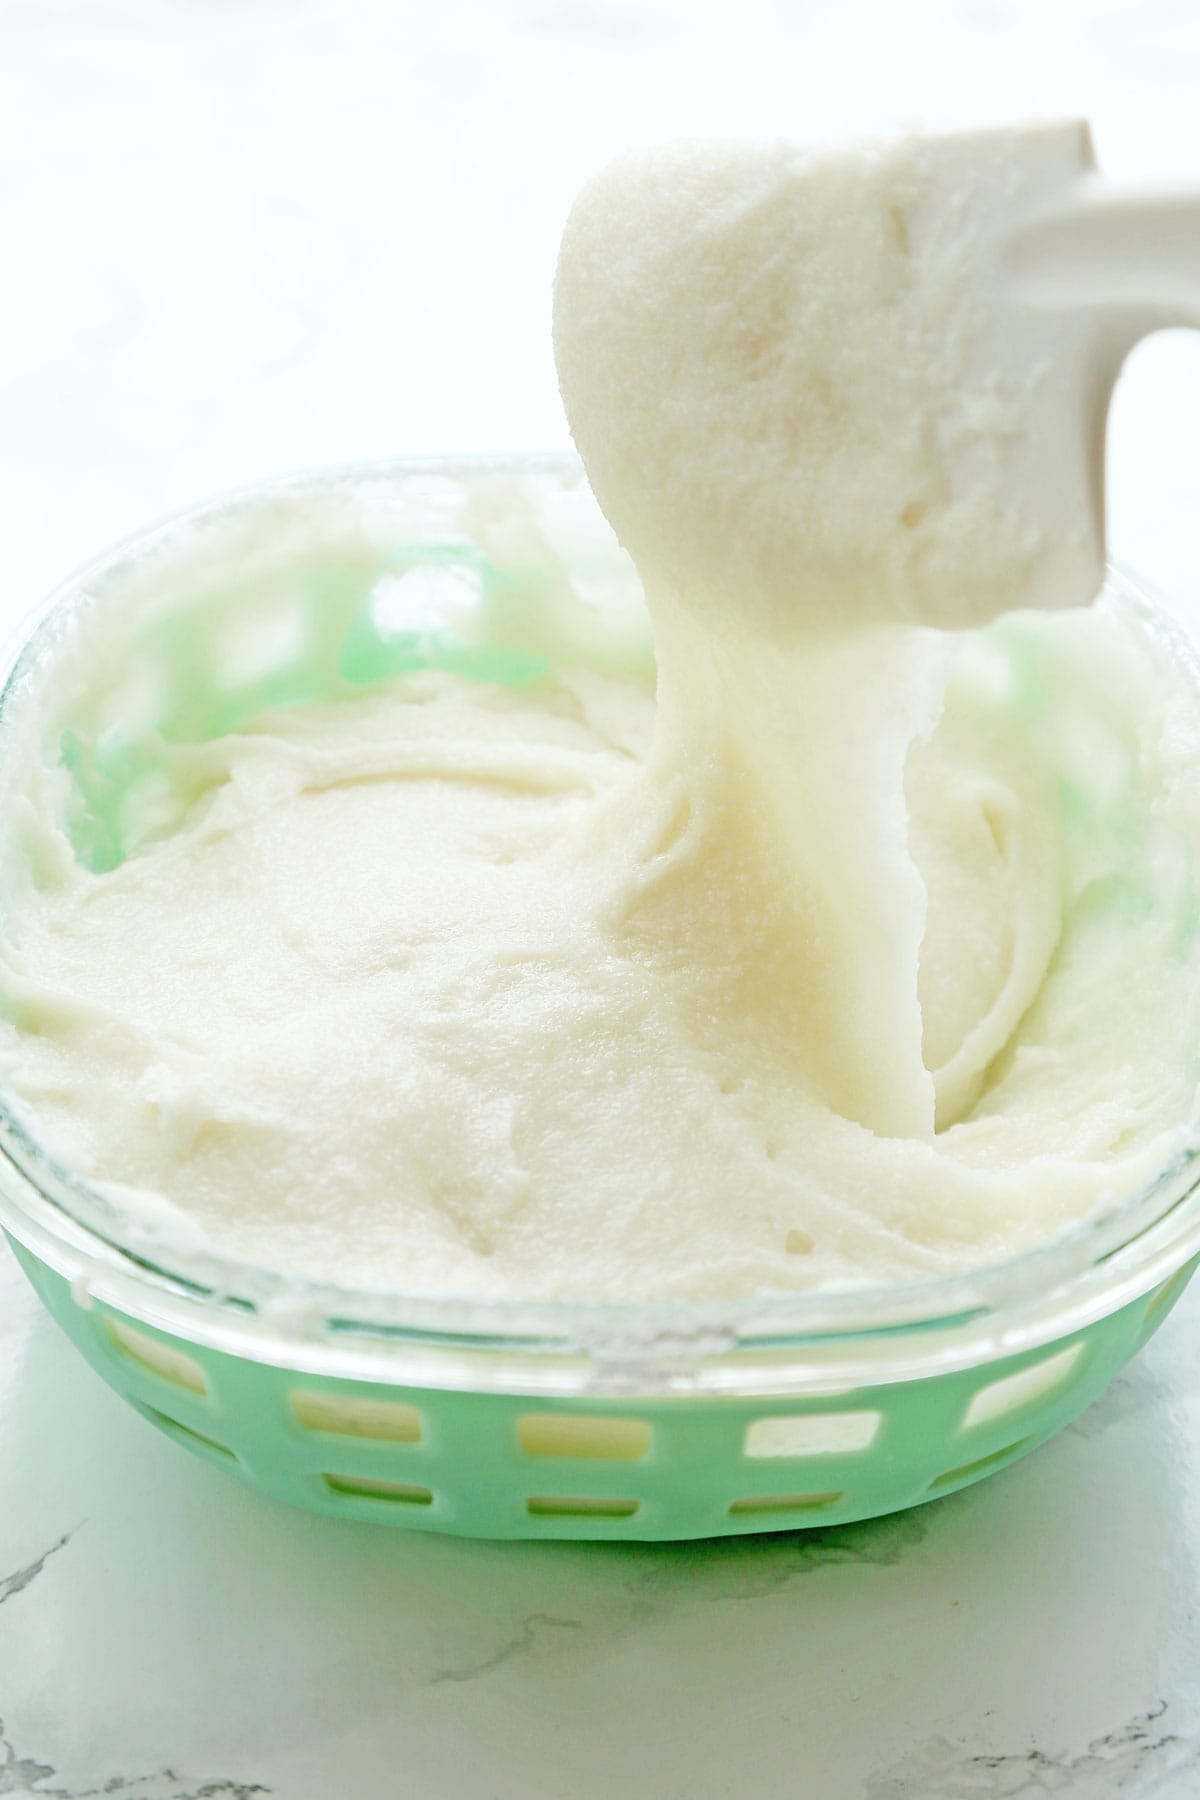
- Pour the blended rice mixture in a microwave safe container and cover loosely with a lid. Microwave on high for 1 minute. Take the container out of the microwave and fold the mixture using the spatula. There won’t be much to fold at this point since the mixture will be more liquid than solid. Place the container and lid back in the microwave and microwave for another minute. Take the container out of the microwave and fold again. Repeat this step once more at 1 minute, and 3 more times at 30 seconds. The total microwave time will be 4 1/2 minutes.
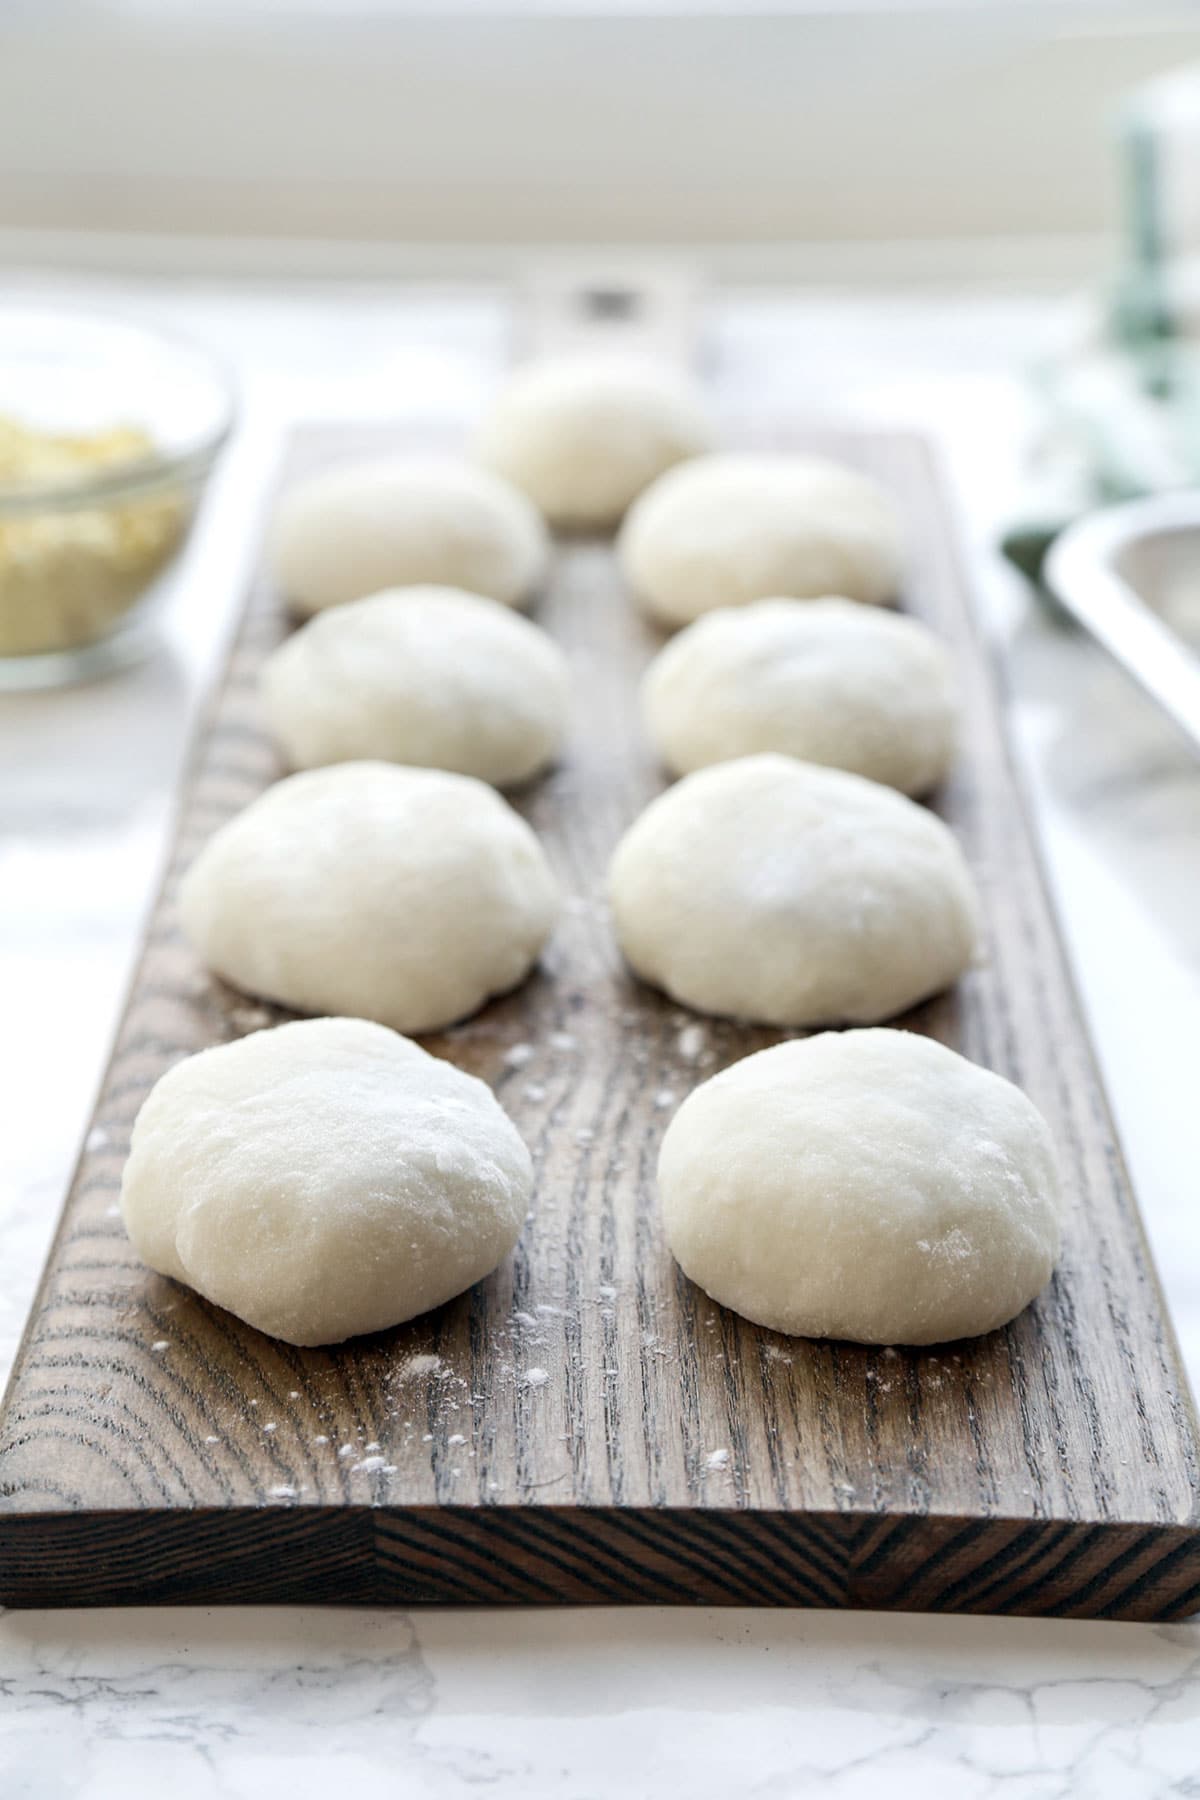
- Put the dough in a baking sheet covered with potato starch and sprinkle the dough with potato starch. Stretch the dough using your hands and let it cool down. Dust your hands with potato starch and grab a small palm size piece of mochi. Shape the mochi into a ball or any shape that you like and set it on the plate. Repeat this step until all the mochi has been used.
- You can serve the mochi with kinako or stuff it with anko or your favorite filling.
How Long Does Mochi Last?
Mochi tastes best when it’s fresh because the texture is soft and chewy, which is what makes mochi so yummy and addictive. It shouldn’t be left at room temperature for more than one day since rice develops mold quickly and easily.
Can I refrigerate it?
Yes but I don’t recommend it. That’s because the texture will become hard and grainy and microwaving it would make it too soft. But if you do decide to refrigerate it, let the mochi sit on the counter until it reaches room temperature before eating so the texture gets a little softer.
In the freezer:
Mochi keeps extremely well frozen! Wrap each mochi ball in plastic wrap and place them in an airtight storage container before freezing. When you want to use them, microwave for 45 seconds or a little longer and unwrap after. If you want to use mochi in a soup, simply add the frozen ball in the soup since it doesn’t need to thaw.
How to Store Mochi
Mochi is best when it’s moist and chewy so always keep the rice cakes in an airtight storage container with a lid, or Ziploc bag, sealed. Or if you are freezing them, wrapped individually in plastic wrap and placed in a Ziploc bag, sealed.

How to Serve Mochi
There are so many different ways you can serve mochi – as a snack, dessert, appetizer, or side dish. Here are some of the more popular ways to serve mochi:
- Traditional Daifuku: Daifuku is a traditional Japanese confection which consists of mochi stuffed with anko (sweet red bean paste). Stretch the mochi that’s in your palm by gently pulling on each side to widen the surface. Scoop up a little anko and place it in the center of the mochi. Stretch the mochi a little more to widen the surface. Then fold each side to meet in the center and pinch the ends. Keep on pinching as you shape the mochi into a ball and set it on a plate.
- Strawberry Daifuku: Place a strawberry slice (or other fruit you like) in the center of the mochi you are holding in the palm of your hand and add a little anko or nutella. Stretch the mochi to widen the surface and fold each side to meet in the center and pinch the ends. Keep on pinching as you shape the mochi into a ball and set it on a plate.
- Kinako Mochi: Mix half kinako powder, half sugar, and a pinch of salt. Dip the mochi in water and dip it in the kinako, or serve the mochi sprinkled with kinako on top.
- Ozoni Soup: Click on this link to see the recipe.
- Zenzai: Add about 1 cup of anko and 1 1/4 cup of water to a pot and bring to a boil. Lower the heat to a simmer, cover and cook for 20 minutes. Add a pinch of salt, stir, and turn the heat off. Ladle the soup into bowls and add a piece of mochi to each bowl. Serve.

Did you like this ‘How to make mochi in a microwave’ tutorial? Are there changes you made that you would like to share? Share your tips and recommendations in the comments section below!
PrintHow to Make Mochi in a Microwave

All you need is an immersion blender and a microwave to make these chewy Japanese mochi cakes!
- Prep Time: 5 minutes + passive time
- Cook Time: 5 minutes
- Total Time: 1 hour 30 minutes
- Yield: 12–14 pieces 1x
- Category: snack
- Method: Microwave
- Cuisine: Japanese
- Diet: Vegan
Ingredients
- 450 grams mochigome rice (Japonica short grain sweet rice)
- 375 ml ml water
- Potato starch or cornstarch
Filling or topping (optional):
- Anko (sweet red bean paste) this is my homemade recipe, or you can buy it pre-made here
- Nutella
- Jam
- Kinako
Instructions
- Put the rice in a rice washing bowl and rinse under running water until the water runs clear. Drain. Or put the rice in a bowl and fill it halfway with water. Rinse the rice in a swirling motion and drain most of the water. Repeat 5-6 times until the water runs clear and drain the rice through a strainer. Don’t use a strainer while rinsing the rice since the grains may fall through the holes.
- Place the mochigome rice in a bowl and add the water. Let sit for 90 minutes. Don’t worry if it looks like the rice grains have absorbed most of the water, this is normal.
- Transfer half of the rice and water in the immersion blender cup and blend until the rice grains have been pulverized into a milky liquid (don’t worry if it feel a little grainy to the touch). If you don’t have an immersion blender cup you can use any tall cup. Add the remaining rice and water to the cup and blend until smooth and milky. This step is very important so take your time blending everything!
- Place a spatula in a bowl with room temperature water and set aside.
- Transfer the mixture to a microwave safe bowl or plastic container and loosely cover with a lid.
- Microwave on high for 1 minute and take the container out of the microwave. Fold the mixture with a plastic or rubber spatula or spoon and put the lid back on. There won’t be much to fold at this point since the mixture will be more liquid than solid. Microwave for 1 more minute and take the container out of the microwave again. Fold the mixture, put the lid back one and microwave for one last minute.
- Fold the mixture with a spatula until the mochi looks glossy and put the lid back on. This time, microwave for 30 seconds. Repeat this step two more times for a total of 3 times. The total microwave time is 4 1/2 minutes (3 times at 1 minute, 3 times at 30 seconds).
- Dust a baking sheet with plenty of potato starch (really cover it since mochi is super sticky!) and place the mochi dough on top. Sprinkle potato starch on top of the dough and stretch it across the baking sheet using your hands. Let the mochi cool for 2 minutes so the mixture is easier to handle.
- Place a serving plate next to the baking sheet and dust it with potato starch.
- Dust your hands with potato starch – make sure you hands are dry when you do this! – and grab a small palm size ball of mochi. Pull and twist to separate it.
- Shape it into a ball or any shape you like, and place it on the plate.
- Grab another palm size ball of mochi and pull/twist to separate. Shape it into a ball or any shape you like, and place it on the plate. Repeat until all the mochi has been used.
How to serve mochi:
- With kinako: Mix 2 parts kinako, 1 part sugar, pinch of salt. To serve, wet the mochi and dip it in the kinako, or place the mochi on a plate and sprinkle kinako on top.
- With anko filling (daifuku):
- Grab a small palm size ball of mochi and pull/twist to separate it. Stretch the mochi by gently pulling on each side to widen the surface. Scoop up a little anko and place it in the center of the mochi. Stretch the mochi a little more to widen the surface. Then fold each side to meet in the center and pinch the ends. Keep on pinching as you shape the mochi into a ball and set it on a plate.
Notes
HOW TO STORE MOCHI:
Mochi is best when it’s moist and chewy so always keep the rice cakes in an airtight storage container with a lid, or Ziploc bag, sealed.
FREEZING: Wrap the mochi balls individually in plastic wrap and placed them a Ziploc bag, sealed. They will keep for up to a month.
Nutrition
- Serving Size: 1 mochi
- Calories: 119
- Sugar: 0g
- Sodium: 38.2g
- Fat: 0.2g
- Saturated Fat: 0g
- Unsaturated Fat: 0.1g
- Trans Fat: 0g
- Carbohydrates: 26.3g
- Fiber: 0.9g
- Protein: 2.2g
- Cholesterol: 0mg


Hi does this recipe taste like fresh cooked rice thats been pounded or like the cheat mochi i have seen using mochiko sweet rice flour? Just wondering since i dont like the latter and am hoping it still has that pleasant freshly cooked rice taste
Hi A! It tastes like actual mochi 🙂
May I use the sweet rice flour if so what is the measurement of the sweet rice flour and the water? For how long should I microwave it. Thank you for your sharing.
Mercedes Ty
Hi Mercedes! Unfortunately I don’t know if this would work with sweet rice flour as I have never tested using that ingredient. I’m so sorry, I wish I could be of more help 🙁
Curious if this is something like a type of rice cake. Trying to find a rice cake type that you could roll in powdered sugar or sea salt. That is Crispy in taste maybe 3 inches in diameter. Very addicting for sure. Short time in California at store they had these made by Kameda I think that was maker. They made a maple flavored one too.
Hi Kathleen! This recipe is for chewy mochi rice cakes. They are doughy and stretchy. I think you might be looking for a “senbei” recipe which are the toasted crispy ones 🙂
My mochi is too wet & sticky. How can I make it more firm + dough like?
I would add a little more rice and stick to the same recipe. I would also suggest to wait a little since the rice expands quite a bit after the microwaving is done 🙂
Does the rice have to say short grain sweet rice or can it be any short grain rice?
Hi Victoria! The rice does have to say ‘sweet rice’ otherwise it won’t have the same texture and taste. I use Sho-Chiku-Bai which you can get on Amazon 🙂
Can one use a regular blender?
Hi June, I’m not sure about a regular blender but I would assume it would work since the grains have absorbed most of the water and are quite soft. But I haven’t tried… If you do, please let me know how it turns out!
Can I use a regular blender, food processor or Nutra Bullet? I don’t have a Immersion Blender.
Hi Lisa! I think a Nutri Bullet might work for this! As long as you can get a milky white texture, you use anything 🙂
Oh.. Goody !
We always buy mochi (fresh or frozen).
Am anxious to try your recipe.
But first I’ll need to convert your ‘foreign’ ingredient measurements to American measurements.
Thanks for posting.
Thank you Doug, I hope you like them! 🙂
Omg I’ve only bought this or yes made at New Years helping my friends pound it so fresh!!
Service Suggestion tho:) how about fried til golden on both sides in oil and then dipped in shoyu? Or sweet syrup ? Yummmmmmm
My favorite and my sons fav! Especially on cold mornings ..
Hi Kimiko!
I’ve never had fried mochi – do you mean pan fried or deep fried? Sounds delicious! 🙂