Learn how to easily set up a Wordpress blog on Bluehost with this step by step tutorial so you can start making money today!

I have been blogging for 9 years and it has completely changed my life, for the better!
Through my blog I was able to branch out as a food and product photographer, recipe developer and food stylist. Blogging allows me to work from home and choose my own hours. I can also take long vacations and work from anywhere in the world.
You can’t beat that.
And I make good money too even though my blog isn’t getting a million visitors a month. You don’t need a ton of traffic to make money, you just have to learn the most effective way to make it.
- In 2017 I made $71,474.58
- In 2018 I made $87,884.88
- In 2019 I made $127,637.90
- In 2020 I made $212,161.88
- In 2021 I made $218,769.04
- In 2022 I made $221,232.28

Anyone can make money with a blog, and you can start as soon as you publish your first post! Click here to get started and to get the special Bluehost discount only available to my readers through this link.
There are plenty of affiliate programs you can join as soon as your blog is live. This is the easiest way to make money, and some bloggers are so successful at it they make over six figures, monthly, just from that! To help you get started you can read my post, 11 Best Affiliate Programs to see which programs have converted well for me.
Creating a blog using Wordpress can be intimidating if you are new to blogging. But in this post I’m going to show you how surprisingly simple it is!
In this step by step tutorial, I’m going to show you:
- How to use Wordpress on Bluehost
- How to start a Wordpress blog
- How to publish a Wordpress blog
- How to change your username in Wordpress (to make your site more secure)
- How to install and change a Wordpress theme
- How to customize a Wordpress theme
I’m also giving you a list of really useful tools to install and use to make your blog successful.

Create an Account with Bluehost
The first step to creating a successful blog is to find a good hosting company.
Bluehost is one of the most established and well-known hosting brands on the internet. They host over 2 million WordPress sites and are excellent for beginners and starting websites because their platform is easy to use.
Click here to signup for as little as $2.95/month (this deal is only available through my blog).
To cut down on steps, Bluehost uses a process that automatically installs WordPress at sign-up. This means you can start writing your first post minutes after joining!
You also get:
- Free domain name (the name of your website – you usually have to pay for this separately).
- Free email address.
- Bandwidth is unmetered – this means you don’t have to worry about your blog crashing if it suddenly gets a ton of traffic. Whether you get 5 people or 10,000 people visiting, you will be charged the same amount. That’s huge!
- Extensive library of training videos (Installing a Wordpress theme, setting up mail, how to embed a video, etc…) Their videos make it easy for everyone to successfully build a website.
- Full refund if you cancel your account within 30 days. Or prorated refund for the remainder of your hosting term if you cancel Bluehost after 30 days.
- 24-hour technical support via chat, ticket or by phone.
What about Starting a blog for free?
If you want to be serious about blogging, DO NOT start a blog for free.
It’s very difficult to make money on a free blogging platform because you have limited control over it. The templates are also limited and very basic which will make you look like a novice. Visitors to your blog will see you as someone who blogs as a hobby instead of taking you seriously.
Companies also don’t like to work with blogs that are hosted on free platforms (sponsored posts, direct advertising, etc).
It’s best to start blogging on a solid platform to avoid having to deal with unnecessary problems in the future. If you have a solid base to build your blog upon, you are golden!
Selecting a Plan and Registering Your Domain Name
1. Create an Account
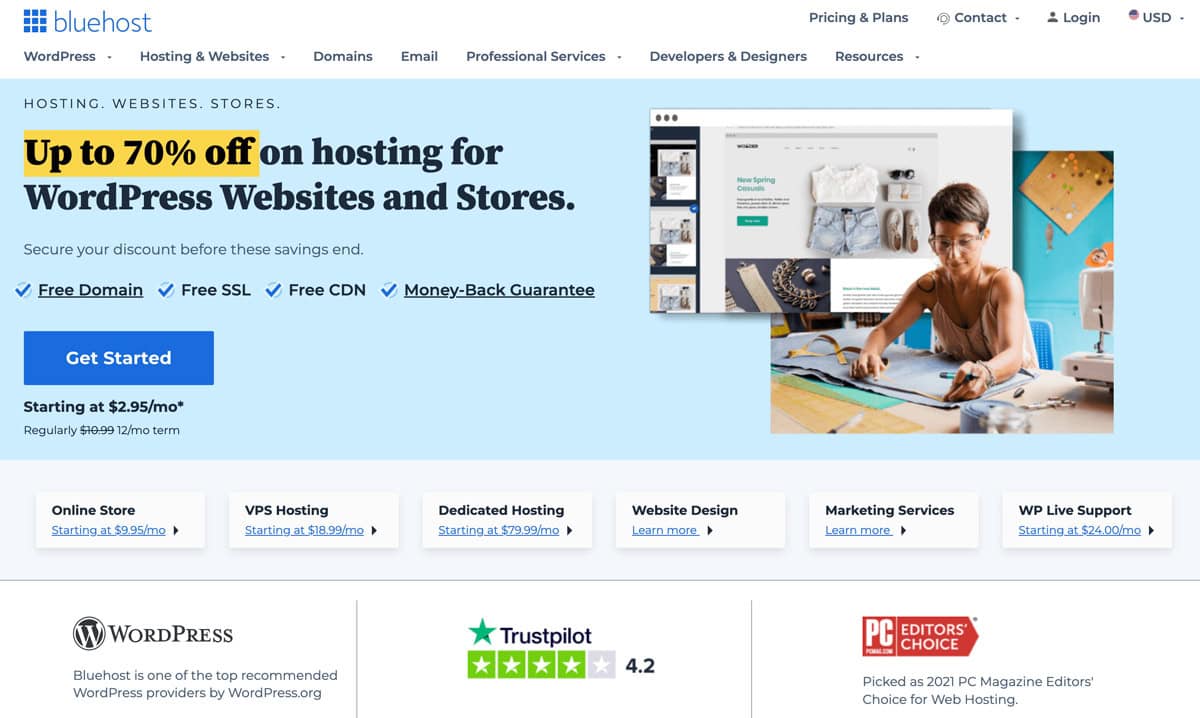
Go to Bluehost and create an account. Click on Get Started Now and you will be taken to the Select Your Plan page.
2. Selecting The Best Plan
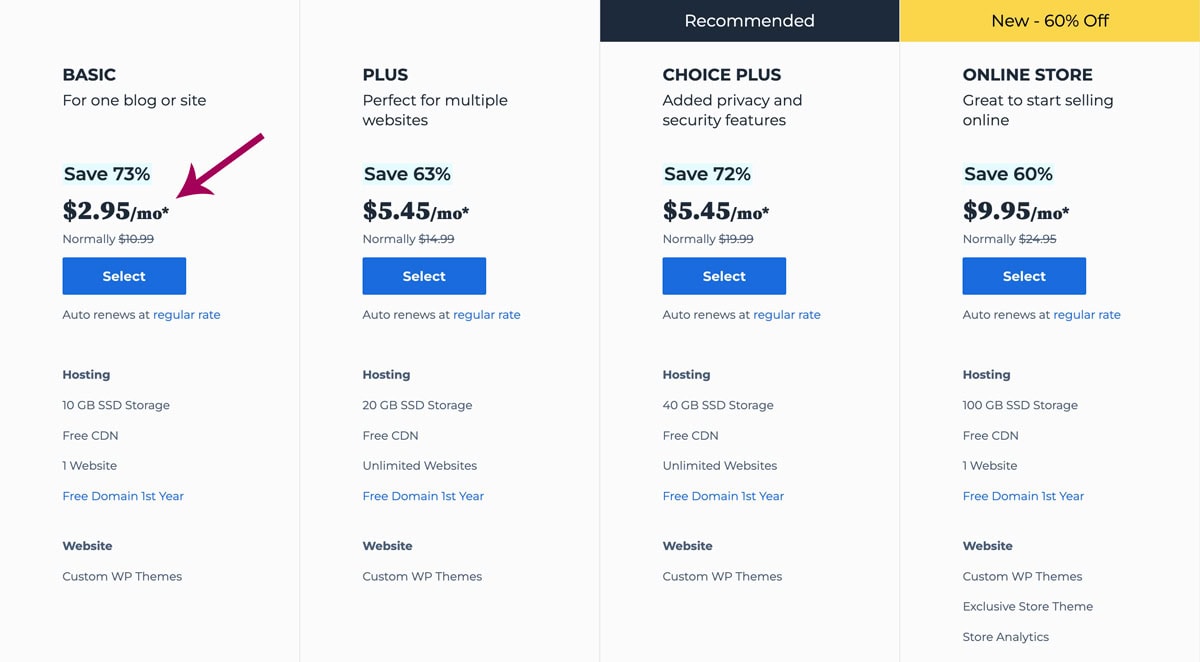
This is where you decide how much you would like to spend on your hosting. Choose the $2.95 month plan for the best pricing.
3. Choosing Your Domain Name
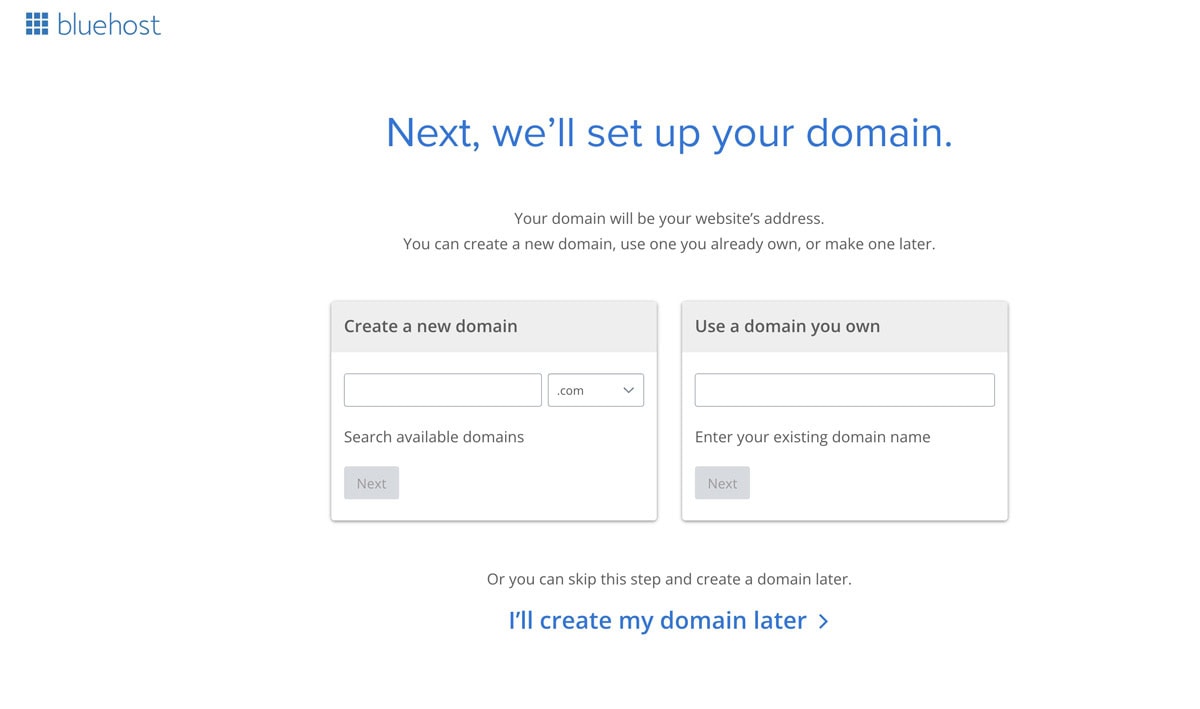
The domain name is the name of your website (mine is pickledplum.com). There are no additional charges to this since Bluehost gives it to you for free!
If you are having trouble coming up with a domain name, think of word combinations that represent what you will be blogging about.
Blogging about photography? Then try snap, photos, foto, pix, frame, shutter, etc…
If you are having trouble finding something that’s available, the other option is to make up a word that stands out and is easy to remember.
I chose Pickled Plum because I wanted a name that represented my Japanese roots (I’m half Japanese). I’ve had a love affair with umeboshi (Japanese for pickled plum) since I was a little girl so naming my blog after these pickled delicacies seemed appropriate.
The key is to not overthink here because you will drive yourself crazy!
Remember that your goal is to create content so you can start making money blogging. Just pick something you like, it doesn’t have to be perfect, and go with it. If you decide later that you really don’t like it, you can always change it.
I also recommend going with a .com over .net or .co since it’s more common and looks more authoritative. My blog used to be pickledplum.net because when I was looking to purchase it, .com was taken. I stayed with .net for a while but as my blog grew, I was ready to move it to a .com.
I contacted the person who owned the .com extension and was able to purchase it for a reasonable price. Best decision ever!
Imagine if I had waited for pickledplum.com to become available – I may have never started a blog!
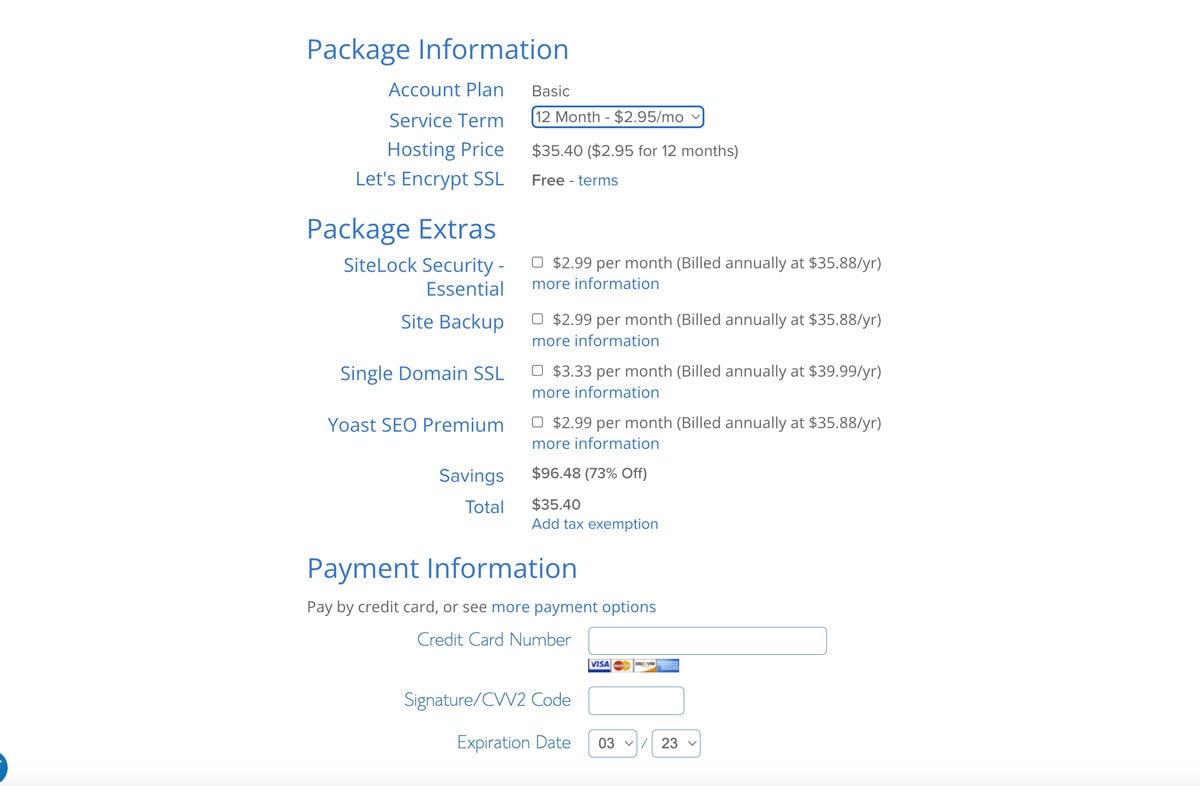
Select the 12-month plan for the best pricing (for savings up to 73%). I know I’ve mentioned this a couple of times already but you must click on my link to get this deal.
If you decide to cancel your account after 12 months, Bluehost will refund you for the 24 months you haven’t used. So no matter how you look at it, the cheaper monthly fee will always be better since you can cancel anytime, and get your money for the unused months back!
Canceling is also super easy. Customer service is very helpful and nice too! There’s no jumping through hoops to get to your refund, it’s all done in a very straight forward manner.
You can uncheck all the other options for now since you technically don’t need them.
If anything I would recommend choosing the Site Backup Pro (it’s always good to have a backup) and the SiteLock Security to prevent hackers and spammers from accessing your blog.
Bluehost has its own security service installed and it’s a very strong one so you don’t need SiteLock, but it’s always good to double up on security for added safety.
For now though, leave them all unchecked as these are services you can add later.
After choosing your plan, enter your payment information and click submit.
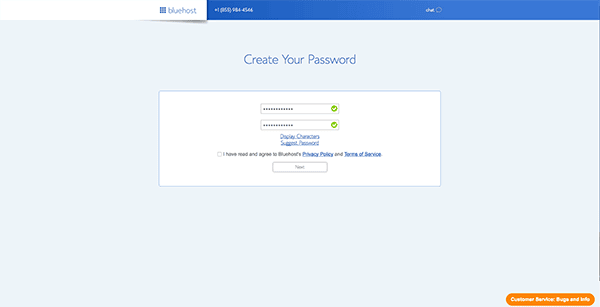
Create a password and, Congratulations! You can now access your Bluehost account which will automatically take you to the Wordpress installation process.

Installing Wordpress In Bluehost
Before we dive into this chapter, let me quickly explain the difference between Bluehost, Wordpress, plugins and themes. Since some of you are new at this, understanding what a hosting company is versus a blogging platform versus plugins and themes can be super confusing. I know it since I’ve been there!
So as a just in case, I’ll explain the difference.
Bluehost is where your blog is going to live. Think of Bluehost as an apartment complex where you are renting a space. That’s where your blog is going to live and stay for as long as you want to keep it there.
Wordpress is a blogging platform. It’s basically a blank space that you fill with your writing and images, just like the walls of your apartment.
A Wordpress theme is the style of your blog, your own personal architect/interior designer! This is where you pick the colors and the layout of your blog.
Plugins are like furniture and ornaments in that they make your room more useful and prettier. If you want a subscription box to your blog page, that would be a plugin you would have to add.
Now let’s install Wordpress!
- Log in and in the Welcome page, click on Log in to Wordpress.
- Next you will be asked about the kind of site you would like to set up – business or personal. That’s totally up to you or you can skip this step and click on I don’t need help.
- The next page is Pick A Theme That Inspires You. Don’t sit on this for too long as you will be able to change your theme later.
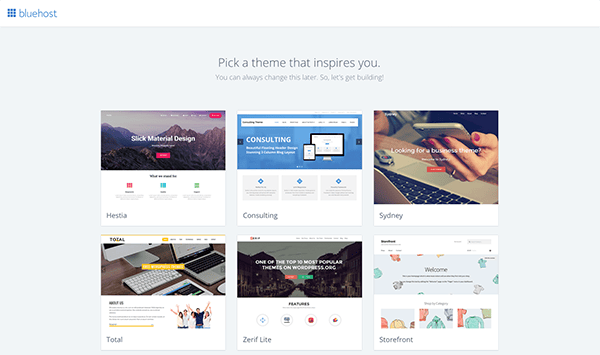
I find that it’s better to pick a random one (the ones offered are FREE), write a couple of posts and change it afterward. The reason for this is because it’s hard to know what your blog will exactly look like without any content in it.
Most bloggers (if not all!) will go through several themes before settling on one they like. It took me almost four years and five complete redesigns before I felt truly satisfied with the esthetics of my blog. Even now I constantly find ways to make it better and more user friendly!


How To Use Wordpress On Bluehost And Publish A Post
Now that you are set up with Wordpress, it’s time to log in and launch your blog!
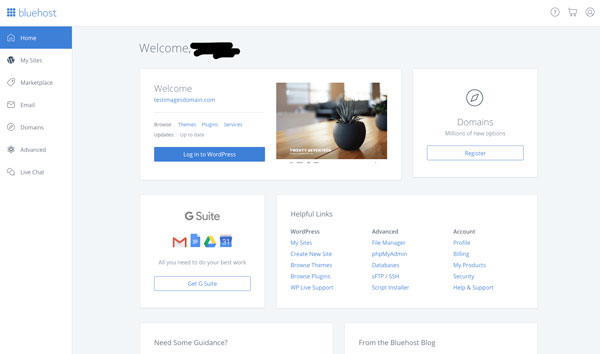
If you didn’t pick your own username and password, I strongly suggest you do so.
Now usually the default username given is admin but I suggest changing it into something else since hackers know about this, which makes your site more vulnerable. Pick a username that you can remember, it doesn’t have to be as complicated as the password, and then save it (more on this below).
Now that you are inside Wordpress, click on Posts and Add New to create your very first post.
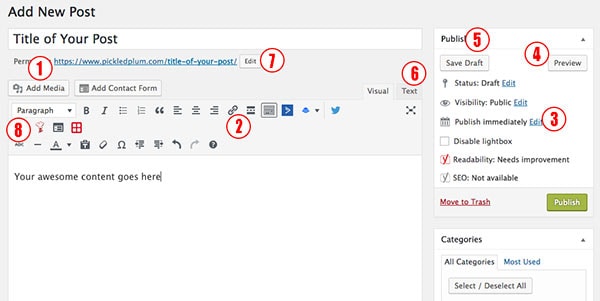
As you can see, there are a lot of functions you can use within a post, but there are a few important ones you should know about.
- Add Media button. This is where you can add images and videos to your posts. Click on the button and you will be taken to another window where you can upload your content.
- Add a link. Highlight the words you would like to link and click on the chain to add the url.
- Publish Immediately. This is great because you can schedule your posts to go live on a specific date. I use this with every single one of my posts since I usually have about a month’s worth of content pre-shot and written. Click Edit and choose a publishing date.
- Preview. This shows you what your Wordpress blog post is going to look like.
- Save Draft. The most important button as far as I’m concerned. Get used to saving your drafts as often as you can in case you accidentally close your window, get booted out of Wordpress or something crashes and ends your connection. The last thing you want is to lose hours of hard work and see it vanish before your eyes, like it never existed!
- Text shows you the HTML of your page. For example, if you wanted to add a banner to your page, you would click on text and add the html code there so that it comes up as an image on the visual side.
- Edit button is to change the url of your post. I ONLY recommend changing the url BEFORE the post is published. Changing it after can cause 404 errors and you could lose traffic from sites that were linking to that specific page. Changing the url is good for titles that are too long. For example, if you title your post Best Comfort Shoes For Women And Men Over The Age Of 65, by default the url is going to look something like www.yourblogname.com/best-comfort-shoes-women-men-over-age-65. That’s too long! Google doesn’t like long urls, so you could rename it www.yourblogname.com/best-comfort-shoes-for-seniors.
- Paragraph has a drop down menu where you can find H1 to H6 tags which are important to include in a post for seo purposes.
And there you have it. You are minutes away from publishing your first piece of content!
Click the green Publish button when your post is ready to go live.
If you accidentally publish your post while in the midst of creating it (happens to me sometimes), no worries! Just go to Satus and set it to Draft, or click Edit where it says Published, and schedule to publish at a later date.
If you would like more information on how to set up a Wordpress website, check out WPBeginner. You will find a wealth of information and tons of tutorials, all Wordpress related.
Keep reading as I explain how you can change your username in Wordpress, change and install a new theme, and how to customize a theme. I’m also give you a list of useful tools to create a successful blog.
How To Change You Username In Wordpress
If your username is the default username in Wordpress, it’s a good idea to change it.
Most hackers are aware of this so when they hack into accounts they use the default admin username to access them. Now all they have to figure out is your password and boom, they are in. Changing your username into something else makes it twice as hard for them to get past the front door.
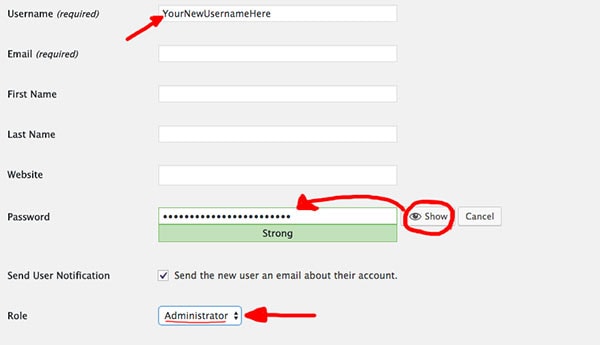
First, log in to your Wordpress account and under Users, click Add New.

- Add your new username under Username. As I previously mentioned, you don’t have to come up with some crazy complicated username that you may not be able to remember later. Anything new is better than the default admin.
- Where the password is, click on Show so you can copy, paste and save it somewhere safe. This password is different than the one you were originally given so make sure to write it down and save it somewhere safe because we are about to delete the admin user.
- Under Role, change it to Administrator.
Click on Add New User and that’s it. Just make sure you have the new username and password saved somewhere!
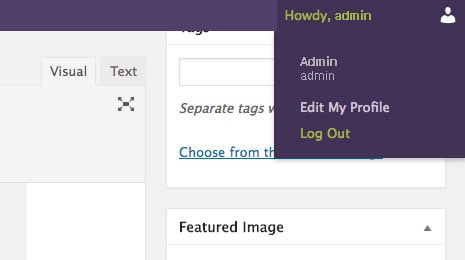
Now you will need to log out of your account and log back in with your new username and password.
- Log back into Wordpress with your new username and password.
- Go to Users -> All users
- Find Admin and delete it.
That’s it, you are done. Now your blog is twice as safe!
Changing Your Theme From Inside Wordpress
Every now and then you may feel like your blog needs a makeover.
As your blog takes shape, you might decide that you want to change its style or add certain features that your current theme doesn’t support.
You can start by looking through the FREE themes available in the Wordpress Themes section of your dashboard, under Appearance -> Themes.
These are great as a starting point since you can try as many as you want for FREE!
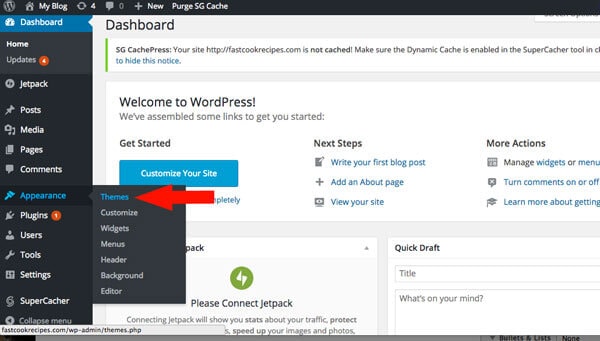
Here you can browse through the free themes available.
Using your cursor, hover over the design you like and click on Live Preview. This will show you what your blog will look like if you choose this theme. If you are happy with what you see, go ahead and click on Activate.
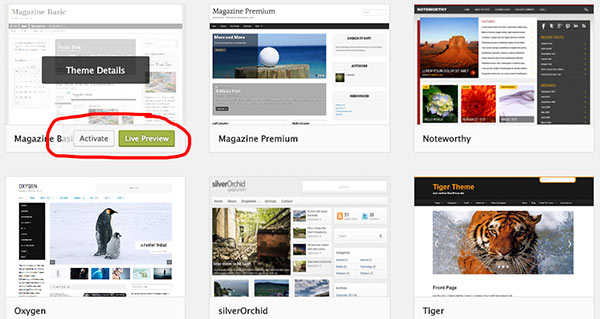
You can easily go back and forth between templates by simply clicking on Activate.
Installing A Wordpress Theme That’s Imported
If you decide to import a theme, make sure that it comes from a reliable source. Wordpress does NOT recommend you import FREE themes unless they are listed here, in the Official Wordpress.org Themes Directory.
I used a FREE theme for the first couple of years of blogging but eventually moved on to something that offered more features and customization options.
As for where I purchase my themes, I go to Studiopress for premium WordPress themes. Their themplates are stunning and offer lots of different functions. The other advantage of using Studiopress themes is that you get special deals – amazing deals – after your first purchase. You never have to pay full price again.
Elegant Themes is also another company I recommend but not because I’ve used them. I know of them through many successful bloggers who are very happy with their templates.
Importing a theme is slightly different but just as easy.
In your Wordpress Dashboard, go to:
Appearance -> Themes -> Add New (the button is at the top of the page, above the themes).
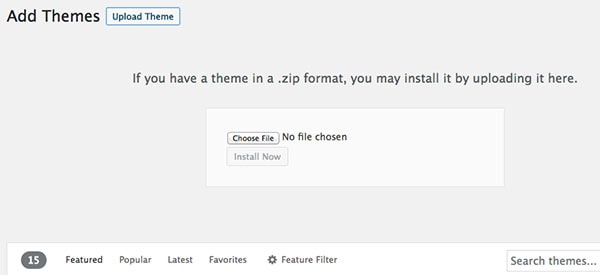
Next to Add Themes, click on the Upload Themes button.
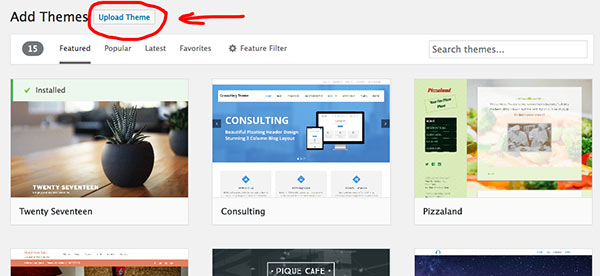
Click on Choose File and upload the ZIP file (the zip file will be inside the folder you have downloaded after purchasing the theme). Click on Install Now and click on Activate.
How To Customize A WordPress Theme
Now that you have a theme picked, you can play around with the font sizes, colors, menu and other features.
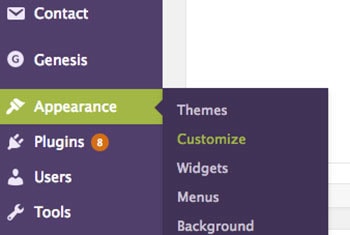
To customize your theme, go to your Wordpress dashboard and click on Appearance -> Customize.
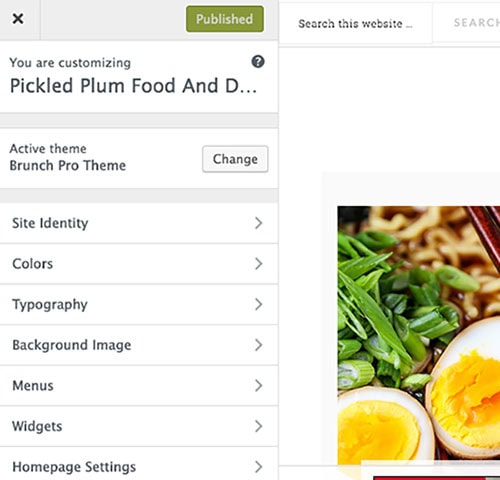
As you can see, I’m using the Brunch Pro Theme which is actually a child theme paired with the Genesis framework.
* WHAT IS A CHILD THEME?
A child theme is a WordPress theme that inherits its functionality from another WordPress theme -> the parent theme. Child themes are often used when you want to customize or tweak an existing WordPress theme without losing the ability to upgrade that theme.
From here you can make all the changes you desire to give your blog the look you have in mind. Every time you click on something you will see a preview on the right side of the screen. So say for example I change the text color from black to pink, I would see the text in pink on the right side.
Once you are happy with the changes, click the green Published button.

Additional Tools To Create A Successful Blog
Now that you know how to set up a blog on Wordpress, here are a few additional tools I recommend checking out. You won’t need all of these right away so I suggest you bookmark this page and come back to it later, when it’s time to do some upgrading.
Google Analytics
You have published a few posts and now it’s time to see where the traffic is coming from.
Is it coming from organic Google searches or from social media channels like Twitter and Facebook? Or better yet, one of your posts was shared by a big site like Buzzfeed and you are getting a sudden spike in traffic.
First of all, how do you find out that Buzzfeed is sharing your content and which one of your post has gone viral?
That’s exactly what Google Analytics is for. It’s a very powerful FREE web analytics service that shows you where your visitors are from, how long they stay on your bog, which one of your post is the most popular and how your blog is being found.
Installing Google Analytics should be a priority since you need to know what your visitors like about your blog in order to become successful at blogging.

Yoast SEO Plugin
Another FREE tool you should install as soon as you have created your Wordpress blog is the Yoast SEO plugin.
SEO (search engine optimization) is basically writing content that’s optimized for organic searches. This means that in order for people to find your posts, you will need to rank high on searches in Google, Bing and other search engines. One way to help your posts gain traction is to focus on seo by adding keywords to your high quality content.
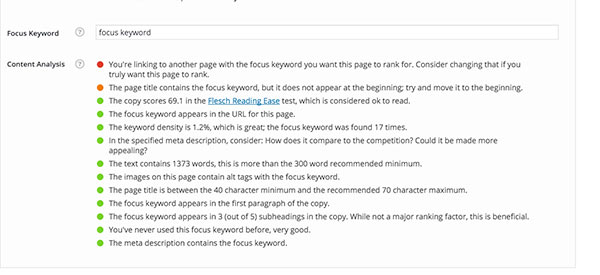
Then Yoast can help you create a sitemap, set up meta titles, shorten you urls, and give you pointers on the content of each of your posts.
There are even colored dots showing you what needs work (red) and what looks good (green).
Optinmonster
Once your blog takes off you will want to connect with your readers by sending them weekly newsletters (my traffic always spikes when I send out a newsletter because I have over 10,000 subscribers) or inform them on new products you are selling. If you want to make money as a blogger, it’s essential to have a strong email list!
Your loyal followers will want to know what you are up to and are more likely to purchase something from you than a random visitor to your site. I have three locations for my signup boxes:
- One in my sidebar.
- One that lightbox popup which is a web form that appears on top of the webpage that you are viewing.
- One at the bottom of each post.
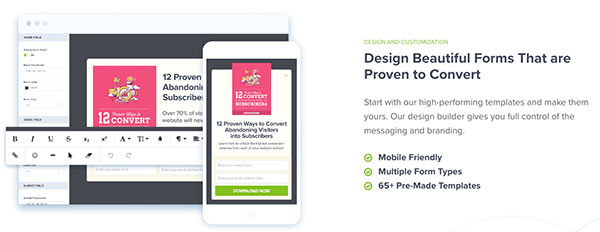
I use Optinmonster because they specialize in high converting signup boxes and have a extensive library to choose from. I can also see which boxes are converting well – my lighbox popup converts at 68% versus 23% for the one in the sidebar – and their customer service is by far the best I’ve experienced online. I have the basic package which costs $9/month.
Mailchimp
I currently use ActiveCampaign because of their advanced automation system and competitive prices for bloggers with bigger mailing lists.
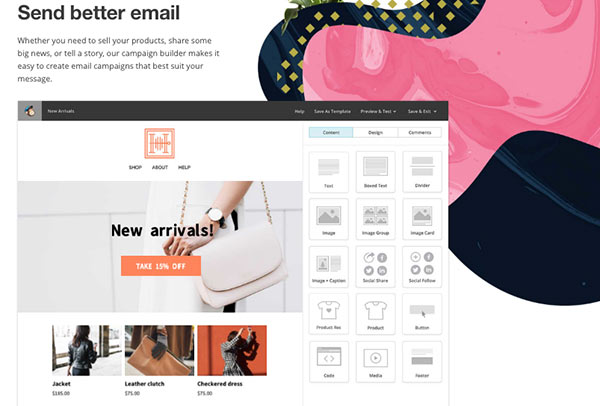
But for the first three years of my blogging career I used Mailchimp and was very happy with it. The reason being that Mailchimp is FREE to use – 100% FREE – for up to 2,000 subscribers! It’s also very easy to set up since they have tons of beautiful pre-made templates that only need your content added before they can be sent out.
Buffer
Getting a blog off the ground is a lot of work and part of your job as a blogger is to share your content on social media. The more eyes you can get on your content, the better!
Buffer is a social media management platform that schedules posts, tracks the performance of your content, and manages all your social accounts in one place (Facebook, Twitter, Pinterest, Instagram, Google +, Linkedin).
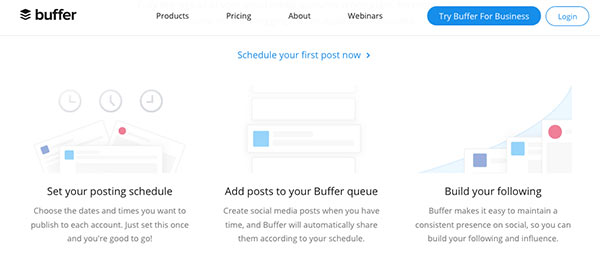
By using Buffer, you can schedule content to publish across several social media platforms days ahead of time. This means instead of having to worry about posting stuff a few times a day every day, you can do it once a week by setting up a posting schedule. I’m not 100% sure but I think you can schedule posts up to 3 weeks ahead. This is a huge time saver!
Canva
Canva is a wonderful tool for creating graphics for your posts (look at my blue and white polka dot page breaks – that’s done in Canva) to make reading your content easier. When you only have blocks of writing pasted onto your pages, it can be tiring for the eyes to follow.
Breaking up your paragraph with images, infographics and cute designs will liven up your posts and make them more engaging.
You can also create pins for Pinterest and design eye catching graphics for other social media platforms such as Facebook, Instagram and Twitter.

Landing Page Builder To Sell Your Product(s)
A landing page builder is essential when you are selling your own product. They look beautiful and convert extremely well.
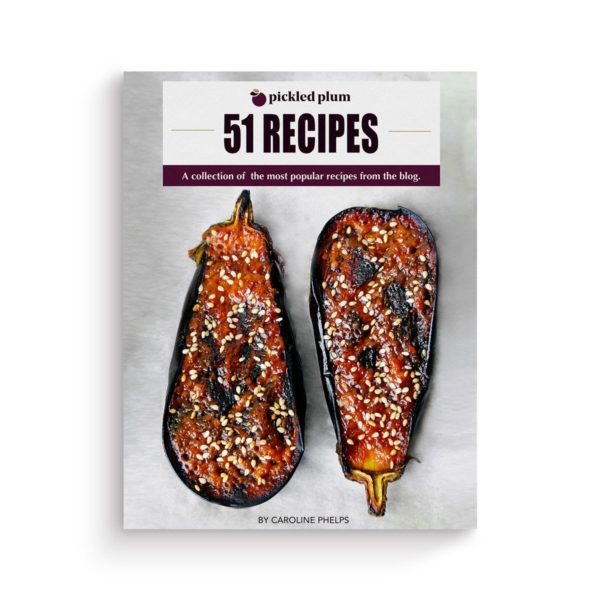
I use Leadpages to sell my ebook 51 Recipes which only took 20 minutes to set up.
The pages are also mobile responsive which is extremely important these days since most people use their mobile devices to browse and shop online. This is money well spent when you have a product ready to sell. Since using Leadpages, my ebook sales have tripled!
Pin This Post To Save Or Re-Read Later
That’s it for this How To Start A Wordpress Blog On Bluehost tutorial. If you have any questions or would like to share some helpful tips, leave a comment at the bottom or send me an email using the contact form. If you liked this post, check out my top 11 Best Affiliate Programs For Food Blogs.


Hi Caroline!
I love your blog. This enlightened me since I was thinking of trying to start a blog free. I am a baby on starting a blog for which I could earn. I just want to clarify on some details. I am an ordinary person with no company at all. Could I even start a blog and earn from it? I wanted to ask a lot maybe thru email if you could spare me some time and enlighten me more. Hoping to hear from you Caroline.
Hi Caroline,
I just recently found your blog and find it so informative. I too have my own food blog, but your information has opened my eyes to a lot I was not doing and I am excited to try out a lot of what you have said. Do you mind sharing how you create your ebooks? Thanks
Great post.I really loved it.Thanks a lot
This article is really fabulous. Because I’m also a WordPress blogger. I’m doing blogging from about 2 months. I got a lot of knowledge from this blog. Thank you for sharing.
So informative and very useful, I am already on my way to creating my own blog! Thank you!
Thank you very much. It was so useful. It would help a lot for beginners to start a WordPress blog
Hi there
I am so happy I found this article.
Amazing work
Very easy to understand and straight forward.
I want to start a blog but not monetize it straight away.
Can I still use the above methods?
Whilst I learn all the relevant information and gain experience first. I found it very overwhelming with all the information I have found.
Thank you
Ceri Roberts
Hey Caroline,
I must say – you have made it all easy and highly possible for me. Before coming here, I have read a bunch of articles.
Whatever, I am still a little confused about web hosting. The problem is – I am a new freelance writer and I have not much budget for now.
I have read here that Dreamhost is offering a free domain name for life – https://www.ecommerceasean.com/bluehost-vs-dreamhost-for-wordpress/
In addition, I have pretty much found that both web hosting services are too similar. The only difference is free migration and domain name for life..
What do you think about it? Should I go for Dreamhost or not? If I take dreamhost, I wouldn’t have to pay domain fees for the upcoming years.
Please help me Caroline.. I can’t make a decision on my own..
Hi Caroline! Nice name by the way ;P
I’m not seeing the free domain for life on Dreamhost but I’m also not living in South East Asia, so maybe it’s a special for there?
It’s hard for me to speak about Dreamhost since I’ve never been with them. I don’t feel comfortable talking about product I haven’t used since it would be dishonest. That being said, I’ve heard of them and they have been around forever so they must be doing something right 🙂
The reason why I recommend Bluehost is because I was with them for a few years and was a satisfied customer. I only left because I needed more space, speed, security, etc.. So for me Bluehost was the perfect host to start my career as a blogger.
The one advantage you have with Bluehost is that most bloggers who teach blogging have tutorials about Bluehost and for me that was super helpful in the beginning since I needed help with the most basic things. And because I have a good relationship with them, they are offering a special price for my readers of $2.95 a month instead of $3.95, which you can get through this link only (https://www.bluehost.com/track/pickledplum ).
Honestly, it was also the reason why I chose Converkit over other online mail delivery services, because I could learn how to use it, step by step, with images, through other bloggers who had experience with the product. This makes life so much easier when you get started because there is so much to learn and it can be overwhelming at times!
Either way I think you will be making a good choice Caroline, so long as the customer service is good you will be in good hands 🙂
Good luck with everything and keep me posted!
I see the benefits of using bluehost. What do you use now, though? Also, thank you for all of this advice.
Hi Heather! I now use Bigscoot and was previously with Liquidweb. They are both great once you get over a certain amount of page views 🙂
Really very helpful article. Thank you for helping us to how beginners can start a WordPress blog
Thanks for the useful tutorial, and the tip to changing the user name in particular. I’m using the Admin default name but didn’t know that it could be a target for hackers. I will update it along with the password.
Hey there, this provided me with everything I had been searching for. I’m in the middle of building my first blog and wanted to use your link for the Bluehost deal but it doesn’t seem to be automatically applied- could you give me a hand with that? I’d love to join as soon as possible. Also do I have to pay for a wordpress.org if I use Bluehost because I was initially starting with Wordpress.com and was going to pay for an upgraded plan but won’t bother if Wordpress.org is better (: thank you!
Hi Jarrah-Grace! I’ve checked all the links and they should work now, thanks for letting me know 🙂 You don’t have to pay for Wordpress, it’s automatically added to the fee + you get a free domain name as well. So you get everything you need in one place. The set up is super easy to follow, straight forward, you are going to love it. I wish you the best with your new blogging career and make sure to read my other posts on blogging as they are very helpful in getting started the right way!
Thanks for the fantastic post! This information is really good and thanks a ton for sharing it 🙂
I m looking forward desperately for the next post of yours..
Hi Caroline,
I came across your blog and really liked how your writing and content was very simple and easy to read. I also liked that you shared a post about how to be a blogger and other related topics to start a blog, which was very helpful and easy to follow. I didn’t have any intentions of starting my own blog, but after reading your post, it makes me seriously want to start one immediately!
Just like you, I also suffer from psoriasis and I too have found that adjusting what I eat has helped me get less outbreaks. I look forward to using your recipes to help me get healthier and on my way to being completely, or near zero outbreak-free. Losing weight while doing that would just be icing on the cake!
Anyways, Congratulations on your success and more power to you! I will continue to come to your site for healthy recipes and everything else you decide to share with your subscribers.
Thank you so much Bernadette! FYI, I’ve been on a gluten-free diet for the past 10 days after reading that gluten can worsen psoriasis. You might want to look into that as well, you don’t have to go completely gluten-free but cutting down may help as well 🙂
Good luck with everything – I hope you do start a blog and wish you lots of success on your journey to being psoriasis free and maybe weight loss too!
Absolutely brilliant content! Very helpful for New Bloggers like me.
Thanks Nazim 🙂
With every single detail about Blogging and its starting, for a beginner, it is 100% valuable. WordPress and Bluehost are the best recommendations for a Blogger who want to start their carrier in blogging.
Thank you so much for this sound and concise post! Your writing style is amazing. So easy to stay with and informative, detailed yet simple, and descriptive yet keeping your point clear as a bell throughout. Where did you learn to blog like this?
How do you successfully run the day to day of your blog without running out of time, energy, and enthusiasm?
I am a former Occupational Therapy Assistant and have an incomplete Psych degree (finishing that up asap), turned stay-at-home mother to two beautiful girls. I am praying about starting an encouraging, faith-based homemaking blog with a ‘therapeutic/ life-coach’-type flare but am scared.. many things surrounding the whole experience intimidate me but honestly, I feel led to do this and desire to be obedient to that.
Any extra insight and/ or encouragement you could provide would be so helpful and appreciated.
Hi Jamie,
First of all, congratulations on thinking about starting a blog, that’s the first step! I’ve been blogging for over 8 years and have gathered all this information from a lot of trial and error. It’s true that blogging takes a long time but it’s just like anything else – it doesn’t feel like work if you love what you do. I wouldn’t think too hard at first, go ahead and start your blog and go from there. The only three things I would say to keep in mind is that in order to be successful as a work at home person, you must find discipline. This means you should treat blogging as a full time job. Wake up in the morning at the same time every day just like you would if you were going to an office. If I hear that little voice in my head saying “I’m really tired, maybe I can sleep in an extra hour”, I have another trained voice there to say “you wouldn’t have that luxury if you had an office job. So get up and get to work.” The other thing is patience – it takes time to create solid content so give yourself plenty of time to achieve your goals. Lastly, organization. Just like with discipline, you must schedule your work days ahead of time. Getting up with no plan won’t work. I have a calendar filled with daily tasks and deadlines, this keeps me focused and organized. Ultimately, you will find your grove, the key is not to panic if you don’t see any significant traffic in the first 6 months. Just focus on helping people and you will be successful 🙂 Good luck with everything!
Thank you! That is the best and most sound advice. Thank you for taking the time to share with me those fundamental starting blocks.. you hit the nail on the head with two things I think will genuinely be the most beneficial for me personally.
Hi!
I want to start blogging about two related TV show franchises (including movies, comics, and other media). I want to talk about what I learned from them, which is something I know I’m good at doing because I am a total nerd. Do you know any affiliate programs that could help with something like this? I know what my blog will be named and everything. I may even have ideas for a first blog post, but I could always use a little extra help.
A.J.
Hi A.J, you can make commission from Amazon on DVDs or for people who join Prime (I think, not 100% sure but you should check it out.) Apple also has an affiliate program for iTunes and other media related products.
Join Shareasale to see if they have affiliates related to the media.
I would also recommend joining Target and Walmart’s affiliate programs as you could sell anything from DVDs to comic toys for kids, puzzles, etc. Good luck with everything A.J!
HI!
Can you please help me set up my blog properly? I am not sure what I am doing wrong but this is the case:
I had a personal Wordpress account. I decided to add bluehost to my Wordpress and paid for my plan After set it up, I noticed that, on my Wordpress site, a new site was created. Why is this so?
Also, I decided to change my domain name on Wordpress. I did and paid for the updates. How do I go about changing it on bluehost? why does it seem like I have two different blogs; one on bluehost and one on Wordpress?
If you are able to help me figure out what I’m doing wrong, I would really appreciate it. Looking forward to hearing from you.
Hi Imani,
The best thing for you to do at this point is to call the people at Bluehost, they should know what happened since they have access to your account. You can also ask them to help you set up your blog, that’s part of their job. Don’t ever hesitate to contact your hosting whenever you have problems, I always do it and they are super helpful 🙂
Thanks so much for this.
Do you reccommend Word Press or Word press.org? And what is the difference?
Thanks
Cheryl
Hi Cheryl,
I recommend using Wordpress.org which comes automatically installed with Bluehost so you don’t have to do anything but start blogging. It’s also the ‘real’ Wordpress, the one you hear about where you have full control and can add free or paid plugins, themes, etc.. You can join affiliate programs and ad networks to make money.
Wordpress.com on the other hand is a hosting service created by the co-founder of WordPress. There are several limitations with the Free plan and they place ads on free blogs for your readers to see. The downside is you don’t make any money from those ads!You are NOT allowed to sell ads on your website either + you cannot upload plugins or themes. If your goal is to turn blogging into a business (make money from it), then without a doubt go with wordpress.org. If it’s just for personal use, as a hobby, then Wordpress.com will work just fine. I hope this helps!
Hi Caroline,
I just found your blog a couple of days ago, and I think it’s fate! Like you, I’m lactose intolerant (I’m African American), and I’m always looking for tasty dairy free recipes. I tend to gravitate to Asian food, because there is typically no dairy.
Just yesterday I was talking to a friend about starting a blog, and then I stumbled on this post today. I think its a sign that I should go for it!
I’ve subscribed to your blog, and I look forward to following your journey.
Warm regards,
Angela
That’s great Angela, I think you should absolutely go for it! I will be posting a lot more about blogging so I hope I can help during your journey to success 🙂