Every time I walk by a bakery in Japan, I get excited all over again. Shelves filled with curry bread, melon pan, sweet rolls, and airy loaves of Japanese milk bread. While Japanese milk bread, or shokupan, is very easy to find in Japan, it’s much harder to find it anywhere else. The good news is that it’s fairly easy to make at home. The steps are simple, most of the time is hands-off, and the result is a soft, fluffy loaf that your entire family will love.
This recipe is very special to me because shokupan is strongly tied to my childhood. My aunt used to make it from scratch almost every day, and I still remember waking up to the smell of fresh bread in the kitchen. She would cut me a thick slice — because shokupan is always better when it’s cut thick — toast it, and spread a generous amount of butter and strawberry jam on top.
It was the best breakfast ever.
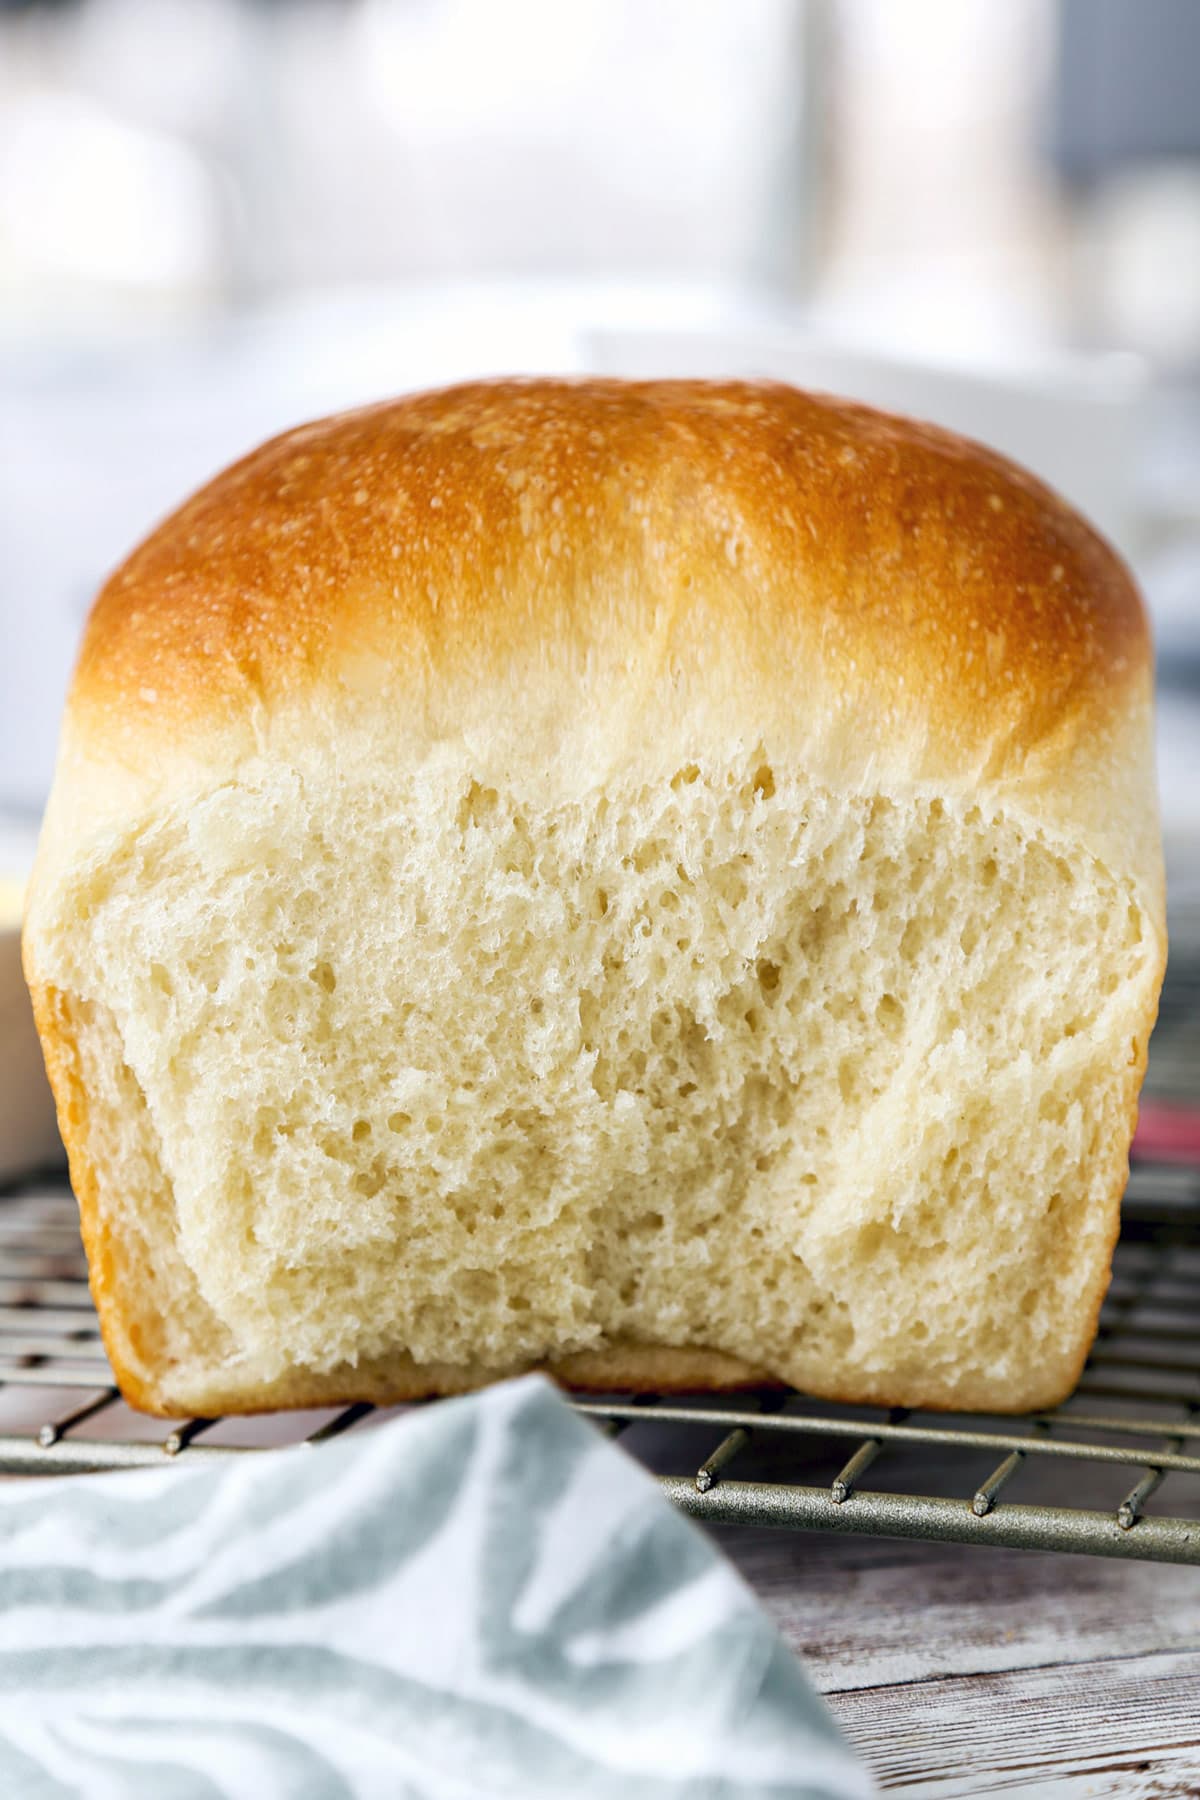
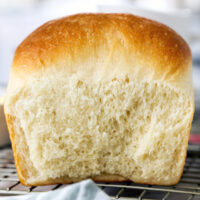
Japanese milk bread may look simple, but the texture is what makes it so special. It’s soft and airy, but still has a little chew. It’s rich, but not heavy. And because this recipe uses tangzhong, the bread stays moist and tender for days.
There are a few steps involved, but they are easy to follow. The most important thing to know before starting is that this bread takes time because the dough needs to rest and rise. It’s not a quick bread, but the hands-on work is simple — and the result is absolutely worth it.
Table of contents
What is Japanese Milk Bread?
Japanese milk bread (食パン) is Japan’s version of sandwich bread. The word shokupan simply means “eating bread”.
The texture is what makes it different from regular sandwich bread. Shokupan is softer, airier, and slightly sweeter.
Some Japanese milk bread recipes use yudane, which is a starter made by mixing flour with boiling water. This recipe uses tangzhong, which is a similar cooked flour paste made with flour, milk, and water. Both methods help the dough hold on to moisture, giving the bread its signature soft and fluffy texture.
What is Tangzhong?
Tangzhong is a cooked flour paste used in many Asian bread recipes. It’s made by whisking flour with liquid and cooking it gently until it thickens into a soft, gelatinous paste. This small step makes a big difference.
Tangzhong helps the dough absorb and hold more moisture, which gives the bread a softer texture and keeps it from drying out too quickly. That’s why this shokupan stays moist and fluffy for several days when stored properly.
For this recipe, the tangzhong is made with bread flour, milk, and water. Once it has thickened, it needs to cool before being added to the dough.
What Does it Taste Like?
Japanese milk bread is soft, lightly sweet, but not as sweet as brioche. Every bakery has its own version. Some loaves are sweeter, some are milkier, and some have a stronger buttery aroma. But good shokupan should always be soft, fluffy, and slightly sweet.
The texture is the best part. It’s pillowy and tender, with a crumb that pulls apart beautifully.
How Long It Takes to Make
This recipe is easy but does take time to make. Most of the time is inactive, which means the dough is resting, rising, or cooling.
Here’s a quick idea of the timing:
- Make and cool the tangzhong: about 40 minutes
- Knead the dough: about 25 minutes
- First rise: about 50 minutes
- Rest the shaped dough: 15 minutes
- Second rise: about 40 minutes
- Bake: 35 to 40 minutes
- Cool before slicing: at least 1 hour
The bread takes about 3 1/2 hours to make, not including the full cooling time before slicing. If you want clean slices, let the loaf cool for at least 1 hour before cutting into it.
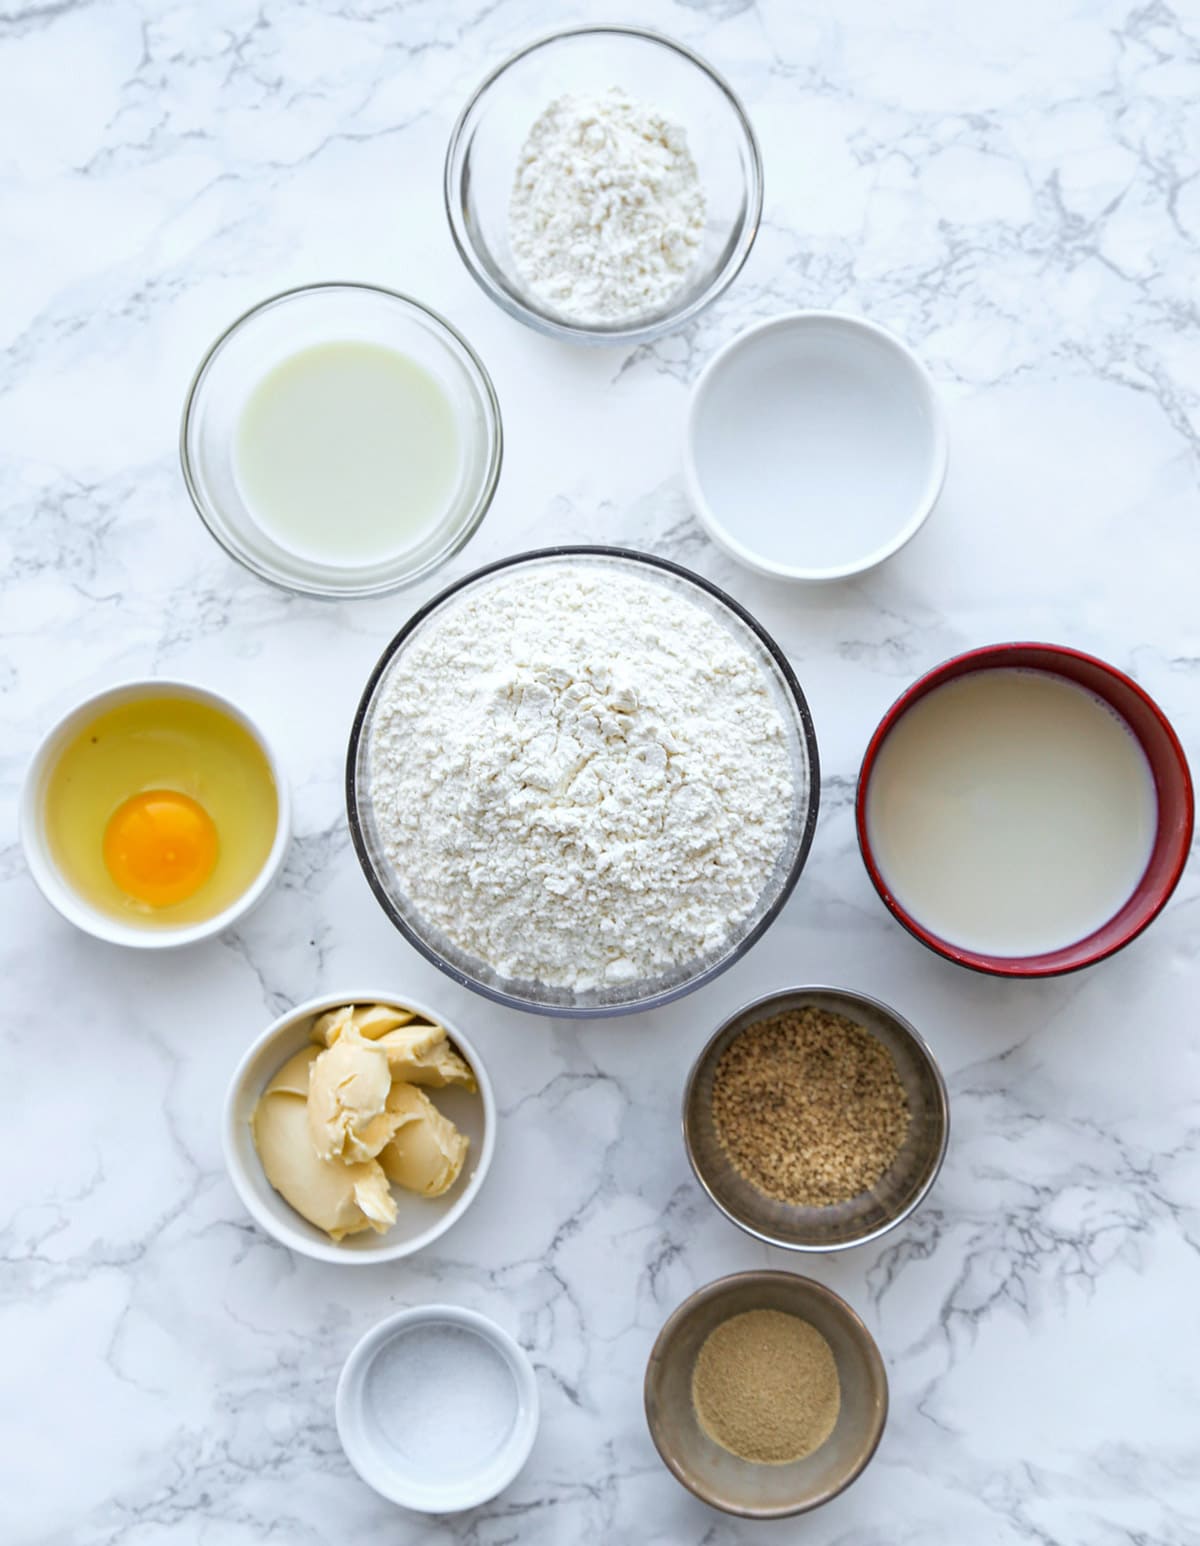
Japanese Milk Bread Ingredients
- Starter (tangzhong): A mixture of bread flour, water, and milk. Tangzhon is what makes the bread super moist and fluffy.
- Bread flour: Bread flour gives the loaf structure and helps it rise tall and fluffy. It’s used in both the tangzhong and the dough.
- Sugar: I don’t like my bread to be too sweet so I’ve only added 20 grams of sugar. However, feel free to add 30 or 40 grams for a sweeter, more dessert-like bread.
- Active dry yeast: 1 packet, which comes to 7 grams is what you will need to give your loaf a nice rise.
- Salt: Just a little to season the bread and balance out the sweetness.
- Egg: I’ve tested shokupan with and without egg. Both versions are good, but I prefer the one with egg because the crumb is slightly richer and more moist.
- Milk: Milk adds richness and a soft texture. I like using 2% milk, but whole milk also works. For a dairy-free version, use unsweetened oat milk.
- Butter: Use room temperature unsalted butter cut into cubes. The butter is added after the dough has already started to come together so it can slowly work into the dough.
Best Flour for Japanese Milk Bread
Bread flour is the best flour to use for Japanese milk bread because it has more protein than all-purpose flour. That extra protein helps the dough build enough gluten to rise properly and create a fluffy, stretchy texture.
I recommend using bread flour with at least 12% protein. I have tested this recipe with lower-protein bread flour and found that the loaf didn’t rise as much and wasn’t quite as light.
All-purpose flour can technically be used, but the bread may be softer, flatter, and less airy.

How to Make it
Scroll down to the recipe card for the full recipe.
Kitchen Tools Needed
- Stand mixer
- Mixing bowl
- Small pot
- Rolling pin
- 9-by-5-inch loaf pan
- Kitchen towel or plastic wrap
- Cooling rack
- Instant-read thermometer, optional but helpful
- Start by making the tangzhong, which is the cooked flour paste that gives shokupan its soft, fluffy texture. Once it has thickened, let it cool before adding it to the dough.
- Next, mix the ingredients for the dough in a stand mixer and knead until the dough becomes smooth, stretchy, and slightly sticky. Add the butter partway through kneading so it can slowly work into the dough.
- Let the dough rise until doubled in size. Then divide it in half, shape each piece into a log, and place both logs in a loaf pan.
- Let the dough rise a second time, until it reaches the top of the pan. Brush the top with milk and bake until golden brown.
- Let the loaf cool before slicing so the inside has time to set properly.

Cooking Tips
- Use bread flour if possible. It gives the bread better structure and a fluffier rise.
- Don’t add extra flour too quickly. The dough should be soft and slightly sticky. Adding too much flour can make the bread dense and dry.
- Let the tangzhong cool before using it. If it’s too hot, it can affect the yeast.
- Use a warm place for proofing. A temperature around 75ºF to 85ºF is ideal. If your kitchen is cold, the dough will take longer to rise.
- Knead long enough. The dough needs time to become stretchy and elastic. This is what gives the bread its soft, pull-apart texture.
- Don’t slice it too soon. Fresh bread smells amazing, but cutting into it too early can make the inside gummy. Let it cool for at least 1 hour.
Troubleshooting
- Why is my dough so sticky?
Shokupan dough is supposed to be soft and a little sticky. Lightly oil or wet your hands when handling it instead of adding lots of extra flour. Too much flour can make the bread dense. - Why didn’t my bread rise?
The yeast may be old, the milk or tangzhong may have been too hot, or your kitchen may be too cold. If the dough hasn’t doubled after the suggested time, give it more time. - Why is my bread dense?
Dense bread can happen when the dough wasn’t kneaded long enough, didn’t proof enough, or had too much flour added to it. - Why is the inside gummy?
The bread may have been sliced too soon or underbaked. Let it cool before slicing, and use an instant-read thermometer if you have one. The center should reach 190ºF.
Storage and Freezing
Store Japanese milk bread in an airtight container or plastic bag at room temperature. It should stay soft for 3 to 4 days.
Do not refrigerate it. The refrigerator can dry out bread and make the texture stale faster.
To freeze, slice the bread first and wrap in plastic wrap. Then, place the slices in a freezer-safe bag. Freeze for up to 1 month. You can toast the slices straight from frozen, or let them thaw at room temperature before eating.
For the softest texture, warm leftover slices in the toaster or microwave for a few seconds before serving.
Best Way to Eat Japanese Milk Bread
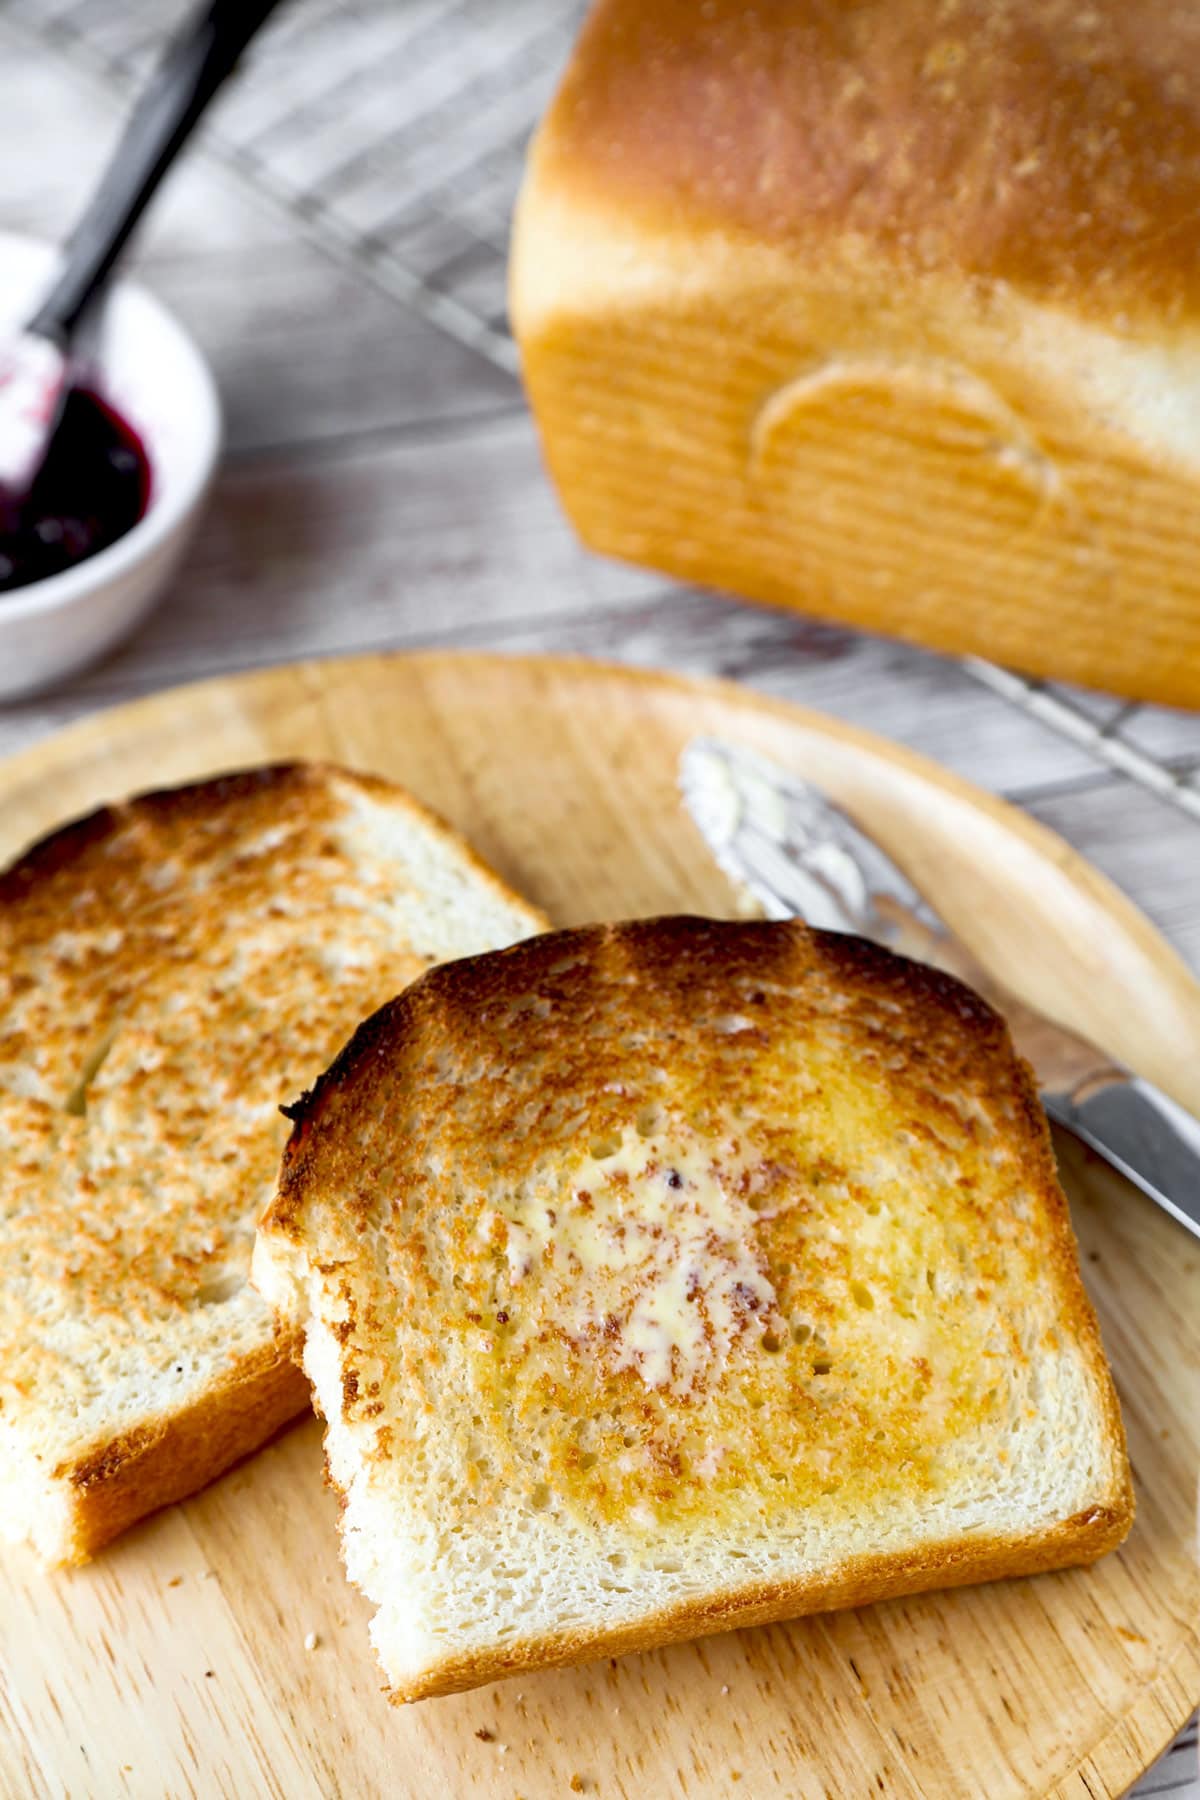
Japanese milk bread is so moist and airy that it’s best eaten fresh, when it’s still a little warm, and with just a little butter. And don’t be afraid to cut thick slices since that’s the way it’s usually served in Japan.
It also makes the best soft sandwiches. Use it to make a Japanese egg sandwich, a potato salad sandwich, a tuna sandwich, or a crispy tempeh katsu sandwich. The bread is soft and fluffy, but still sturdy enough to hold creamy fillings and crunchy cutlets.
After a day or two, it makes excellent toast. I love it with butter and strawberry jam, but it’s also delicious with sweet red bean paste (anko), honey, or a little cinnamon sugar. For more Japanese bakery-style treats and sweets, try my taiyaki or dorayaki recipe .
To make your sandwiches taste like they came from a Japanese konbini, spread a thin layer of homemade Japanese mayo on the bread before adding the filling.
PrintJapanese Milk Bread (Shokupan)
Learn how to make the most delicious, moist, and airy, Japanese Milk Bread. Fresh warm shokupan is so easy to make.
- Prep Time: 35 minutes
- Cook Time: 2 hours 50 minutes
- Total Time: 3 hours 25 minutes
- Yield: 2 small loaves 1x
- Category: Baked goods
- Method: Baking
- Cuisine: Japanese
- Diet: Vegetarian
Ingredients
Starter (Tangzhong)
- 1/4 cup bread flour
- 1/4 cup milk (for vegan: use unsweetened oat milk)
- 5 tablespoons water
DOUGH
- 325g bread flour
- 20 grams sugar
- 7 grams active dry yeast (1 packet)
- 4 grams salt
- 1 large egg (for vegan: mix 1 tablespoon ground flaxseed with 2 1/2 tablespoons water. Let sit for 15 minutes before using)
- 130 milliliters room temperature milk (for vegan: use unsweetened oat milk)
- 50 grams unsalted butter, room temperature and cut into cubes (for vegan: use vegan butter)
Instructions
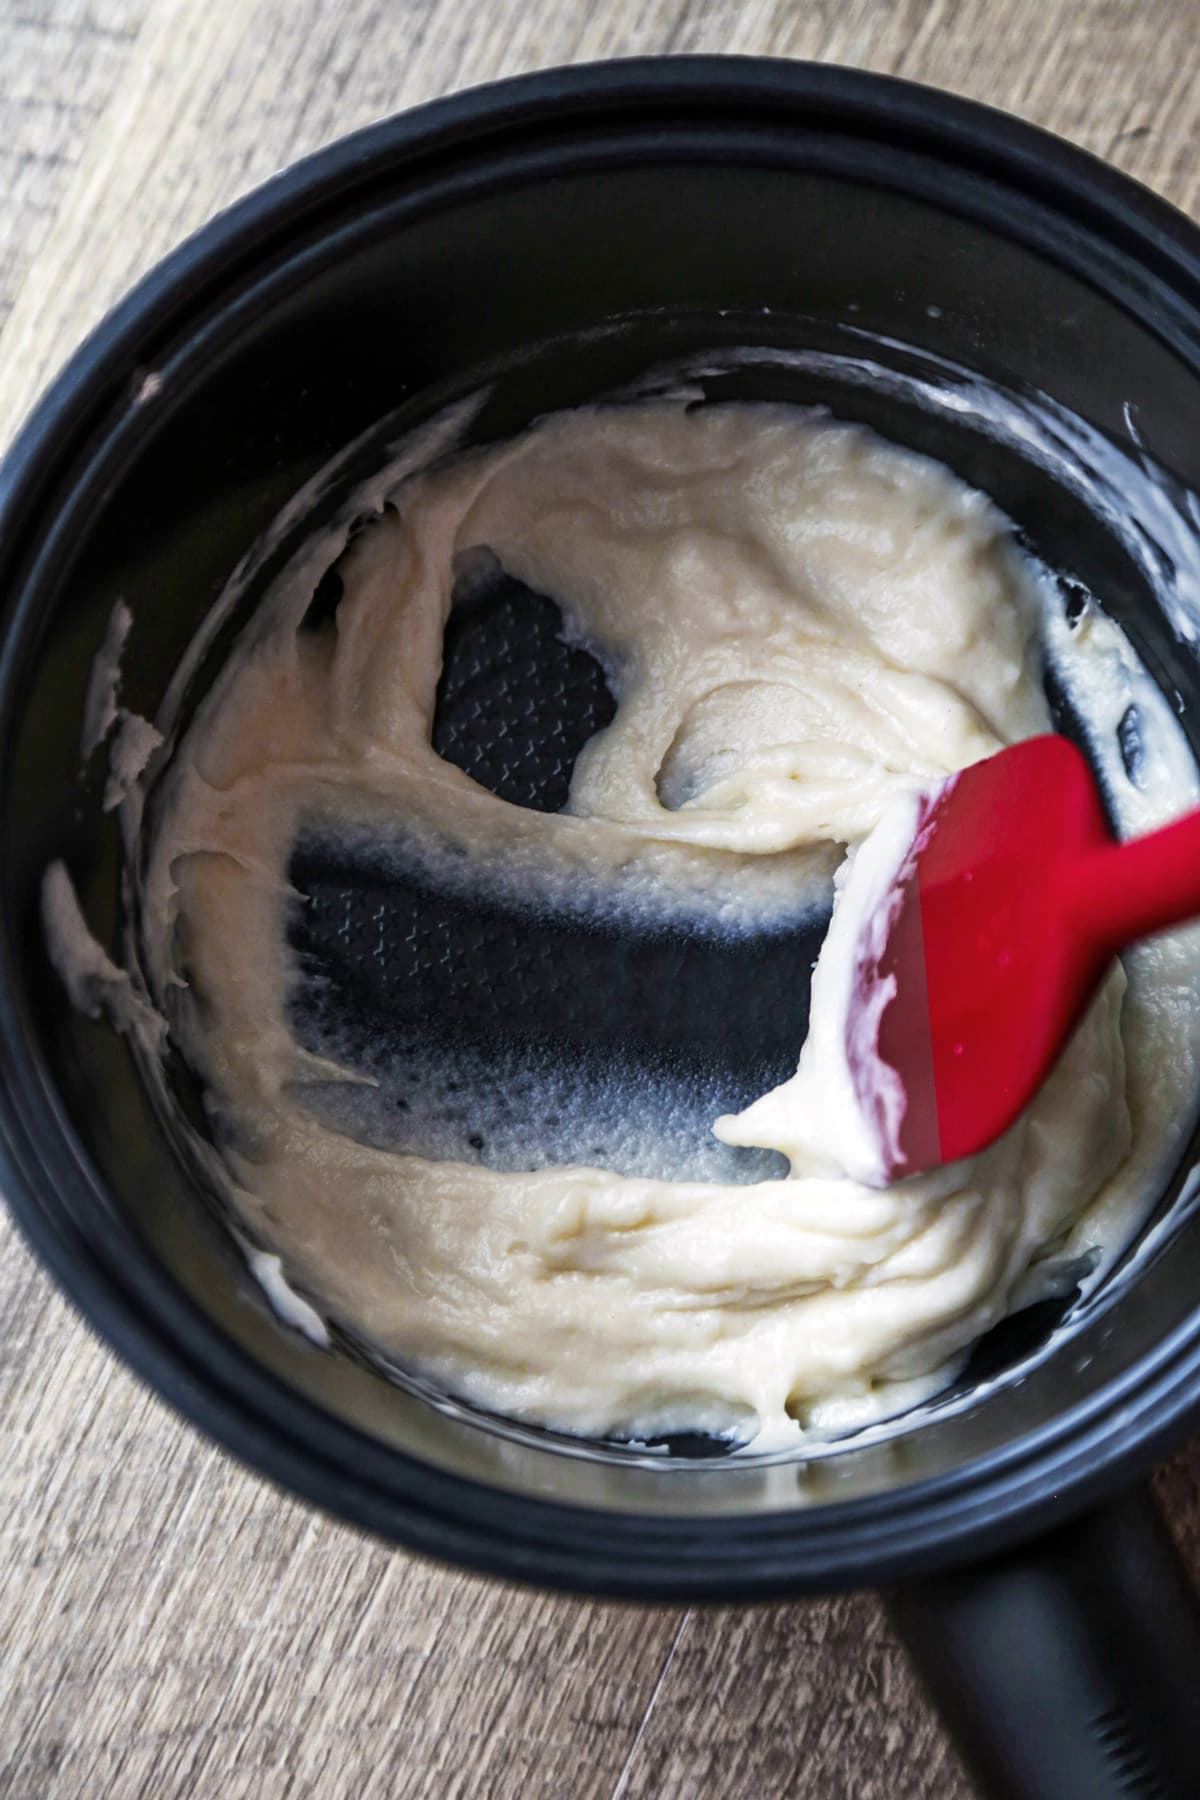
- To make the starter (tangzhong), whisk the flour, milk, and water, in a pot until smooth, and turn the heat to low. Stir and cook for about 8-10 minutes, until the mixture thickens and becomes a gelatinous paste.
- Turn the heat off and transfer the tangzhong to a bowl. Cover the bowl with plastic wrap and let cool for 30 minutes. Simple tip for fluffier bread: let the tangzhong sit for an additional 1-2 hours if you have the time. This will yield an even fluffier texture.
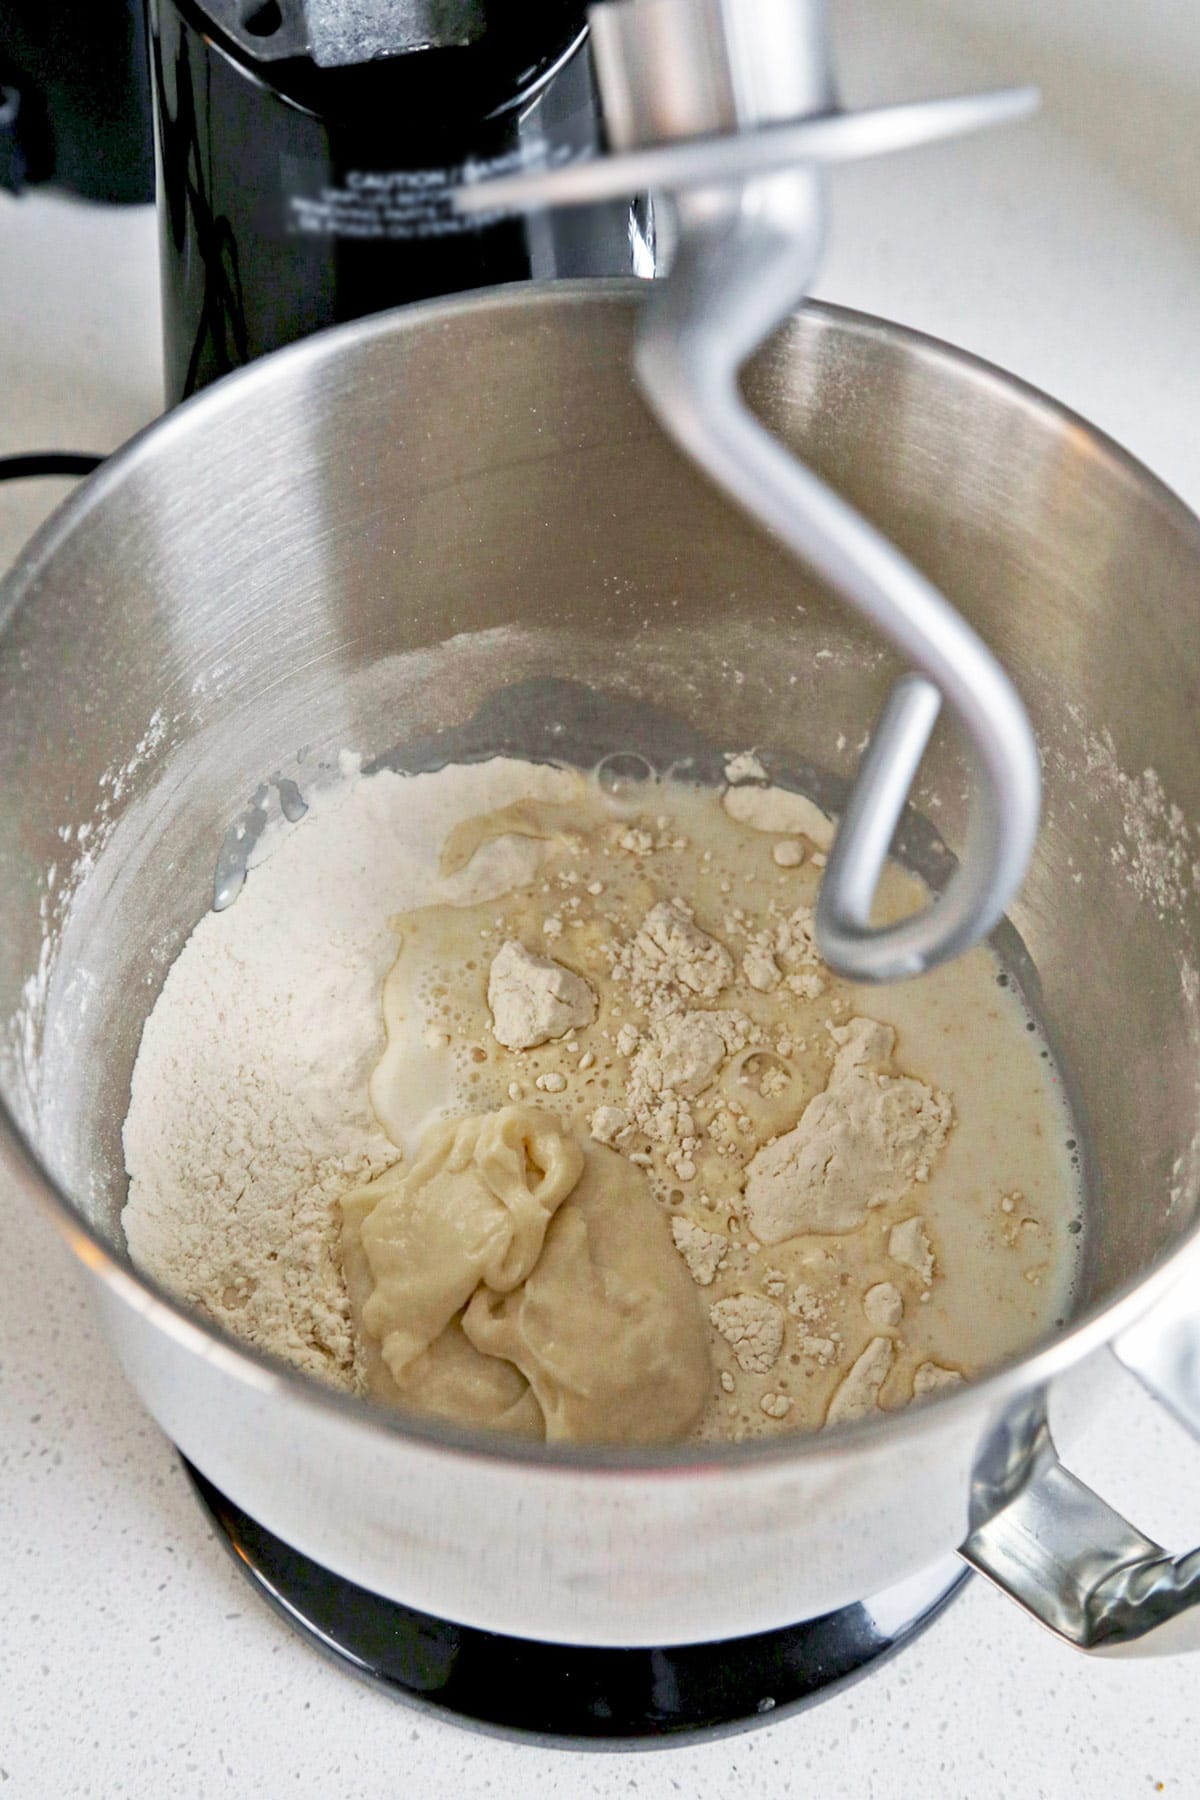
- Use the bowl of your stand mixer and add the flour, sugar, yeast, and salt. Stir until the ingredients are well mixed.
- Add the egg, milk, and tangzhong, place the dough hook on the mixer, and knead on low speed for 5 minutes.
- Add the butter and knead on medium (speed 4 on a Cuisinart stand mixer) for an additional 20 minutes, until the dough is springy and slightly sticky.
- Meanwhile, lightly grease a bowl and set it aside.
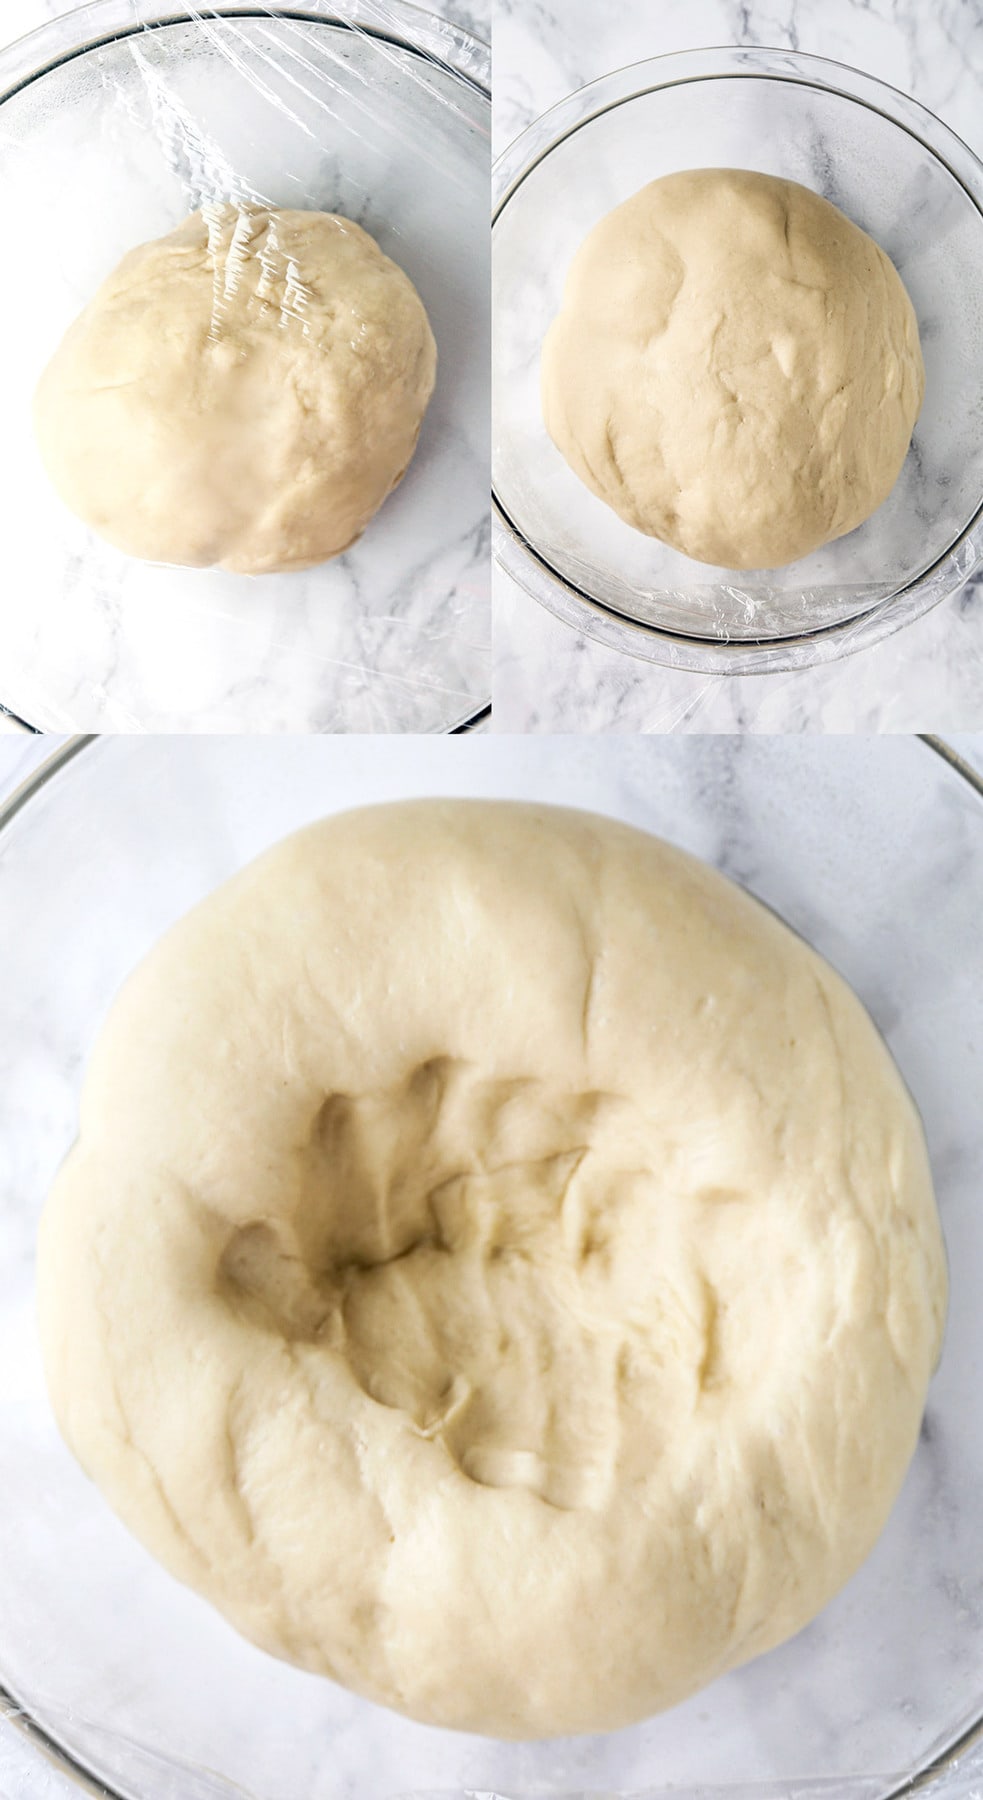
- Lightly wet your hands, or rub a little oil on them, and scoop the dough. Shape it into a ball and place it in the greased bowl. Cover with plastic wrap and let the dough rise for 50 minutes somewhere a little warmer than room temperature (75-85ºF), until it doubles in size.
- Punch the dough down and transfer it onto a flat surface. Equally cut the dough in half and shape into 2 balls. Cover the balls with a kitchen towel and let them rise for 15 minutes.
- Grease a 9-by-5-inch loaf pan and set aside.
- Use a rolling pin to roll out each dough ball into a 6-by-9-inch oval.
- Fold each side of the oval and make them join in the center. Do the same with the top and bottom (bring them to the center).
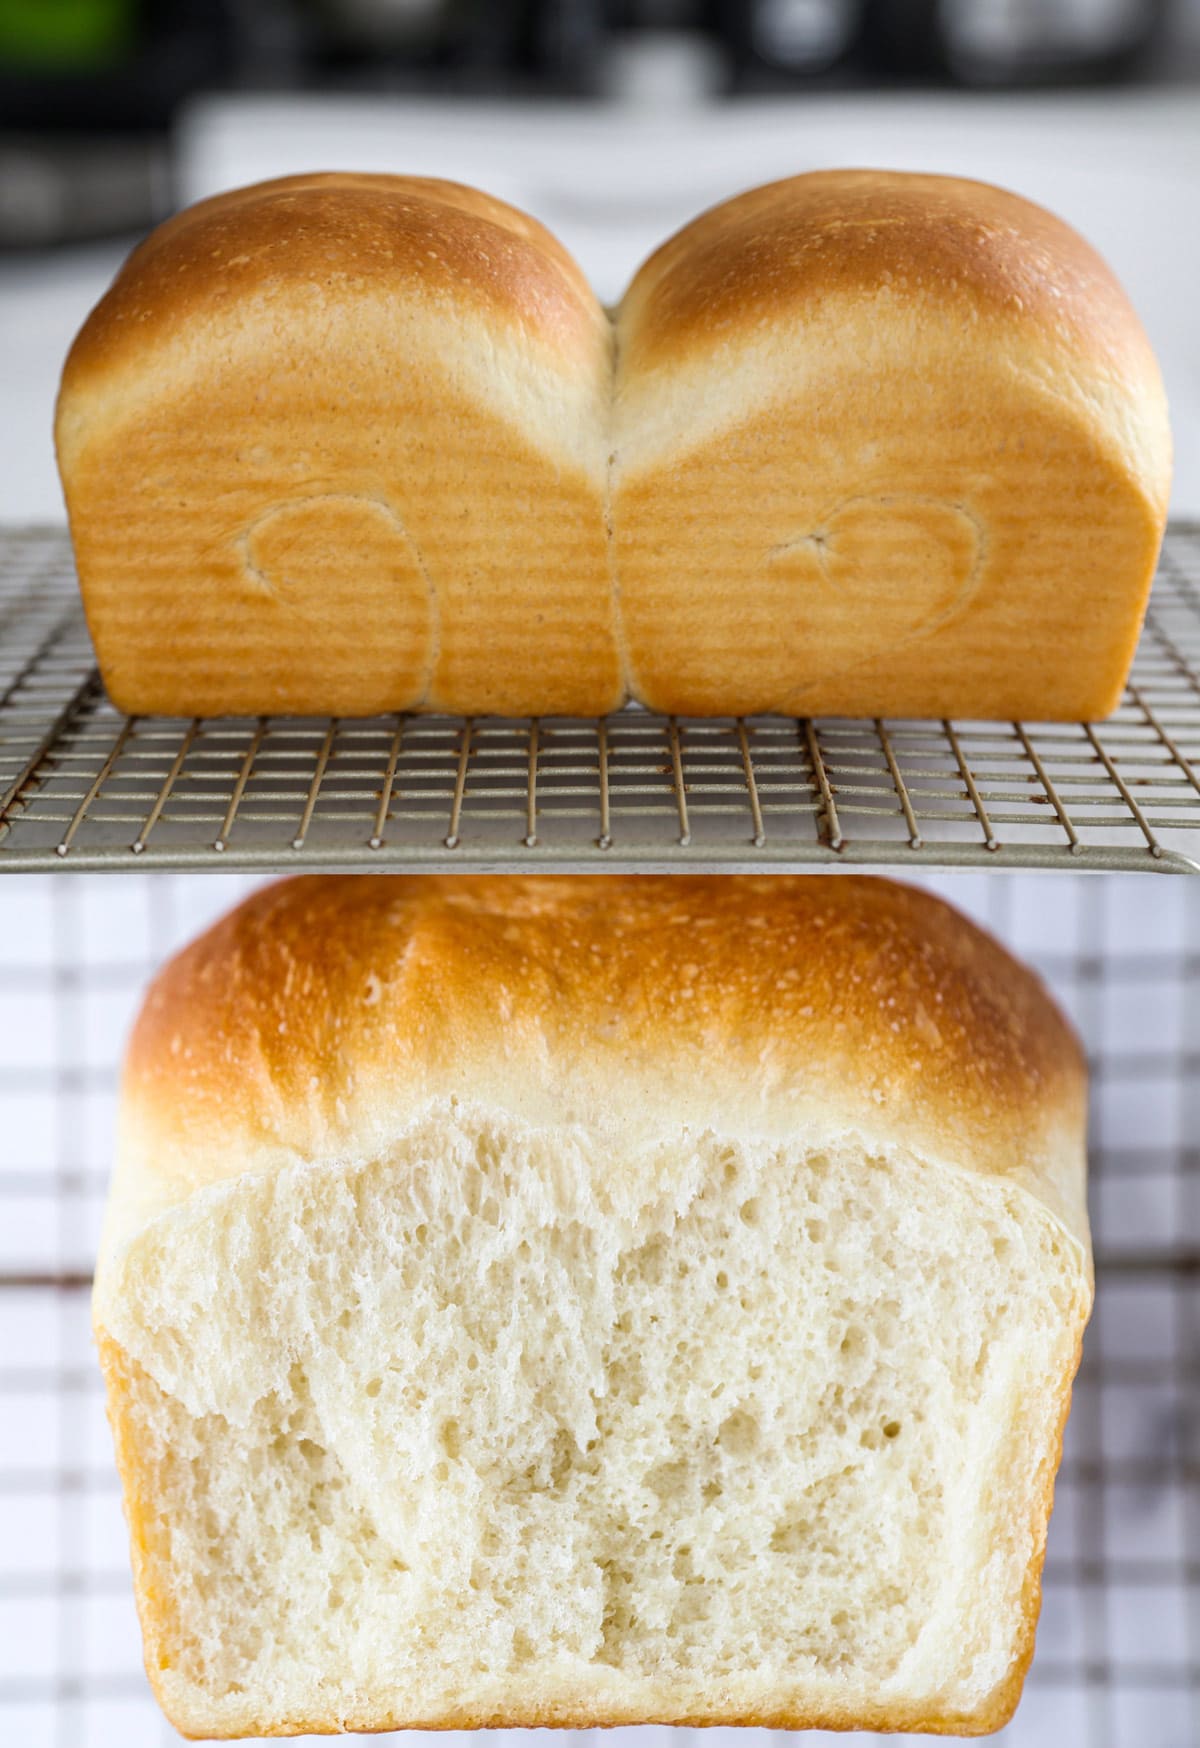
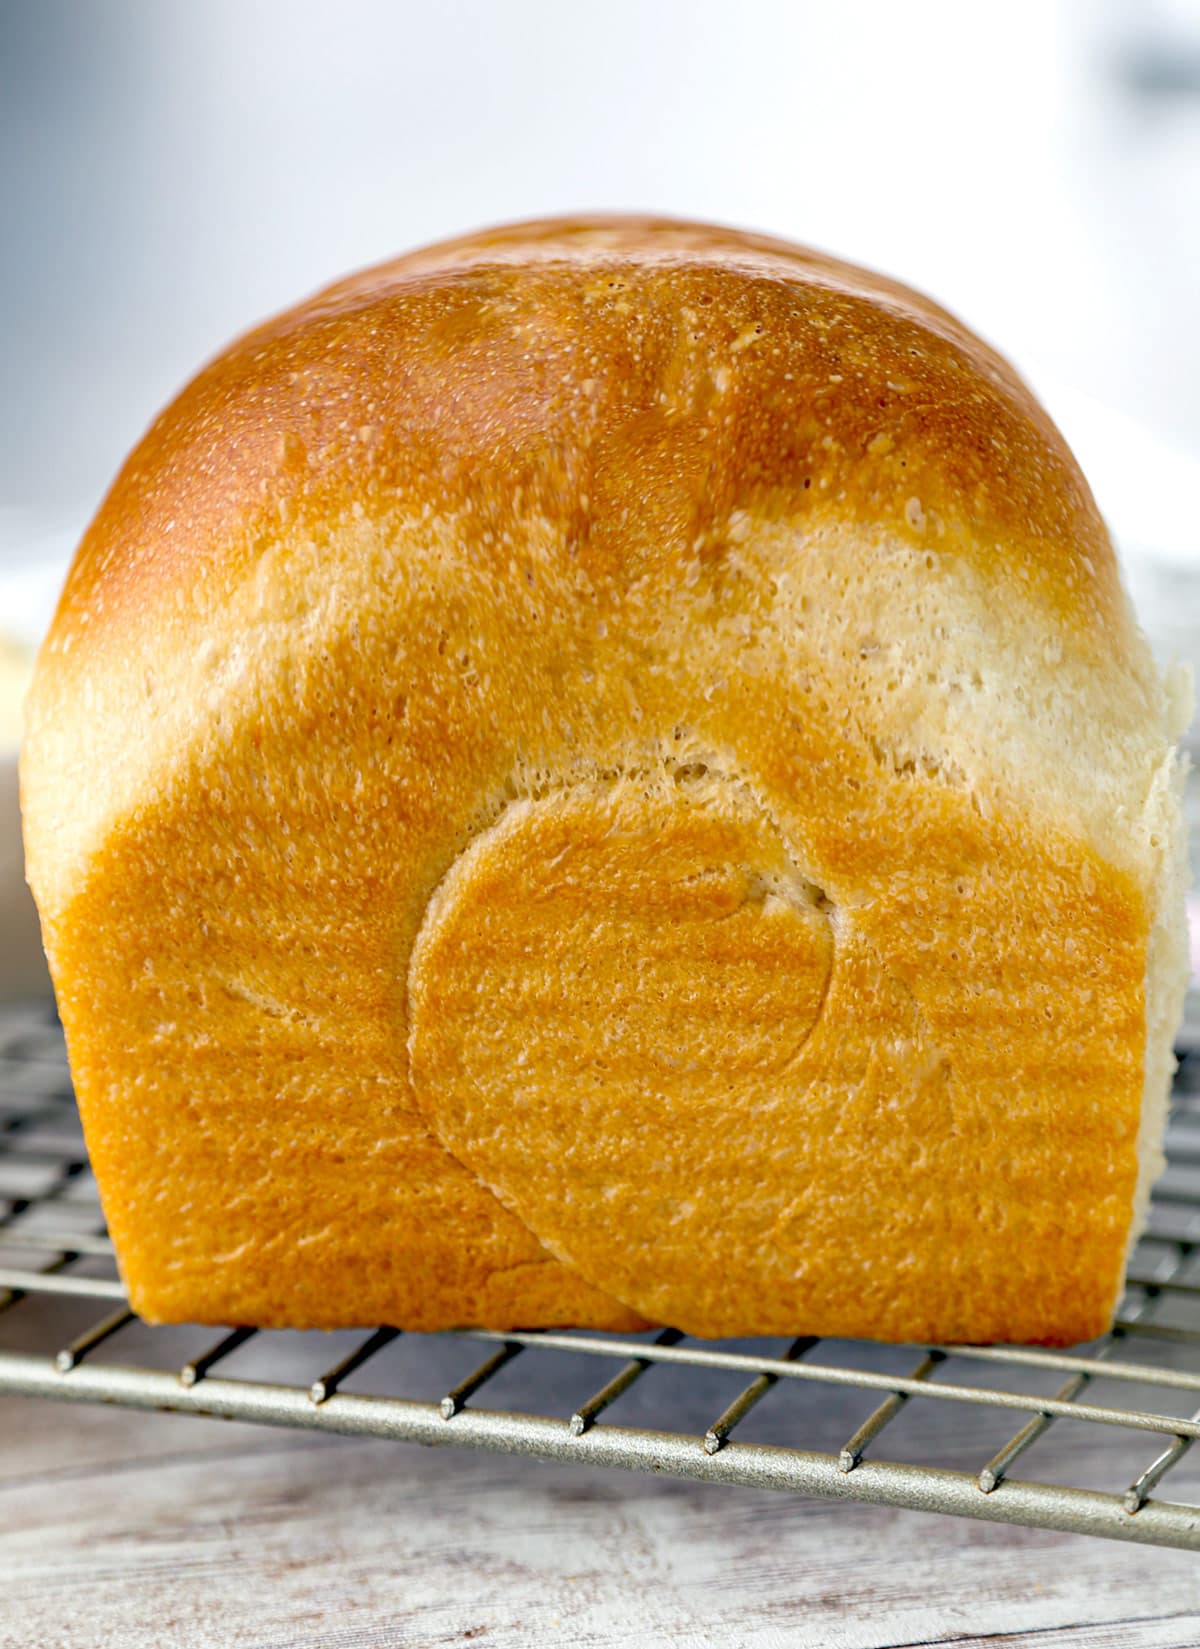
- Tightly roll the dough into a log and place it on one end of the loaf pan, smooth side up. Repeat the same steps for the remaining ball of dough and place it in the other end of the pan.
- Cover with a towel and let the dough rise for 40 minutes, until it has doubled in size.
- Meanwhile, preheat the oven to 350ºF.
- The dough is ready when the logs are touching in the center and are at the same level, or slightly over, as the pan.
- Brush the top of the dough with a little milk.
- Bake for 35-40 minutes. If the bread is turning a golden brown too quickly, lightly cover the pan with foil. The bread is ready when it reaches an internal temperature of 190ºF.
- Take the pan out of the oven and transfer the bread to a cooling rack immediately.
- Let cool for at least an hour before eating.
Notes
Make it vegan: Skip the egg, switch milk for unsweetened oat milk, and butter for vegan butter such as Miyokos.
Tools Needed:
- Stand mixer
- 9×5 loaf pan
- Rolling pin
Nutrition
- Serving Size: 1 slice
- Calories: 155
- Sugar: 3.4g
- Sodium: 138mg
- Fat: 3.9g
- Saturated Fat: 2.2g
- Unsaturated Fat: 0.3g
- Trans Fat: 0g
- Carbohydrates: 25.3g
- Fiber: 0.9g
- Protein: 4.4g
- Cholesterol: 9.3mg
Frequently Asked Questions
They are very similar and the names are often used interchangeably outside of Japan. Both refer to a soft, fluffy milk bread made with enriched dough.
Yes. Use unsweetened oat milk instead of milk, vegan butter instead of butter, and replace the egg with 1 tablespoon ground flaxseed mixed with 2 1/2 tablespoons water. Let the flax mixture sit for 15 minutes before using.
I haven’t tested this recipe as rolls, so I can’t give an exact baking time. The dough is very soft and fluffy, so it may work, but the texture and timing will be different from the loaf version.
Yes, but it takes more effort because the dough is sticky and enriched with butter. Knead by hand until the dough becomes smooth, elastic, and stretchy.


Oh wow! I couldn’t believe how well this came out. I have NEVER made any bread before so I was a little skeptical about making it. Looked complicated. But it sure was worth it. They came out just like the pictures. So soft and airy with a really great crust. Makes a perfect toast. This is definitely a recipe to make over and over. Now that I know I can do it!! I do have to agree with one of the other comments. It takes much longer to make that you stated.
Thank you so much John! Can you tell me how long it took you to make it? I can definitely add that the overall cooking time might vary per person 🙂
Just the proofing time. When I look at a recipe I need to know time from beginning to end. It was into the night before I was done. I should have added in the proofing time that you had put in there. As for regular cooking time you were right on the money! Your recipes are awesome Caroline. Made several ramens, shoyu donburi, and now I am marinating my chicken for chicken bulgari!! Need to get some fancy bowls so I can start taking pictures!!
Delicious! But the “total time” on the recipe is WAYYY off if you factor in all the proofing time. I didn’t have a stand mixer so I mixed it with my hands for a few minutes and it still came out beautifully! So fluffy and airy. If I did this recipe again I’d definitely do an egg wash though as I prefer the shine. I didn’t have enough bowls to transfer the dough constantly or a towel to cover the dough, but keeping it in the same doughy bowl and covering with tinfoil to proof worked just fine 🙂
Can these be made into rolls?
Hi Betty, I’m not sure if this recipe would work for rolls since I have never tried. The bread comes out very fluffy and light so it’s hard to tell if it would have the same texture. If you do try it, please let me know!
This bread is amazing and you should make it right now! It was gone within the same day I made it! It was so delicious!
Thank you Penny! 🙂
Is there a way to make it without the mixer? Will working the dough with one’s hands work?
Hi Ania! I’m sure you can make it using your hands but I’m not sure how much kneading is needed. If you are used to making bread that way, I think you could make it no problem 🙂
Hi! Can’t wait to make this as I absolutely love Japanese milk bread. Have you tried proofing the dough overnight so you can just bake in the AM and have fresh bread for breakfast?
Hi Sejin! I haven’t tried proofing the dough overnight but I’m sure it would make it even better! 🙂
Caroline – it’s me again.. 4th recipe of yours I’ve tried, and with great success! This bread came looking like your pics, soft and luscious.. saved and printed.. reminds us of the soft and squishy WonderBread we bought growing up.. they out of business now, maybe it was a regional thing, IDK? THANKS MUCH!
Thank you so much Steve! 🙂
I just pulled this out the oven 30 minutes ago and it tastes AMAZING!!! It tastes just like the bread I ate in Japanese bakeries, and now I can have it in the States! I have never been able to find bread this soft even in the Asian grocery stores, and I know I’ll be making this again!
That’s wonderful Shizu! I’m so happy, you just made my day!!
I totally agree that Japanese bakeries are right up there with the French ones. When I am in Japan I have my favorite bakery to hang out in. Always a great selection. Never disappoints. And of course the employees are always welcoming and friendly. Thank you for posting this. It’s a great bread. Gathering the ingredients!
Sounds and looks delicious !
Unfortunately… I’ll need to pass baking it.
Don’t own a stand mixer.
I bake a lot but decided in my age (early 80s) of life.. not to purchase one.
On the lookout for good Japanese Bakeries.
Planning to visit Hawaii in October
Hi Doug! You will find really good shokupan in Hawaii, they have amazing Japanese bakeries. Lucky you!