Yaki Onigiri (Grill Rice Balls)
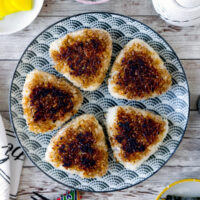
These grilled rice balls are such a delight to snack on and only take a few minutes to make.
- Prep Time: 10 minutes
- Cook Time: 20 minutes
- Total Time: 30 minutes
- Yield: 6-8 yaki onigiri 1x
- Category: Rice
- Method: Pan frying
- Cuisine: Japanese
- Diet: Vegan
Ingredients
Scale
- 4 cups cooked Japanese short grain rice
- Salt
- 1/4 cup soy sauce
- 1 1/2 tablespoon mirin
- Ground black pepper (optional)
- Nori (optional)
- 1/2 cup grated cheddar, parmesan, or pecorino romano
Instructions
- Place a small bowl of tepid water next to your work station.
- Mix the soy sauce and mirin in a bowl and place it next to the oven or stove top.
- Lightly wet your hands and sprinkle a little salt in both of your palms.
- Scoop about ½ cup of cooked Japanese rice and shape the rice into a triangular shape. Put a good amount of pressure on the rice but not so much that it squishes the rice. Season with a little ground black pepper on both sides.
- If using an onigiri mold: Place the rice in the mold and shape it. Wet your hands and sprinkle your palms with some salt. Take the onigiri out or the mold and lightly press it between your palms, just so it can absorb some the salt. Place the onigiri on a plate and repeat this step for all the rice. Season with a little ground black pepper on both sides.
- Place the non-stick skillet over medium-low heat and place a few onigiri, flat side down.
- Lightly brush the top side of each onigiri with the soy sauce mixture and flip them over. I find it’s best to use chopsticks to lift the onigiri and then scoop it with a spatula to flip. This prevents them from breaking or splitting.
- Lightly brush the other side and cook for 3 minutes. Flip the onigiri, brush the top side of each onigiri and leave for 3 minutes. Repeat this step until both sides are golden brown – even a little charred is okay – and crispy (about 20 minutes).
- Serve the onigiri on a plate with some nori sheets on the side. You can also let a little butter melt over the yaki onigiri to make it more decadent.
For Cheesy Yaki Onigiri
By hand
- Scoop about ½ cup of cooked Japanese rice and shape the rice into a ball.
- Press in the center to create a dent and add a little cheese, not much, about ½ tablespoon.
- Cover the cheese with rice and shape into a triangle.
With an onigiri mold
- Fill the mold with rice and place the indentation piece on the other mold.
- Press the rice to create an indentation in the center of the triangle. If the indentation looks shallow, make it a little deeper by pressing your thumb in it until you can stuff enough cheese.
- Cover the cheese with a little rice, remove the indentation piece and press to shape the onigiri one more time.
Notes
Tools needed:
- Onigiri mold (optional)
- Basting brush
- Oven or nonstick skillet
- Cooking sheet (optional)
Nutrition
- Serving Size: 1 yaki onigiri
- Calories: 213
- Sugar: 1.4g
- Sodium: 175mg
- Fat: 1.5g
- Saturated Fat: 0.3g
- Unsaturated Fat: 0.7g
- Trans Fat: 0g
- Carbohydrates: 44.9g
- Fiber: 6.4g
- Protein: 8.4g
- Cholesterol: 0mg
Find it online: https://pickledplum.com/yaki-onigiri-grilled-rice-ball/